Official Luthiers Forum! http://luthiersforum.com/forum/ |
|
Tips for installing threaded inserts http://luthiersforum.com/forum/viewtopic.php?f=10101&t=48434 |
Page 1 of 2 |
Author: | James Orr [ Thu Oct 20, 2016 6:24 pm ] |
Post subject: | Tips for installing threaded inserts |
I'm trying to install some E-Z Lock threaded inserts into a neck blank. The pilot holes are square thanks to this bad boy, but the inserts keep going all cock-eyed after a thread or two. Any tips on keeping them square? Is there a secret handshake I don't know about? |
Author: | johnparchem [ Thu Oct 20, 2016 6:51 pm ] |
Post subject: | Re: Tips for installing threaded inserts |
Which E-Z lock inserts do you have. Some of them have a fine threads that as not good for end grain. |
Author: | James Orr [ Thu Oct 20, 2016 7:14 pm ] |
Post subject: | Re: Tips for installing threaded inserts |
Thanks, John. E-Z Lok Threaded Insert, Brass, Knife Thread, 1/4"-20 Internal Threads, 0.500" Length (Pack of 25) Link to them on Amazon. |
Author: | Ken Lewis [ Thu Oct 20, 2016 8:23 pm ] |
Post subject: | Re: Tips for installing threaded inserts |
Put a 1 1/2 or 2 inch bolt in with a nut or two to lock it up. Then use a deep socket. The bolt head and the nut will keep things lined up. I use a palm ratchet to drive. Lee Valley also sells a dedicated driver for this. Ken |
Author: | George L [ Thu Oct 20, 2016 8:42 pm ] |
Post subject: | Re: Tips for installing threaded inserts |
+1 to the ratchet trick. Works for me. |
Author: | david farmer [ Thu Oct 20, 2016 8:50 pm ] |
Post subject: | Re: Tips for installing threaded inserts |
You can chuck the bolt and nut in the drill press and turn it by hand if it's really fighting you. Attachment: IMG_2544 - Copy.JPG
|
Author: | johnparchem [ Thu Oct 20, 2016 9:09 pm ] |
Post subject: | Re: Tips for installing threaded inserts |
James Orr wrote: Thanks, John. E-Z Lok Threaded Insert, Brass, Knife Thread, 1/4"-20 Internal Threads, 0.500" Length (Pack of 25) Link to them on Amazon. Those are the ones I use. I use a bolt and a nut to lock the bolt to the insert. I am usually able to drive them straight using a driver with the correct hex inset. |
Author: | James Orr [ Thu Oct 20, 2016 9:54 pm ] |
Post subject: | Re: Tips for installing threaded inserts |
Right on. Thanks, guys. I was starting to feel incompetent! I was using an allen head bolt. I'll try the hex head and a socket to help keep things aligned. Sent from my iPhone using Tapatalk |
Author: | jfmckenna [ Fri Oct 21, 2016 8:13 am ] |
Post subject: | Re: Tips for installing threaded inserts |
FWIW I just epoxy mine in. I drill the holes so that the thread barely bite and then just epoxy them in. I do that because I had the same problems aligning them that you had and because I think that screwing those in tight might cause a lot of stress in the heal. I would say that ideally if you want to thread them in tight then using inserts with a matched tap and die would be best. That way you can tap the proper hole and thread and they will just screw right in. |
Author: | kencierp [ Fri Oct 21, 2016 8:36 am ] |
Post subject: | Re: Tips for installing threaded inserts |
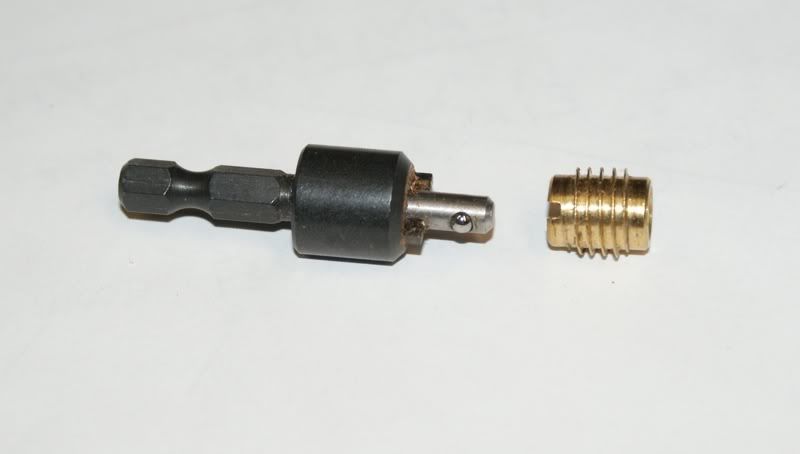
The most important aspect of this operation is to have the correct insert -- which is the course outer thread 1/4-20 style. Available at Lowe's The fine threaded inserts sold at most wood worker supply center are way too large on the outside diameter. It can be done but the course thread insert sure makes life easier. 
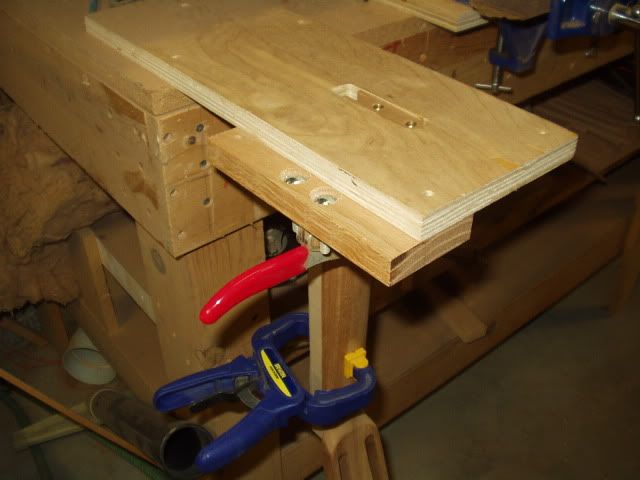
Our fixture serves several purposes -- the tenon is gauged for size, it is securely captured to prevent split out, and the table keeps the installation tool perpendicular -- this is important, an insert that is out of alignment can cause problems down the road. ![]() ![]() Here's the gadget we use to install the inserts -- purchased from Harbor Freight 
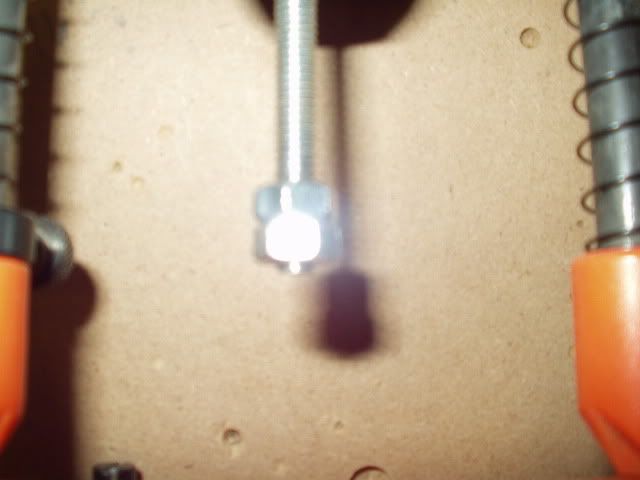
The "insertion tool" is simply a cut-off bolt and two nuts, catch the insert on a few threads run down snug, hold the nuts with an open end wrench and reverse the drill motor. Oh -- the end that looks like a screw driver slot is really part of the tread cutting process and it goes into the pilot hole. ![]() ![]() 
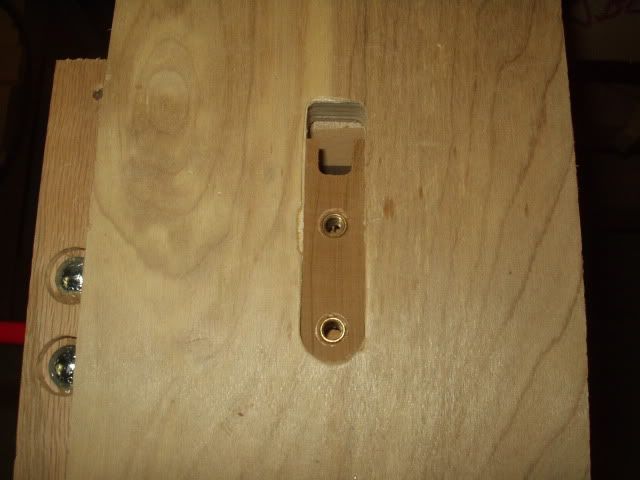
We apply a good bit of CA to capture the insert as well toughening up the end grain of the tenon. |
Author: | Don Williams [ Fri Oct 21, 2016 9:04 am ] |
Post subject: | Re: Tips for installing threaded inserts |
Woodcraft sells little wrenches for this operation that work very well. You still have to be careful to hold the thing square when turning it, but it works nice. http://www.woodcraft.com/product/12k55/ ... serts.aspx But I like Ken's method better! I think... |
Author: | Pmaj7 [ Fri Oct 21, 2016 11:02 am ] |
Post subject: | Re: Tips for installing threaded inserts |
James Orr wrote: I was using an allen head bolt. Assuming a very short one or using a nut to hold it up.....That should work the same as long as you are using a T-handle driver and not an L shaped hex wrench. Those threads look very fine and don't seem like they would work well in end grain though... kencierp wrote: The most important aspect of this operation is to have the correct insert Ken, can you link or pic what are you using?kencierp wrote: Oh -- the end that looks like a screw driver slot is really part of the tread cutting process I have heard this claim before, but on the EZ Lock website, they say that it IS for a screw driver (do not try!) or a proprietary driver that registers into that slot. Where did you hear about the thread cutting theory?
|
Author: | kencierp [ Fri Oct 21, 2016 11:46 am ] |
Post subject: | Re: Tips for installing threaded inserts |
Here's the insert -- Lowe's has them too. https://www.amazon.com/Hillman-Group-30 ... B00HYM05C0 We have the EZ lock tool for their inserts also, but we do not use that product for neck fasteners. The thread cutter on the Hillman style course thread insert is not a theory, its how the item is used -- but I did verify the procedure first hand at the Martin Factory. Another tip -- to further help in getting the insert started straight we spin a counter sink to chamfer the hole a little. |
Author: | SteveSmith [ Fri Oct 21, 2016 12:06 pm ] |
Post subject: | Re: Tips for installing threaded inserts |
pat macaluso wrote: ... kencierp wrote: Oh -- the end that looks like a screw driver slot is really part of the tread cutting process I have heard this claim before, but on the EZ Lock website, they say that it IS for a screw driver (do not try!) or a proprietary driver that registers into that slot. Where did you hear about the thread cutting theory?Correct, it is for the driver - I have one for the inserts that I use. I will add a photo later when I'm in the shop if I can remember. My drill press table rotates so it is relatively easy for me to clamp the neck to the DP table, drill the hole then put the driver in the chuck and rotate the chuck by hand to install the insert. I also add thin CA around the insert to stabilize it. |
Author: | kencierp [ Fri Oct 21, 2016 12:22 pm ] |
Post subject: | Re: Tips for installing threaded inserts |
Here's the EZ lock tool and insert --- but as I mention above I believe it is the wrong choice of inserts because of the OD. My set up is for the use of the Hillman "Dual Thread Cutting" brass insert, the same one used at the Martin Factory. ![]() |
Author: | SteveSmith [ Fri Oct 21, 2016 1:05 pm ] |
Post subject: | Re: Tips for installing threaded inserts |
Ken, that's the insert and driver I was referring to, of course. You are apparently using a different insert now. |
Author: | meddlingfool [ Fri Oct 21, 2016 1:47 pm ] |
Post subject: | Re: Tips for installing threaded inserts |
I've developed a real hate on for those brass buggers. I've switched to these wonderful bits. ![]() ![]() |
Author: | James Orr [ Fri Oct 21, 2016 3:14 pm ] |
Post subject: | Re: Tips for installing threaded inserts |
Thanks, guys. I'm headed to Lowes to find these Hillman inserts. |
Author: | James Orr [ Fri Oct 21, 2016 5:37 pm ] |
Post subject: | Re: Tips for installing threaded inserts |
Ken and Ed for the win ![]() Lowes had precisely two packages of the Hillman inserts in stock, and they went in effortlessly. It's the pitch of the threads that made all the difference (for me). The thread pitch of the Hillman inserts and the inserts Ed shared look relatively similar. First I tried to drive the E-Z Lock inserts in with the socket as some of you suggested, and they still started to lean. That's when I decided to drive over to Lowes to give the Hillman's a try. Driving them in with the socket worked like a charm. I backed them back out with a screwdriver so I could wipe a little epoxy in the grooves, then screwed them right back in. I love the drill press method some of you shared. I watched an episode of The Highland Woodworker yesterday, and the segment host shared the same idea, but I couldn't figure out how to make it work for a neck tenon. The pictures that David and Ken shared have my wheels spinning for something to do in the future. The lessons learned here are to go for the course threads and not to be afraid of looking like a fool on the forum by starting a thread saying you can't drive in a few big ol's screws ![]() |
Author: | Aaron O [ Sat Oct 22, 2016 3:23 am ] |
Post subject: | Re: Tips for installing threaded inserts |
James Orr wrote: I'm trying to install some E-Z Lock threaded inserts into a neck blank. The pilot holes are square thanks to this bad boy, but the inserts keep going all cock-eyed after a thread or two. Any tips on keeping them square? Is there a secret handshake I don't know about? I used to open up the hole with the first step (that fits) of a step drill. This way the insert starts going in straight right off the bat. Then I got a doweling jig (like yours). Since you already use a doweling jig, how timely that this was recently shot. I titled it a "backwards" installation as it seems more commonplace. Guys like Ken and I don't call it backwards; as stated, it's "correct". It has to be - if you use a screwdriver, it always blows out. I'm sure the guys that made the driver came from the same gene pool that puts top hats in subwoofers so you can mount the top speakers above them and split the subs - oops, wrong forum heh heh. https://m.youtube.com/watch?v=62B0T4dImJ8 |
Author: | Woodie G [ Sat Oct 22, 2016 5:41 am ] |
Post subject: | Re: Tips for installing threaded inserts |
We use the Hillman steel inserts as described, and the same approach as others here for insertion - a hardened hex head 1/4-20 bolt w/nut as a driver and a 6" extension on ratchet with a Bessey Tradesman clamp on the tenon or across the heel (on butted joints) to prevent any blowout during insertion. The Hillman inserts are available with a 5/16" or 3/8" base diameter - we use the smaller ones where we are forced to go to a 1/2" dowel insert for reinforcement. After insertion of any threaded insert, we carefully flow in a mix of med and thin CA to harden the cut threads and increase withdrawal resistance. Mahogany is a fairly porose wood, so thin or super thin CA can wick all the way out to the surface of the heel on a butt joint...using a little medium mixed with the thin prevents this. We fill the grain on mahogany necks with epoxy, which wets out the wood like CA, so not an issue (but might be with a combination paste wood pore filler/stain). The building guide I have been editing as part of my job here has a good discussion on threaded fasteners and inserts, and the need to reinforce end grain threads. Quote: ...the first engaged thread of the insert will carry over 1/3 of the total load; the first and second threads almost 60% and the first three threads about 3/4's of the load. Threads cut by a tap or self-threading insert in end grain (wood) have much less resistance to shear failure at the base of the cut thread than for face grain threads, so cutting the first few threads cleanly and properly aligned to the insert axis is very important. This is also why a face grain insert is recommended when relying on threaded inserts for a bolt-on neck connection, and why correct technique for insert installation is so important. Assuming that end grain threads WILL fail without reinforcement seems like a prudent practice to us, given Martin's troublesome failure history with their M&T necks. While it appears to us that these failures are due to reliance on a poorly toleranced glue joint and poor adhesive choice, the threaded inserts used in assembly should be strong enough to double as the primary method to keep the neck on the guitar. We buy our Hillman branded steel inserts from Amazon (the larger ones that take a 3/8" starter hole) and our local full selection Ace Hardware store (Strosnider's) for the inserts that take a 5/16" starter hole. |
Author: | George L [ Sat Oct 22, 2016 9:12 am ] |
Post subject: | Re: Tips for installing threaded inserts |
I've started installing the inserts before cutting the tenon. I find this makes it easier for me to keep everything square and eliminates the chance of tenon blowout. |
Author: | meddlingfool [ Sat Oct 22, 2016 11:06 am ] |
Post subject: | Re: Tips for installing threaded inserts |
James, Always ask the question, man. I still have trouble getting them in straight as well, however, I believe it's because sometimes as you drive them in, they can 'wander' depending on the grain of the wood. Even if you have everything lined up exactly true and exactly square, sometimes the result is still a wtf...until I tool up to drive them in with a drill press, I expect it will always be the case. Aaron, Not 100% certain, but...I'm pretty sure that slot is not meant to be used to drive it in. I believe they're meant to go slot first, and the slot is a chip clearing device. If you look at the accompanying driver device, it keys into the threads, not the slot. |
Author: | Aaron O [ Sat Oct 22, 2016 2:46 pm ] |
Post subject: | Re: Tips for installing threaded inserts |
meddlingfool wrote: Aaron, Not 100% certain, but...I'm pretty sure that slot is not meant to be used to drive it in. I believe they're meant to go slot first, and the slot is a chip clearing device. If you look at the accompanying driver device, it keys into the threads, not the slot. Ed, you didn't watch the video, did you? And my sarcastic analogy about splitting subwoofers instead of clustering didn't catch - that's okay, inside sarcasm anyway. Sorry, I tried to embed it so you can see the first screen shot, but I couldn't figure out how to do it. Here it is again: https://www.youtube.com/watch?v=62B0T4dImJ8&app=desktop Personally, be 100% certain, the slot is to cut, not to drive. |
Author: | meddlingfool [ Sat Oct 22, 2016 4:36 pm ] |
Post subject: | Re: Tips for installing threaded inserts |
Indeed I did not... |
Page 1 of 2 | All times are UTC - 5 hours |
Powered by phpBB® Forum Software © phpBB Group http://www.phpbb.com/ |