Official Luthiers Forum!
http://luthiersforum.com/forum/

DIY Thickness plane
http://luthiersforum.com/forum/viewtopic.php?f=10101&t=49107
Page 1 of 1

Author:  BradHall [ Thu Mar 09, 2017 2:10 pm ]
Post subject:  DIY Thickness plane

I have a nice set of Sitka spruce for my next build. Fully quartered, very tight grain. It has a wonderful musical tap tone as is.....but it is more than twice the thickness I'm targeting. It's a shame it falls short of resawing and doubling the yield. I could spend time on my homemade thickness sander. Would rather develop another skill. I have an old Dunlop Jack plane that's pretty flat. Could get it better with a little work on my granite slab. I'm thinking of taking a triangle file to the blade to cut notches and using it as a thickness plane. Is this a good idea? What pit falls should I be aware of?
__________________

Author:  Joe Beaver [ Thu Mar 09, 2017 3:05 pm ]
Post subject:  Re: DIY Thickness plane

I wouldn't bother for a Sitka top. A sharp well-tuned plane will work fine. It'll even work on the back and sides but if you do those regularly then you might want to consider getting a second notched Edge blade

Author:  DennisK [ Thu Mar 09, 2017 4:16 pm ]
Post subject:  Re: DIY Thickness plane

No need for teeth on softwoods. Just sharpen it up and go at it. I prefer a block plane for its lighter weight. Lifting those big ones over and over gets tiresome.

For major material removal, I start with my trusty 1/2" chisel, ripping and tearing wood in large chips. Then switch to the plane to smooth out the rough landscape left behind. A scrub plane would be the proper tool, but I haven't gotten around to making one yet. And in your case, I'd recommend using the regular plane for the whole thing, so you can get plenty of practice before you have to worry about going too far.

Author:  truckjohn [ Thu Mar 09, 2017 5:06 pm ]
Post subject:  Re: DIY Thickness plane

I wouldn't tooth a plane iron unless you can replace it pretty easily...

If a standard Stanley iron fits the plane - get a $4.00 Buck Brothers iron at Home Depot and notch it with your dremel... A file is going to take a LONG time on that hard steel...

The notches only need to be 1/16" deep and 1/8" apart.

Sharpen as usual and go to town. Then - just switch planes or swap irons to knock down the tooth marks.

Author:  Bryan Bear [ Thu Mar 09, 2017 5:07 pm ]
Post subject:  Re: DIY Thickness plane

Just remember, when you are going across the grain and have a lot of material to use, it is easy to take aggressive cuts and forget about the potential for blow out on the edges (particularly in the area where the lower bout will be). I forgot to be careful recently when roughing a cherry back down before going to the thickness sander. I almost turned my size 1 into a size 2.

Author:  Clay S. [ Thu Mar 09, 2017 5:51 pm ]
Post subject:  Re: DIY Thickness plane

Toothed blades are used for woods with difficult grain to reduce tear out. That is not the situation you have for the typical spruce top. Toothing the blade would only degrade the performance of the plane.
Two things that might help would be to sharpen the blade really really well and move the frog slightly forward to close up the throat and make it act more like a smoothing plane. Closing the throat will allow it to take thinner, finer shavings. It will take a little longer to reduce the thickness but give you a little more control. If it's your first attempt with a hand plane, leave enough wood to bring it to final thickness with your thickness sander.

Author:  truckjohn [ Thu Mar 09, 2017 7:43 pm ]
Post subject:  Re: DIY Thickness plane

You don't want thinner, finer shavings when you are after bulk stock removal. You just want to hog it off.

Move the frog back as far as you can to open up the mouth. That way - you can take a nice thick cut. Just pay attention to the runout in the wood.

It's true that theoretically - a normal iron can cut better in spruce than a toother.. My experience is that this is certainly true when using a thicker aftermarket iron like an IBC or Hock. The standard Stanley/Dunlap is pretty thin and doesn't do as well when hogging.

But... Before you go do anything special - sharpen that puppy up good and give it a try.

Author:  Trevor Gore [ Fri Mar 10, 2017 7:18 pm ]
Post subject:  Re: DIY Thickness plane

BradHall wrote:
I'm thinking of taking a triangle file to the blade to cut notches and using it as a thickness plane. Is this a good idea? What pit falls should I be aware of?

You're better off with a scrub plane than a toothed plane for heavy thickness reduction on softwood.

Here's how to set up for a one plane (jack, #5) 2 blade, scrub and smoothing operation.

Buy a thicker aftermarket blade.
Set the frog with this blade in to give a very fine mouth. Sharpen up the blade and this is your smoothing set up.

Switch back to the standard thin blade. You will see the mouth is now wider because of the thinner blade. Sharpen the thinner blade to a crescent shape by just leaning on the edges of it when "honing" on a course stone. Then hone up similarly on a fine stone. Load up this blade and this is your scrub plane set up. Set the cut depth about as deep as the crescent (so you don't tear the edge of the cut too much) and hog off that wood. If you put too much crescent on and too deep a cut, you'll struggle to push the thing. Switch back to the thick blade for finishing.

Author:  Bob Lucas [ Sat Mar 11, 2017 6:31 pm ]
Post subject:  Re: DIY Thickness plane

The purpose of a toothing plane is this: to leave a visible track. This is to ensure planing one stroke evenly across the plate. Think of using the lawnmower track to align the next pass. It is an aid to a beginner and serves no purpose after one learns to remove wood evenly.

Author:  Bri [ Sat Mar 11, 2017 6:50 pm ]
Post subject:  Re: DIY Thickness plane

Bob, I respectfully disagree. Toothing irons originally had two purposes.
1. To aid in the rapid removal of stock in difficult grain.
2. Veneering. The finer toothed irons were used to maximize glue surface on the substrate piece.

Brian

Author:  Bob Lucas [ Sat Mar 11, 2017 7:20 pm ]
Post subject:  Re: DIY Thickness plane

I should have added that this is my take from the Natelson Cumpiano book.

Author:  Bob Lucas [ Sat Mar 11, 2017 8:28 pm ]
Post subject:  Re: DIY Thickness plane

As I consider your thoughts I must respectfully differ. No. 1 refers to difficult grain, which should not be an issue with any decent spruce top wood. No. 2 concerns veneer laminating which not the task at hand. Please do not think me ornery or having any motive other than rigor in giving Brad my best advice. A well sharpened and tuned bench plane is perfectly suited to thickness spruce. These are my opinions only. In any case thanks for responding.
I joined this forum today specifically to seek advice on a confounding problem with a spruce top btw. And can't get my image to post. After 30 or40 hours of diligent work it has warped and curled up like a
cowboy hat.

Author:  StevenWheeler [ Sat Mar 11, 2017 9:00 pm ]
Post subject:  Re: DIY Thickness plane

Bob Lucas wrote:
I joined this forum today specifically to seek advice on a confounding problem with a spruce top btw. And can't get my image to post. After 30 or40 hours of diligent work it has warped and curled up like a
cowboy hat.


Hi Bob,
Welcome to the forum. You can start a new topic without pictures, but then we'll ask you for pictures so...
Resize your photos to a max file size of 256kb. On a MS machine open the picture with MS Paint to resize. I don't speak Apple.
You'll get plenty of replies on the virtues of humidity control. Do a forum search on the subject and you'll find loads of info to help with your problem.

Brad,
Like the guys said, toothed planes are for difficult grains (quilt, flame, burl, crotch...).

Steve

Author:  Bob Lucas [ Sat Mar 11, 2017 9:24 pm ]
Post subject:  Re: DIY Thickness plane

Thanks for the advice. I'm limited to an Android phone lately ( spend all my money on sharpening stones) but I'll try it. I just learned that the braces were the perp because after I planed and scraped them completely off the plate relaxed perfectly flat. So obviously the brace wood had expanded to deform the top. Now I need to know why and how to avoid this. I guess I'm glad it happened now and not after assembling the box. Thanks again I've been building for years and have never met another builder so this is a dear resource.

Author:  david farmer [ Sat Mar 11, 2017 9:52 pm ]
Post subject:  Re: DIY Thickness plane

Welcome Bob.
It's not the braces changing with humidity, it's the plate.
Understanding and controlling the moisture content of wood is essential to instrument building success, (and all solid wood construction). If you don't start with gaining an understanding of how it works, your first results will be random and almost certainly frustrating.

Author:  Bob Lucas [ Sat Mar 11, 2017 10:39 pm ]
Post subject:  Re: DIY Thickness plane

I've a good knowledge of how moisture affects wood. I've been a full time cabinetmaker, woodturner of of koa bowls, designed and built 5 boats. Woodwork has been my serious pastime since 1966. I've about 40 planes and use them all. I'm not trying to impress just to say I've been at it and studying. I've built two previous acoustic guitars worth no problem of this kind. Admittedly this is my first use of Sitka. So I gather if the braces didn't swell then the plate shrunk. But it was highly graded (Stewmac) so shouldn't it have been properly seasoned? I guess it all boils down to, how do I prevent this? Should I have set the top aside after thicknessing? Is a moisture meter in my near future? I know I can research the issue but I'm asking more because the past 48 hrs have been unsettled over this. I'm always learning ( thank goodness) but this has shook me up. Again thank you. I have never been in contact with Luthier before it's all from books.

Author:  DennisK [ Sat Mar 11, 2017 11:57 pm ]
Post subject:  Re: DIY Thickness plane

Do you have a way to control the humidity in your shop? If not, I'm guessing the cold air mass that's been sweeping across the country made it to your area. To avoid similar problems in the future, make sure you only glue braces when the humidity is low. I time my building around the seasons so I only brace in winter when it's cold and dry. Alternatively you could make a heated box to dry things. Sometimes in a pinch I'll warm the top/back in the oven for an hour or so (not too hot, just like 100F) to dry out just before glue-up. I prefer the natural approach so I know exactly what the guitar's equilibrium RH% is, but the oven method seems to work ok too.

Also, I highly recommend making a wood hygrometer. It's really easy if you have some soundboard offcuts lying around. Two strips glued together, one long grain and one cross grain. Sand it down until it's fairly flexible (around 1mm total thickness), and attach it to a base of some sort, with a piece of cardboard or something sticking up behind it for visual reference.
Attachment:
Hygrometer.jpg

The numbers ended up being useless. Can't really calibrate it since it's subject to the hysteresis effect of wood (a piece of wood acclimated from high humidity down to a target RH% will remain more swollen than it would be if dried below the target and then acclimated up), but that actually makes it more accurate than a regular hygrometer for interpreting the condition of the wood you're working with. It's also easily visible from across the room. Use something else for the first year or two, but watch the wood one and over time you'll learn what its overall range is and what is good bracing conditions.

Author:  murrmac [ Sun Mar 12, 2017 2:32 am ]
Post subject:  Re: DIY Thickness plane

Bri wrote:
Bob, I respectfully disagree. Toothing irons originally had two purposes.
1. To aid in the rapid removal of stock in difficult grain.
2. Veneering. The finer toothed irons were used to maximize glue surface on the substrate piece.

Brian


The toothing on the substrate when veneering was more to provide somewhere for the excess glue to flow into, thereby minimizing the probability of bubbles in the veneer, rather than maximizing the gluing area per se.

Author:  Clay S. [ Sun Mar 12, 2017 7:48 am ]
Post subject:  Re: DIY Thickness plane

" So I gather if the braces didn't swell then the plate shrunk. But it was highly graded (Stewmac) so shouldn't it have been properly seasoned? " Hi Bob,
Wood moves more across the grain than along the grain. The width of a board will change more than it's length with humidity changes. Most of us try to have the top glued to the rims soon after bracing and brace our tops at 50% R.H. or lower.
As to top grading, you will find that it is mostly done on a cosmetic basis and less a reflection on it's acoustic properties or "seasoning". Stew Mac is a reputable company, and I would expect their product was reasonably dry but even dry wood will move with humidity changes. Buy and use a hygrometer to monitor your shops R.H. and you will have better success with your instrument making.

Author:  printer2 [ Sun Mar 12, 2017 8:32 am ]
Post subject:  Re: DIY Thickness plane

DennisK wrote:
Do you have a way to control the humidity in your shop? If not, I'm guessing the cold air mass that's been sweeping across the country made it to your area. To avoid similar problems in the future, make sure you only glue braces when the humidity is low. I time my building around the seasons so I only brace in winter when it's cold and dry. Alternatively you could make a heated box to dry things. Sometimes in a pinch I'll warm the top/back in the oven for an hour or so (not too hot, just like 100F) to dry out just before glue-up. I prefer the natural approach so I know exactly what the guitar's equilibrium RH% is, but the oven method seems to work ok too.

Also, I highly recommend making a wood hygrometer. It's really easy if you have some soundboard offcuts lying around. Two strips glued together, one long grain and one cross grain. Sand it down until it's fairly flexible (around 1mm total thickness), and attach it to a base of some sort, with a piece of cardboard or something sticking up behind it for visual reference.
Attachment:
Hygrometer.jpg

The numbers ended up being useless. Can't really calibrate it since it's subject to the hysteresis effect of wood (a piece of wood acclimated from high humidity down to a target RH% will remain more swollen than it would be if dried below the target and then acclimated up), but that actually makes it more accurate than a regular hygrometer for interpreting the condition of the wood you're working with. It's also easily visible from across the room. Use something else for the first year or two, but watch the wood one and over time you'll learn what its overall range is and what is good bracing conditions.


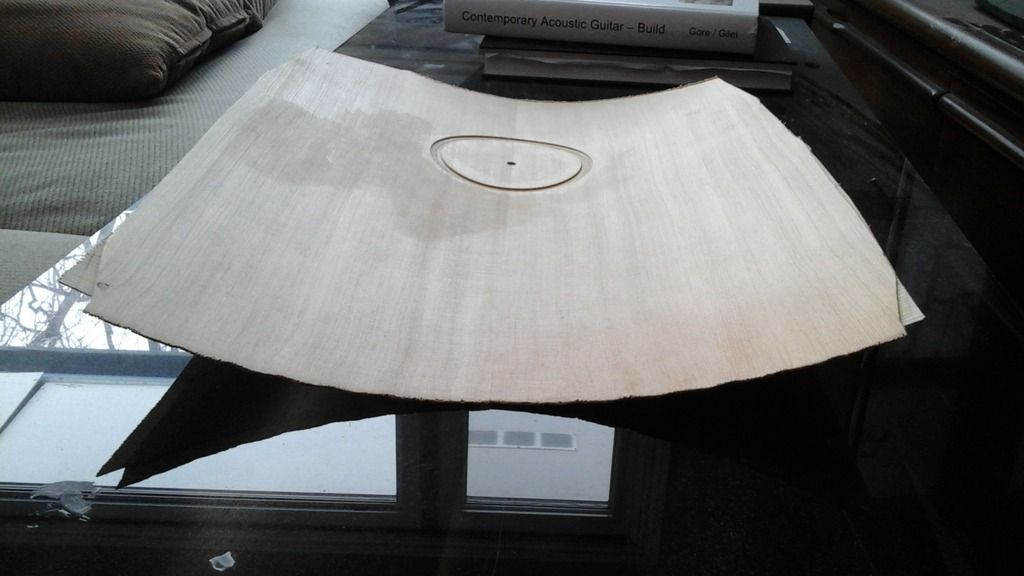
This was just a try at making a laminate. Found out why they use three layers rather than two. Kind of dry in my house right now.

Image

Author:  ernie [ Sun Mar 12, 2017 9:01 am ]
Post subject:  Re: DIY Thickness plane

winterpeg is very cold and dry in winter .If you have a way to measure , with a quality hygrometer, add humidity. .I have 2 humidifiers running all winter and keep the humidity at 40-45% We are about 750mi s. of you.You can create a seperate small space where you do all your glue ups and adding the extra humidity , it will cause less cupping, cracking, warping and problems down the road. Ask me how I know.Now I have 3 hygrometers all over the house 2nd floor, bsmt, and main work area.

Author:  Bob Lucas [ Sun Mar 12, 2017 11:30 am ]
Post subject:  Re: DIY Thickness plane

I certainly appreciate the advice, it's humbling. I think I have a good general take on the technical issues. It's making sense is what I mean. When I want to safely dry anything (details omitted )I put it in the oven. It's a gas range with standing pilot. It stays slightly warm but very dry.

Lastly thanks to Dennis K for the hygrometer suggestion. I now have the pleasure of making a helpful tool at low cost and labor. A relevant , elegant item. Tool making gets me excited. It's important to keep a level head though. You could start making tools that make tools, and so on.

Page 1 of 1 All times are UTC - 5 hours
Powered by phpBB® Forum Software © phpBB Group
http://www.phpbb.com/