Official Luthiers Forum!
http://luthiersforum.com/forum/

Profiling The Back Of The Neck
http://luthiersforum.com/forum/viewtopic.php?f=10101&t=50681
Page 1 of 2

Author:  Jules [ Mon May 28, 2018 9:16 am ]
Post subject:  Profiling The Back Of The Neck

Based on what I have learned thus far from books, plans and elsewhere, I am beginning to get the impression that when it comes to profiling the back of the neck, just go with what feels good. Once the thickness and width are established, profile the neck to suit your personal preference. Is this correct?

If so, what if one wanted to closely duplicate a particular guitar? Is there anything out there that gives neck profiles at a couple of fret locations?

Author:  bluescreek [ Mon May 28, 2018 9:20 am ]
Post subject:  Re: Profiling The Back Of The Neck

This is a great chance to help. You have one thing to worry about and that is that you don't make it too thin that the truss rod would push through. If you have a neck you like here is what you can do
A measure the thickness of the neck at 2 points. Usually 1st fret and 10th. As for the shape you can then take plumbers solder and make a profile of the shape at those 2 points.
Then as you get it closer and your into the final shaping , sand it with your fretting hand and it will fit like it was made for it. You do want the fretboard on the neck so you can get a more accurate feel.

Author:  klooker [ Mon May 28, 2018 9:40 am ]
Post subject:  Re: Profiling The Back Of The Neck

Luthier Supplies, one of the sponsors, sells them.

Author:  arie [ Mon May 28, 2018 10:09 am ]
Post subject:  Re: Profiling The Back Of The Neck

for duping neck contours i use one of those General pin-style contour gages -the ones where you push into the shape and the gage pins show the negative profile on one side and the positive on the other. not perfect, but close. they will scratch a finished neck if you're not careful. i also cnc some acrylic contour templates for checking key spots and use a dial indicator.

Author:  Hans Mattes [ Mon May 28, 2018 12:12 pm ]
Post subject:  Re: Profiling The Back Of The Neck

like Arie, I use a pin-style contour gauge, but then I transfer the contours (frets 1, 4, 8, 12) to ⅛" masonite and make templates - with markings for the neck/fretboard intersection. That way I can plane and sand the overall contour without repeated measurements. (I try to avoid repeated measurements because, when I make them, they rarely come out the same.)

Author:  Clay S. [ Mon May 28, 2018 1:01 pm ]
Post subject:  Re: Profiling The Back Of The Neck

I also use the pin style contour gauge, but usually make the templates out of card stock - not as durable as masonite but relatively quick to make.
You can make the neck to what feels good to you , but always keep in mind what it's job is, and don't stray too far from "normal". But there is a wide range to "normal" out there.

Author:  Terence Kennedy [ Mon May 28, 2018 1:20 pm ]
Post subject:  Re: Profiling The Back Of The Neck

Years ago Mark Blanchard posted a technique on the old 13th fret forum.

Cut the rough profile in a piece of 1/4” ply and roll up a snake of epoxy putty and lay it in the rough cut profile. Put Saran Wrap on the neck and push the profile against the neck and leave it until it sets up.

Sand the excess off. Do for 1 and 10 for a 14 fret neck. Works great.

Author:  Pmaj7 [ Mon May 28, 2018 2:32 pm ]
Post subject:  Re: Profiling The Back Of The Neck

bluescreek wrote:
sand it with your fretting hand and it will fit like it was made for it.


That's brilliant John! (Obvious caveat, that it's for you)

Sent from my SM-N910T using Tapatalk

Author:  Woodie G [ Mon May 28, 2018 2:48 pm ]
Post subject:  Re: Profiling The Back Of The Neck

We use Mr. Blanchard's approach with the added refinement of carefully using water-thin CA to soak the joint between 1/8" plywood and the cured epoxy, and marking the bass and treble sides, as well as the nominal depth and width. Protecting the neck finish with some wax paper or Saran Wrap is a good idea, at the cost of adding a few mills to the neck dimensions.

The temptation to use a wide belt sander to strip off the excess epoxy putty can be strong, but this needs to be done carefully, as the heat build-up can soften things a bit. The epoxy paste is available from several sources as a wood or metal-filled two-part dough-like roll (check Home Depot for the wood-filled stuff, or make up a batch of structural epoxy and fill with a structural filler to a thick paste), and cures quickly enough to allow a single template card to be used for 1st, 6th, and 10th fret profiles (1st and 8th fret for 12-fret-to-body).

The current standard neck template used on most the guitars made in the shop was developed as Mr. Hall suggested, but augmented with expert player judgement. This template also has much less taper between 1st and 10th than seen in some commercial offerings, so consider that as another degree of freedom when developing your neck design.

Commercial neck templates based on selected guitar models are available from Luthier Supplies for $22 each, and include a range of vintage and modern Martin models, as well as Gibson, Santa Cruz, Goodall, Collings, Taylor, Ryan, Anderson, and Maton models. We have a few in the shop from when the boss started building, and they seem to be nicely laid out and useful, but we've had enough in the way of instruments in that we've documented a number of them using the method mentioned by Dr. Kennedy.

Finally, Georgia Luthier Supply offers a free download of "C", modified "V", vintage, and
modern vintage profiles dimensioned in both fractional inches and millimeters. You might consider using these as a basis to get your own profiles close to the mark, then further refine with feedback from your friendly neighborhood contingent of guitarists.

Author:  Haans [ Mon May 28, 2018 3:33 pm ]
Post subject:  Re: Profiling The Back Of The Neck

If you are building one for yourself, that's about right. I used to take about 3-4 weeks to sneak up on what I found to finally like. Rough it out, sand to 80 or 100 grit and play with it for a couple of weeks. Those needle rasps are great for taking a little more off quickly. The old geezer about 15 years ago taking just a little more off an A5 with the half round needle rasp...

Image

For customers, I would tell them to use the solder method (with protection) and have them fit the templates before they sent them to me. If they couldn't handle that, I told them to take it to a repair shop to have the templates made. Hard cardstock was good enough for that.
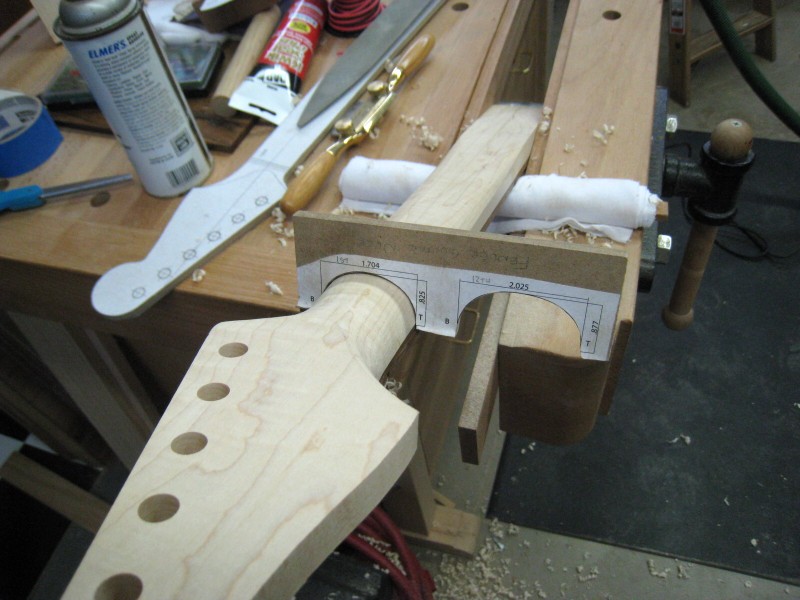
One thing I found that a lot of builders don't get is to take the radius right up to the top of the fretboard. You most always taper the binding some. If you don't, you end up with a fatter neck and a flat at the binding.
Another thing that a lot of builders don't consider is what the curve of the heel looks like at the neck joint. There is no recurve in the area below the fretboard. To have that recurve just means a fatter neck too.

Image

Note that the heel/box joint is concave all the way to the top of the fretboard. Many times I found myself taking more and more out of the heel to help shape the rest of the neck.

Author:  Freeman [ Mon May 28, 2018 4:46 pm ]
Post subject:  Re: Profiling The Back Of The Neck

I happen to think that neck profile (as well as width and f/b radius) is one of the most important parameters for the playability of a guitar - some people like chunky necks, some like thin, some like a Vee profile, some like a C or D. Your Antes plans give a nice generic C looking profile, many people would probably like that.

When somebody brings me a neck that they really like I make at least two templates - one at the nut and one as far up the neck as I can get without running into the heel. I was building an archtop acoustic for a guy but he wanted the neck just like his vintage LP

Image

Image

Image

I happen to like that profile so much I've used it on other guitars.

Here are the two cross sections that came with the StewMac 000 plans, its a little wider than the LP ones above

Image

The two little lines on each side correspond to neck-f/b interface and the top of the f/b. I like to contour my necks before the f/b is glued on, then finalize it after. I usually bind necks so I have to be careful how much I'm removing in that area.

I'll add that my experience with just shaping "until it feels right" I normally end up not taking enough off. I have had two necks where I went back after the guitar was finished and removed more material (one reason to consider a removable neck and finish that can be repaired)

Author:  Freeman [ Mon May 28, 2018 4:58 pm ]
Post subject:  Re: Profiling The Back Of The Neck

You can buy that contour gauge from Grizzly Tools. They have two versions, plastic and metal pins. The one in my picture is metal, I would recommend the plastic one. At least put a piece of tape on anything that you are contouring.

Also, remember a few things about laying out your neck and fretboard. Important dimensions include the depth at several locations, usually the nut and the last fret before the heel starts. You will want the width of the neck at two locations - often the nut and body joint (your Antes plans gives it at the 21'st fret). The string spacing at the nut and bridge are important for playability. And the offset of the strings from the edge of the f/b can affect the feel of the neck, they go hand in hand with spacing.

The reason I think width at the body joint is important is that you might be fitting it into a cutaway where that is predetermined.

Author:  TimAllen [ Tue May 29, 2018 4:50 pm ]
Post subject:  Re: Profiling The Back Of The Neck

I also use the General contour gauge. If necessary, I protect the finish on a neck with a narrow strip of card stock.

One trick helps me more precisely envision the shape of a neck I'm working on. After taking the profile of the neck, I trace the inside of the gauge onto a piece of graph paper. A 1/4" grid makes even a small asymmetry stand out.

Author:  Jules [ Wed May 30, 2018 8:48 am ]
Post subject:  Re: Profiling The Back Of The Neck

In the past, when making necks for electrics, I have used profile templates that I made from blueprints or accurately scaled plans
Image
Without a guitar in the house at the time, that was all I had to work with. But it worked well.

From there I use a rasp to rough out the profile at the 1st and 12th frets. Next was to take a spokeshave and rough out the rest of the neck, to the point where I'd switch to sanding blocks made from MDF. I, too, consider the feel of the neck of prime importance when making a guitar for a particular player. When possible, I have brought the player into the shop and had them do the final sanding so the neck feels just right.

My intent on this guitar was to try to duplicate as closely as possible the original OM neck profile. I consider this first acoustic an R&D project, but I am curious to have some idea how that original neck might feel.

Author:  Bryan Bear [ Wed May 30, 2018 10:00 am ]
Post subject:  Re: Profiling The Back Of The Neck

Haans wrote:
Another thing that a lot of builders don't consider is what the curve of the heel looks like at the neck joint. There is no recurve in the area below the fretboard. To have that recurve just means a fatter neck too.

Note that the heel/box joint is concave all the way to the top of the fretboard. Many times I found myself taking more and more out of the heel to help shape the rest of the neck.


Haans, can you elaborate on this. I'm not really understanding what you are trying to say. I'm sure I'm just being thick headed. . . that part of the heel shape has always been something I wasn't totally happy with in my own necks but I couldn't put my finger on why. I feel like this is my answer, if I could only understand the answer given. bliss

Author:  Freeman [ Wed May 30, 2018 10:25 am ]
Post subject:  Re: Profiling The Back Of The Neck

Jules wrote:
My intent on this guitar was to try to duplicate as closely as possible the original OM neck profile. I consider this first acoustic an R&D project, but I am curious to have some idea how that original neck might feel.


I recently played a very nice new OM-42 (maybe 5 years old). It has the "low profile" C shaped neck that Martin is using on many of its new models. Would be easy to measure one of them. The experts on vintage Martins can tell you want an original one might have had.

Another good reference for Martin guitar neck shapes is this

https://umgf.com/neck-profiles-cross-se ... tml#p72919

Author:  Jules [ Wed May 30, 2018 1:49 pm ]
Post subject:  Re: Profiling The Back Of The Neck

That's a great link, Freeman! Just what I was looking for.

In the past I have accumulated all the information I could on a guitar I planned to build and brought it into AutoCAD. From there I create a drawing I can use to make templates. I find templates makes everything easier plus the time it takes me to create a drawing I sort of become one with it.

I was going to use one of my plans of a Tele-style neck (http://julimorcreations.com/Plans/Tele- ... eck-HR.pdf) but then that voice in my head said, "Do it right!", whatever that is... :roll:

Author:  Haans [ Wed May 30, 2018 2:22 pm ]
Post subject:  Re: Profiling The Back Of The Neck

Bryan Bear wrote:
Haans wrote:
Another thing that a lot of builders don't consider is what the curve of the heel looks like at the neck joint. There is no recurve in the area below the fretboard. To have that recurve just means a fatter neck too.

Note that the heel/box joint is concave all the way to the top of the fretboard. Many times I found myself taking more and more out of the heel to help shape the rest of the neck.


Haans, can you elaborate on this. I'm not really understanding what you are trying to say. I'm sure I'm just being thick headed. . . that part of the heel shape has always been something I wasn't totally happy with in my own necks but I couldn't put my finger on why. I feel like this is my answer, if I could only understand the answer given. bliss


Sure Brian, maybe this view of a "Martin" will show a bit more. At no part of the joint does the joint go convex, it's a completely concave curve from heelcap to fingerboard.

Image

There is no part of that curve that is a reverse of that curve (convex).

Author:  Bryan Bear [ Wed May 30, 2018 4:27 pm ]
Post subject:  Re: Profiling The Back Of The Neck

Interesting Haans, thanks! I have only once built to a plan that someone else designed and I have never used a plan for neck carving. But I do have 2 plans that show a cross-section of the heel interface and they both show a convex surface transitioning to a concave surface. I have always had this shape in my mind when I made my necks and carved them until they felt and looked right. I have never loved carving that part of the heel and doing the transition. Perhaps this is why; I will try this the next time I make a neck!

I'd love to see a 2D rendering of one of your heel joint cross-sections if you have one handy. If not, no biggie.

Author:  Freeman [ Wed May 30, 2018 4:55 pm ]
Post subject:  Re: Profiling The Back Of The Neck

Jules wrote:
That's a great link, Freeman! Just what I was looking for.

In the past I have accumulated all the information I could on a guitar I planned to build and brought it into AutoCAD. From there I create a drawing I can use to make templates. I find templates makes everything easier plus the time it takes me to create a drawing I sort of become one with it.

I was going to use one of my plans of a Tele-style neck (http://julimorcreations.com/Plans/Tele- ... eck-HR.pdf) but then that voice in my head said, "Do it right!", whatever that is... :roll:


If you wanted to do something totally cool in Autocadd, create a parametric model of your neck. That way as you changed one or more parameters you could see how the effect rippled thru the neck. I spend a lot of time (by hand) trying to modify a neck that I like to fit a different nut width or scale length (sorry) or fretboard radius.

I was actually going to suggest something like that for your other thread but it was just getting too ugly. But think of this, if you changed your scale length what happens to all the other design parameters - does the sound hole move, do the braces move and in what fashion, obviously the bridge moves but how? It is the classic example of a parametric design, all we need is someone to do it.

Also, as far as your Autocadd work, you might be interested in several of the recent articles in American Lutherie talking about design of guitar shapes using circles, tangents, splines, some of the classic ratios (Golden et al). The authors typically give both manual and computer aided drafting methods. As I recall the OM was one of the shapes they came up with and this could easily be made into a parametric model too.

Author:  Haans [ Wed May 30, 2018 6:18 pm ]
Post subject:  Re: Profiling The Back Of The Neck

Bryan Bear wrote:
Interesting Haans, thanks! I have only once built to a plan that someone else designed and I have never used a plan for neck carving. But I do have 2 plans that show a cross-section of the heel interface and they both show a convex surface transitioning to a concave surface. I have always had this shape in my mind when I made my necks and carved them until they felt and looked right. I have never loved carving that part of the heel and doing the transition. Perhaps this is why; I will try this the next time I make a neck!

I'd love to see a 2D rendering of one of your heel joint cross-sections if you have one handy. If not, no biggie.


I never learned how to draw in computer, can't highlite with arrows, etc, and am just not thinking as well as I used to, so I have a harder time putting things into words. Never used plans myself.

Found another photo that may do the trick for you...

Image

Hope that helps...

Author:  Mike_P [ Wed May 30, 2018 7:04 pm ]
Post subject:  Re: Profiling The Back Of The Neck

I think what Bryan_Bear is referring to is where the neck attaches to/meets the body...

that is quite clearly concave when viewed down the neck.

the rest is convex in all aspects, but at some point the transition between the 2 occurs, and in an ideal world said juncture would be smooth as silk and not noticed.

Author:  doncaparker [ Thu May 31, 2018 6:08 am ]
Post subject:  Re: Profiling The Back Of The Neck

This difference might be easier for some folks to visualize if it is described in this way:

Imagine you are looking directly at the butt end of the neck before it is attached to the body, and the fingerboard is on top (i.e., the neck is right side up).

Some necks have a portion of the heel that goes relatively straight down for about a half inch on both sides from the edge of the fingerboard (assume symmetry), then the profile turns inward toward the center line, then curves down and in toward the pointy shaped heel, where the profile is mostly heading straight down at that point and the two sides are about an inch apart. This is what some are describing as convex, then concave.

Other necks, like Haans’ shown above, immediately turn inward at the edge of the fingerboard and the whole curve of the profile is spent transitioning to headed straight down. It ends at the pointy shaped heel, same as the other way. This is what some are describing as just concave only.

Author:  Bryan Bear [ Thu May 31, 2018 8:55 am ]
Post subject:  Re: Profiling The Back Of The Neck

Thanks Don, that explains it well. That is what Haans and I were talking about but I couldn't word it well. I'm going to try it the way Haans shows next time.

Haans, thanks for that last picture, it confirmed what I thought I was seeing!

Author:  Haans [ Thu May 31, 2018 9:09 am ]
Post subject:  Re: Profiling The Back Of The Neck

First let me say that yes, some folks like a flat fingerboard binding, but it does make a fatter neck. Most folks I know use their thumb for catching bass notes while fingerpicking, so that flat is not too comfortable. They prefer a contour that continues right to the top of the fingerboard.
Concerning the transition from convex on the neck to concave on heel, it is just a matter of rasping, filing, sanding till the contours blend. I think I understand the question now. Here are a few photos during carving that might help.

Image

Image

Hope that helps...

Page 1 of 2 All times are UTC - 5 hours
Powered by phpBB® Forum Software © phpBB Group
http://www.phpbb.com/