Hesh,
Neat trick with the curved clamping caul

Is that white Titebond you are using?
| Official Luthiers Forum! http://luthiersforum.com/forum/ |
|
| Tutorial – Back Joint Reinforcements http://luthiersforum.com/forum/viewtopic.php?f=10102&t=12773 |
Page 1 of 2 |
| Author: | Dave White [ Mon Jul 09, 2007 5:03 am ] |
| Post subject: | |
Hesh, Neat trick with the curved clamping caul
Is that white Titebond you are using? |
|
| Author: | WaddyThomson [ Mon Jul 09, 2007 5:17 am ] |
| Post subject: | |
Very neat, Hesh. Why not leave gaps in the back reinforcement where the braces will be, maybe a little over the line on each side so minor trimming would make for a very tight fit? Or, would that make it more difficult to align the strip? |
|
| Author: | Rod True [ Mon Jul 09, 2007 5:21 am ] |
| Post subject: | |
Right on Hesh. I've used the gobar deck for this and haven't liked it for the most part. I'll have to give that a try. I've got a little block of wood that I sanded a concave radius into for shaping the reinforcement strip. I put some 100 grit on it and do a rough shape with the block plane than go to the sanding block. I'll post a picture when I get down in the shop later tonight. |
|
| Author: | Mattia Valente [ Mon Jul 09, 2007 5:28 am ] |
| Post subject: | |
Hesh: there are date codes right on the bottle; first number is the last digit of the year, second position is a letter, which is the month (A= January, etc., and I believe they skip I..) I try to stick to 1 year post-manufacture, preferably a little less. |
|
| Author: | Don Williams [ Mon Jul 09, 2007 5:43 am ] |
| Post subject: | |
Forget all that! Nice piece of Brazilian! I can't wait to see that under a finish... |
|
| Author: | Don Williams [ Mon Jul 09, 2007 6:40 am ] |
| Post subject: | |
Those darkish lines are going to jump out from the lighter background. I've got some similar stuff at home which I've wetted with napthanad it has incredible contrast. That's going to be a real looker of a guitar. What are your plans for the rest of it? Top? (you gotta use addi!) Binding scheme? |
|
| Author: | Rod True [ Mon Jul 09, 2007 7:36 am ] |
| Post subject: | |
[quote=The Heshter]Cool Rod a sanding jig now that is a GOOD idea so be sure to post a pic later when you can OK? [/quote]  You make it sound elaborate using the word jig. You make it sound elaborate using the word jig.
Just a sanding block really Here you go, easy as pie (mmmmmmmm, pie) 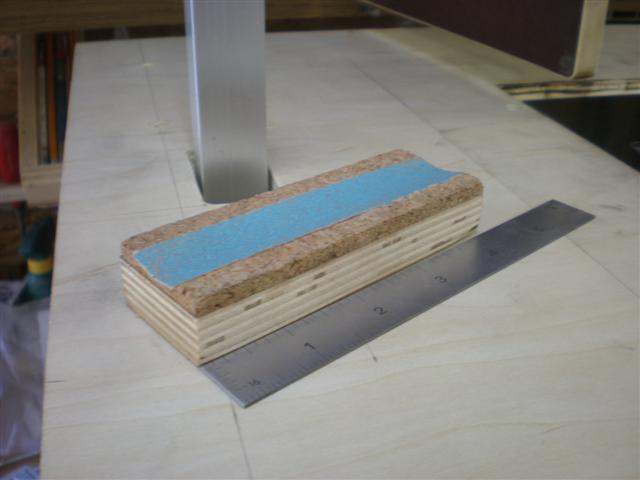
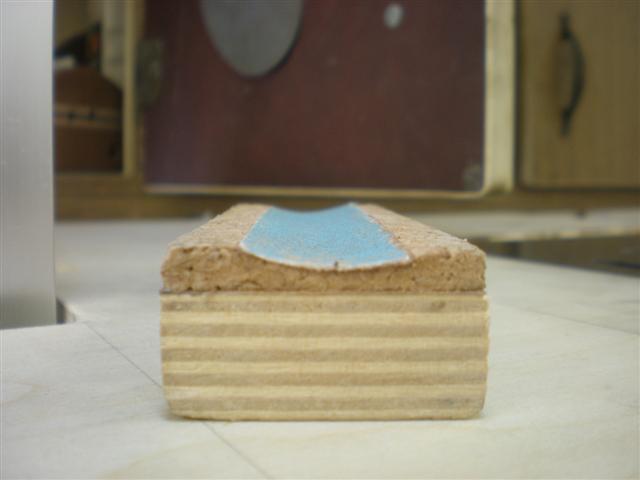
You know what would be really cool with this "jig  " is if that curve were recessed into the block by 3/32" with some vertical walls to run along the edge of the strip. If it were the same basic dimension as the width of the strip you'd have a perfectly arched strip every time. " is if that curve were recessed into the block by 3/32" with some vertical walls to run along the edge of the strip. If it were the same basic dimension as the width of the strip you'd have a perfectly arched strip every time.
Another idea for the scrap book (gotta make this next time). |
|
| Author: | Alexandru Marian [ Mon Jul 09, 2007 8:30 am ] |
| Post subject: | |
Did you say runout ? I hate runout  How does it show on the surface other than the color difference between halves? How does it show on the surface other than the color difference between halves? |
|
| Author: | Rick Turner [ Mon Jul 09, 2007 9:01 am ] |
| Post subject: | |
I have taken to topping the back seam reinforcement with a .022" x .375" carbon fiber strip and bridging over that continuous strip with the back braces. The strength it adds to the back is quite impressive. I'm topping the back braces with CF as well. |
|
| Author: | Joel [ Mon Jul 09, 2007 11:33 am ] |
| Post subject: | |
I love these Heshtorials! |
|
| Author: | Heath Blair [ Mon Jul 09, 2007 12:04 pm ] |
| Post subject: | |
hesh, thanks again bro. im not sure if you know how valuable these sort of tutorials are, but they really help alot. i mean heck, even if i hated your method, its just great to see how someone else does it. so thank you for taking the time to put this stuff together. speaking of putting stuff together... why not print off all of your tutorials, have them put into a book, market and sell said book, retire, and build guitars full time? thatd be my plan. & nbsp; & nbsp; & nbsp; not to highjack the thread, but side note... all of this neutral axis talk... i dont quite get it. if the carbon fiber (or any other material for that matter) were placed perpendicular to the force (is this the same as vertically, as you called it, todd?) how is that nuetral? |
|
| Author: | Dennis Leahy [ Mon Jul 09, 2007 12:05 pm ] |
| Post subject: | |
Thanks, Hesh and Todd! I'll take something from each of you as I brace up several backs just sanded. (Two have wedges made of bookmatched material, and the wedges are too wide IMO to apply one huge patch, so I'll get the chance to try your ideas over and over and over...) Dennis |
|
| Author: | Dave Anderson [ Mon Jul 09, 2007 12:29 pm ] |
| Post subject: | |
Great thread here guys! Thanks Hesh for taking the time to do this excellant Tute. 
Great Braz. back BTW ! I can't wait to see this one finished! |
|
| Author: | rich altieri [ Mon Jul 09, 2007 1:02 pm ] |
| Post subject: | |
Hesh, perfect timing. I have a project in process and was ready to do the center seam brace on the back. After reading your post I made a radiused caul and it worked great - much better than my past approach. I also use a year stick to align to bracing materials during the glue process so combining that with the radiused caul worked out extremely well. Thanks for sharing all that you do. I know how time consuming it is to make an effort like you do and I think I speak for the entire group when I say "we appreciate the effort" |
|
| Author: | Rod True [ Mon Jul 09, 2007 2:00 pm ] |
| Post subject: | |
[QUOTE=ToddStock] If you think about an I-beam in bending, the top flange is in compression (it has to get shorter as the beam bends), the bottom flange is in tension (it has to get longer), and most of the material near the center of the beam has been removed because it does not carry any load (does not need to stretch or shrink). The point in the center of the beam where there is neither compression or tension is the neutral axis, and any time we can remove material here, we get very little decrease in load carrying ability, but a big decrease in weight. Laminating carbon fiber into the center of the beam allows only the fibers furthest from the neutral axis to carry much of a load, so the superior performance of the material under load is not fully utilized. We could remove 80% of the fibers near the neutral axis and see no changes in load-carrying capability. Using a layer of carbon fiber as a flange (like Rod's approach) allows the extra weight of CF to be more than offset by the improved load carrying performance - the entire piece is in tension or compression, so it is more structurally efficient than the earlier example. Clear as mud, right?[/QUOTE] I'll just correct one thing here. It's Rick's approach, not mine both Rick and Todd are smarter than me
|
|
| Author: | Heath Blair [ Mon Jul 09, 2007 4:37 pm ] |
| Post subject: | |
ok, i guess if im going to highjack, i might as well just go for it. thanks for the reply todd. im pretty sure i understand what you are saying as far as compression and tension are concerned. i think what i was/am confused about is, where is the neutral axis located in relation to the load or force that is to be borne (im not sure about that spelling, but i think you get it)? it seems like the load in a guitar back or top is mostly perpendicular to the plane of the plate. am i seeing that correctly? so to me, the neutral axis would be located somewhere between the suface of the plate and the surface of the brace farthest away from the plate. which is why you would want your "I" beam to sit on the plate like this: I and not like this: l-l. like you said, clear as mud. so what im thinking is carbon fiber laminated vertically (or perpendiular to the plate) actually bisects the neutral axis. so i guess i get what you are saying about the CF being out away from said neutral axis, but it would be thin and wide. i thought we wanted braces tall and skinny. what am i missing here? sorry for jacking your thread hesh. |
|
| Author: | Rick Turner [ Mon Jul 09, 2007 5:46 pm ] |
| Post subject: | |
And why do you want conventional braces tall and skinny? Because that puts material as far away from the neutral axis as possible. That part of the brace that's up at the top is doing the work...another reason not to taper it much. Also, if you think about the load on the back of a guitar...the neck is applying leverage to the neck block which is attempting to stretch the back and flatten out the doming. That means that the static load on the back puts the back surface in compression and the tops of the braces in tension...a perfect application for graphite topping. Add to that the fact that most players are pressing the guitar back against their bellies, and you add to the compressive load on the surface of the back and the tensile load on the brace tops. In my back joint reinforcement, I'm using either spruce or cedar in the usual cross grain arrangement, and it is essentially the neutral axis. It's light weight, decent in compression, and the grain is helping to keep the joint together. The "flanges" of the I beam effect are the hardwood back and the graphite composite on the top surface. I suppose I could inlay a back stripe of graphite and make the thing even more radically strong. Hmmm, maybe I will on the one I'm building now... I can say that I really like combining wood and graphite in these ways. I think we can have the best of both worlds. Ken Parker is doing a lot of this in his own way, and to get the strength and stability of graphite with the sound of wood is a worthy goal. |
|
| Author: | bob J [ Mon Jul 09, 2007 9:40 pm ] |
| Post subject: | |
Hesh, Again propf that you are a true Mensch sp. Thank you again for such a great tutorial-your visuals are always great and very helpful. |
|
| Page 1 of 2 | All times are UTC - 5 hours |
| Powered by phpBB® Forum Software © phpBB Group http://www.phpbb.com/ |
|