I was watching Todd Stock's videos on using Zpoxy for pore filling, and liked the look of the Troji that he used to hold the guitar while sanding it. Then I came across this thread and Rod's directions and plans. So I thought I'd use his directions and post pictures of the steps that I went thru in building it. I asked Rod's permission to post them here and he agreed. Thanks Rod.
Here are the major parts. The whole device used up about 3/4's of a sheet of plywood. Shown are the 2 sides, the base, and the long thin pieces are reinforcements for the sides. I spent around $90 for all the parts needed to build this.

Next are the smaller parts. The shelf, a number of different sized "gussets"-used to help hold the side and the shelf vertical. Also, the shelf has a couple of pieces of plywood glued together with a T-nut that will be used to receive a threaded rod that will open and close the Troji. There are a couple of other supports too.

The first thing I did was to assemble 6 of the gusset pieces to form two assemblies that go at the bottom of one of the sides.

They were set 2" from the edge of that side at the bottom. I drew a line on the outside of the side to correspond with the thickness of the gussets and screwed them from the outside. The long side supports will hide most, if not all, the screws.

One of the parts split up near the top, so the picture shows some clamps on that part after I used CA glue on the split.
Next, the shelf was assembled.

You can see the hole on the shelf thru which the threaded rod will go. That support was made from 2 pieces of plywood glued together. I used a forstner bit to drill thru it. The T-nut is on the other side. I bought the wrong kind of T-nut. I wanted the kind that you hammer into the hole. But this one had two holes for screws, but there were no screws in the package. I found some, and used both the screws and some CA glue to hopefully bond it forever.

Here's the side complete.

For the other side, there's a hole near the middle of it where the threaded rod goes. There were 2 vertical and 2 horizontal supports, with one of the horizontal pieces having a hole in it for the handle rod to pass thru. I took care that both holes lined up, and glued and screwed (from the inside) that horizontal piece first. All of those pieces were glued, then I used screws from inside the side to further secure them.

Initially, I set the hinges flush with the bottom of the side, then read in the directions that they need to overhang the side by about 1/8" to allow the side to open a bit wider, and re-set them. It took my wife and me to get this mounted as 2 hands aren't enough. But it's on there now. Oh, also, the side has to be mounted where the rod will go straight thru and catch on the T-nut attached to the shelf. I missed that mark the first time, but after sliding the hinges down and over, got it perfect the 2nd time around.

Speaking of the handle. Here it is.

The directions called for a threaded rod (length to be determined when installed), 2 nuts, 2 regular washers and a larger washer, all to be connected to the handle. I probably could have worked with that, but I put two nuts together on either side of the handle so that they'd lock in place and stay.
My wife took charge of cutting the foam pieces to size, and I used double sided tape and 3M adhesive to secure them to the sides and shelf, completing the Troji. I'm guessing 6-8 good hours of work to do all this.
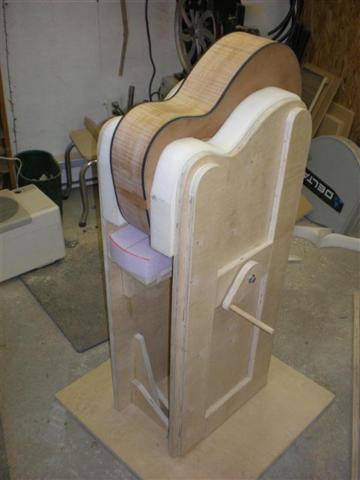
Here it is, completed:

I think I'll be pretty happy using this. There are several times where I need to work something on the sides, and this puts the guitar body at a good height and holds it securely.
Thanks for looking,
Bob
|