Official Luthiers Forum!
http://luthiersforum.com/forum/

The "Perfect" Mold
http://luthiersforum.com/forum/viewtopic.php?f=10122&t=20706
Page 1 of 1

Author:  000lover [ Tue Jan 27, 2009 10:57 am ]
Post subject:  The "Perfect" Mold

How vital is an absolutely perfect mold? I know if you have a Martin kit and want it to be exactly like the 000 or D size then you want the mold to be very close to the size desired. But is perfect symmetry on both sides vital to the structure/sound/etc?

Author:  Michael Dale Payne [ Tue Jan 27, 2009 11:03 am ]
Post subject:  Re: The "Perfect" Mold

000lover wrote:
How vital is an absolutely perfect mold? I know if you have a Martin kit and want it to be exactly like the 000 or D size then you want the mold to be very close to the size desired. But is perfect symmetry on both sides vital to the structure/sound/etc?


There are hundreds or more Asymmetric Designed guitars out there so symmetry is not critical but is a sign of craftsmanship if the design is intended to symmetrical.

Author:  000lover [ Tue Jan 27, 2009 11:48 am ]
Post subject:  Re: The "Perfect" Mold

I am asking because I made a mold this weekend and the sides are pretty symetrical. The thing I am worried about is that there are a few very small dips in a few places. I made it out of 3/4 inch plywood which next time I will not use. then I used a flush cut bit to match them to a template. The only problem is that the bearing made an impression on the template so some have dips in a few places. When all 3 pieces are glued together the overall surface area is fairly uniform but it is not perfect.

Author:  Michael Dale Payne [ Tue Jan 27, 2009 12:05 pm ]
Post subject:  Re: The "Perfect" Mold

take some bondo to the dips and smoth it out

Author:  000lover [ Tue Jan 27, 2009 6:05 pm ]
Post subject:  Re: The "Perfect" Mold

Charles,
I did the steps you mentioned w/the exception of gluing the plan to the plywood. I just traced it onto the wood.

Here are a few pictures of the mold.

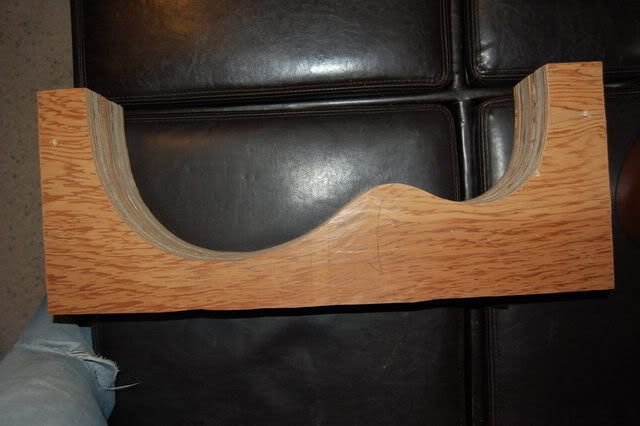
These 2 photos show that is it fairly symmetrical.
Image

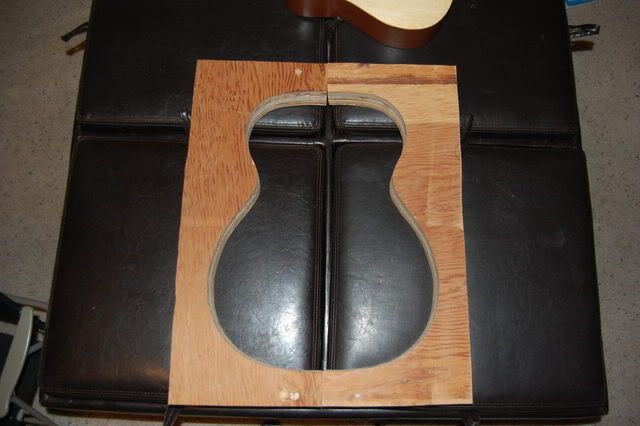
This is the 2nd pic with both sides stacked.
Image

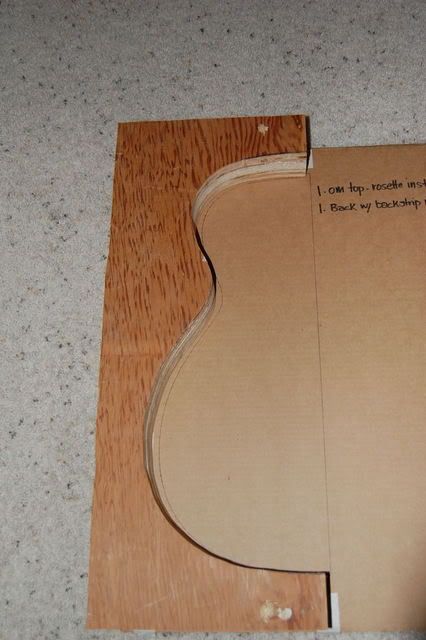
This shows the mold pulled away from the Martin supplied sketch a little to show that it is very close.
Image

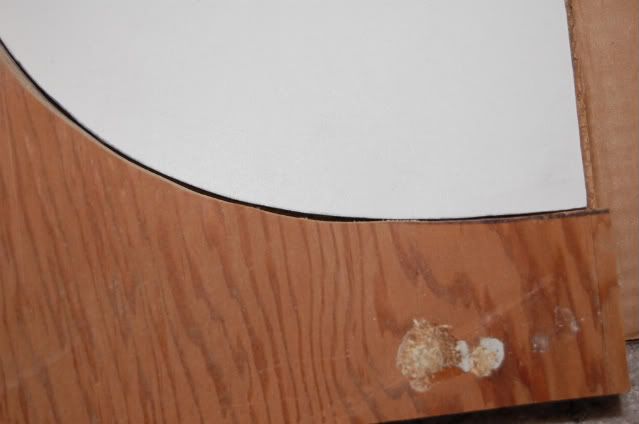
This is the type of waves that i am afraid of. You can see the white template against the mold and the dark area between shows the "wavy" area.

Image

Author:  Piiman [ Wed Jan 28, 2009 11:12 am ]
Post subject:  Re: The "Perfect" Mold

Sand out any incusions to the guitar side of your lines and as Michael said Use bondo to fill any wobbles to the outside of the line.

Author:  Steve Davis [ Sat Jan 31, 2009 4:07 pm ]
Post subject:  Re: The "Perfect" Mold

It is also a good idea to put a square a there and check the sides are perpendicular. The first one i made took me almost as long to fair as to cut! If you are going to use it more than once its worth it not to let errors start creeping in early

Author:  Stephen Boone [ Tue Feb 03, 2009 1:42 pm ]
Post subject:  Re: The "Perfect" Mold

While it is important to get the size of the mold as close as you can, I think that it is much more important to have all the curves be fair with no "humps". Even if you have to start all over (frustrating, I know) it will be better than having to fight with templates and molds that are not fair, square, and true. Accuracy now will pay off huge later.

Author:  Steve Walden [ Tue Feb 03, 2009 5:10 pm ]
Post subject:  Re: The "Perfect" Mold

And I thought this thread was about the wonderful cheeses made with mold........

Or, what is growing in houses after Ike sent 12 feet of water through the house......

Although I have not made one myself, I have seen a tutorial somewhere in the archives on making molds. The poster made one half mold of 3/4" ply perfect to the line and then used it as a pattern for router and a straight bit with a bearing. The maker just kept adding layer upon layer of plywood until the mold was the desired thickness and then flipped the pattern over and did the other half of the mold. I suppose you dont really have to flip it over...... until you are done.

So, as was stated before, bondo the parts past the line and get all the curves clean and use that one piece for a template.

Author:  Frei [ Thu Feb 05, 2009 12:53 am ]
Post subject:  Re: The "Perfect" Mold

To make equal sides, use just one side for a pattern. You trace with tracing paper to a card-stock, and use a single half for both sides.

Author:  enalnitram [ Thu Mar 26, 2009 12:36 pm ]
Post subject:  Re: The "Perfect" Mold

In the pictures portion of Allen St John's "Clapton's Guitar" book, there are what look like (insignificant) gaps in Wayne's OM mold ... but it is from a distance. they may be shadows.

just sayin'.

Author:  MRS [ Sun Apr 05, 2009 10:00 pm ]
Post subject:  Re: The "Perfect" Mold

If you have access to an oscilating drum sander use two long drywal screws and stack the two pieces like you did in the one photo and touch up the mold cutouts till everything is even if the Symmetry is important to you. But the most important thing is having all the curves smooth and even like someone mentioned. If you don't have access to the drum sander hand rasp and rounded surform rasp can be used.

Author:  Quine [ Wed May 06, 2009 1:07 pm ]
Post subject:  Re: The "Perfect" Mold

Geez...that looks pretty nit-picky to me. I might knock down that bump on the right side of the dip with a rasp just to avoid a dent in your side.
I think "mold" isn't really the correct term for these things anyway.....its an assembly fixture. Its just there to hold the sides in place and square for glueing stuff. If you don't have perfect contact all the way around the side its no big deal. I've seen construction methods that only hold the sides at a few points

Author:  matthewrust [ Sat May 09, 2009 10:28 pm ]
Post subject:  Re: The "Perfect" Mold

The most important thing is that the walls are perfectly 90 degrees to the top and bottom or the sides will "flare" out. A few dips and crevices aren't a huge deal. The StewMac kit is built with a simple waist mold. Think about how zig-zaggy the KMG adjustible mold would be if it were one piece instead of dowels for the sides...

Author:  Bailey [ Mon May 11, 2009 9:57 am ]
Post subject:  Re: The "Perfect" Mold

First time forum visit. Excited and scared!
Attempting my first kit. Bought Houser classical kit from LMI with sides bent, neck pre shaped and neck board frets cut. As a professional master woodcarver for 30+ years, and having carved musical instruments for about the same amount of time, I am already overwhelmed with what is looking at me from my cardboard kit box. The video included in the kit is informative BUT leaves me with too many questions.
I thinking I need a guitar building reference book before moving forward. I see many classical book options, but don't want to buy 4-5 books to find one that will satisfy my needs. Any suggestions?
I am also a classical PLAYER (not performer) for 40 years (old woodcarver stumps for fingers) and have the necessity of attempting to alter the hauser plans to a cutaway. With sides already bent, is it possible to cut the top of the one side and invert it to create a cutaway? I realize this would create be a non bent joint at the side...needing a backing to the joint/trim detail and a planned attachment to the neck that differs from a standard side attachment. Is this too deep a project alteration for my first attempt? Is there info. on making this conversion?
Bailey
www.kabart.com

Author:  Pat Foster [ Tue May 12, 2009 12:17 pm ]
Post subject:  Re: The "Perfect" Mold

Welcome, Kent.

I think you'll get more responses if you start a new thread.

Pat

Author:  Pat Foster [ Tue May 12, 2009 12:33 pm ]
Post subject:  Re: The "Perfect" Mold

000lover,

I think 3/4" ply is fine for molds. I used to use birch from HD, but the quality tanked the last few years, with poor adhesion in the layers and voids. Baltic birch is OK, as is MDF. I use two layers of 3/4" ply, with a 3/4" spacer between them to get a 2.25 total thickness without a lot of weight.

Attachment:
l5.jpg


If your sides are bent well, then a few minor dips should be OK, but as Michael said, you could fill them with bondo. I reshaped a mold by bending and gluing in layers of 1/8" birch ply and tapering the edges on a sanding drum, so that's a possibility if needed.

One area where symmetry is important is the neck block area. A slight curve there is good, to avoid the flat look, but the two sides must be symmetrical to avoid neck alignment headaches later. Making sure the sides are perpendicular here is also a good thing. Taking care of these kinds of details early on will make the rest of the project go more smoothly and give a cleaner result.

Pat

Author:  Fred Tellier [ Sat Oct 03, 2009 10:27 am ]
Post subject:  Re: The "Perfect" Mold

My molds though not perfect as compared to tool room accuracy are are easy to make. I make an accurate 1/2 guitar outline pattern from 1/4" MDF or plywood. I then trace this 1/8" or so oversize using a washer as a pencil guide 8 times on 3/4" plywood and cut out. The pattern is screwed on to a ply piece making sure to leave a little excess stock to rout off and using a bearing pattern bit I rout to the template using my router table. This is repeated a second time and now I have two halves of the mold. All that remains is to glue and screw the next piece of each half onto the 1st pieces and using 1st as a pattern again rout with the pattern bit. This is repeated until I have the 4 pieces of each mold half joined and shaped. As long as the router is square to the table you have 2 half of a more than accurate mold. If you plan for the final outside shape on your pattern the mold can be made lighter by removing excess wood on the outside. A couple coats of shellac or varnish will protect the mold from moisture. All that remains is a method of joining the halves together with enough keying to make it repeatable to open and close the mold.

I made my 1st mold from expensive birch ply without removing extra wood from the outside and found it way too heavy.
I now use cheaper plywood which is way lighter and trim the outside. I have so far made a 000 14 fret, 000 12 fret, Dreadnought and small jumbo molds and they have all produced more than acceptable results.

Fred

Author:  Jeff Highland [ Sun Oct 11, 2009 10:30 pm ]
Post subject:  Re: The "Perfect" Mold

If you do accidentally get too big on your mold, you can also just plane or sand back the mating faces to tighten it up.

Page 1 of 1 All times are UTC - 5 hours
Powered by phpBB® Forum Software © phpBB Group
http://www.phpbb.com/