Official Luthiers Forum!

Owned and operated by Lance Kragenbrink
It is currently Sat Jun 15, 2024 10:24 pm


All times are UTC - 5 hours


Forum rules


Be nice, no cussin and enjoy!


Post new topic Reply to topic  [ 23 posts ] 
Author Message
 Post subject: 12 string jumbo plans???
PostPosted: Sat Nov 22, 2008 11:03 pm 
Offline
Walnut
Walnut

Joined: Thu Oct 16, 2008 10:22 pm
Posts: 19
Does anyone know were I can get a good set of 12 string jumbo plans? I played a larrivee jumbo mahogany years ago and would love to build a guitar like it. Ive looked around and havent been able to find anything as far as jumbo plans go.
Thanks in advance.
This is a amazing site, so much great info and amazing luthiers here. I spend hours just reading and learning. [:Y:]


Top
 Profile  
 
PostPosted: Sun Nov 23, 2008 8:55 am 
Offline
Brazilian Rosewood
Brazilian Rosewood

Joined: Tue Nov 29, 2005 11:44 am
Posts: 2186
Location: Newark, DE
First name: Jim
Last Name: Kirby
Focus: Build
Status: Amateur
tubeman426 wrote:
Does anyone know were I can get a good set of 12 string jumbo plans? I played a larrivee jumbo mahogany years ago and would love to build a guitar like it. Ive looked around and havent been able to find anything as far as jumbo plans go.
Thanks in advance.
This is a amazing site, so much great info and amazing luthiers here. I spend hours just reading and learning. [:Y:]


Hi tubeman,

Let us know your name.

I like jumbo 12's too - mine is a Guild 412.

LMI (sponsor link above) sells a J-200 style plan, which I haven't seen. There really isn't much different with a 12 other than size of the neck cross section and width (and add more stiffening). The internal bracing pattern is the same, just go higher on width and height than you would go for a 6 string. Someone who has done this may want to be more specific here with these numbers - I'd probably just add a 1/16" to everything, or possibly 1/8" taller on the X. Some people also recommend adding a little brace behind the bridge plate, connecting the two legs of the X.

Jim

_________________
Jim Kirby
kirby@udel.edu


Top
 Profile  
 
PostPosted: Mon Nov 24, 2008 4:48 pm 
Offline
Koa
Koa

Joined: Sun Feb 26, 2006 10:21 pm
Posts: 1055
Location: Australia
My latest build is a 12 string dreadie which was based on a 6 string plan. With the bracing I increased height a bit but kept width the same and added a third tone bar. I didnt add a brace behind the bridge plate but it wouldnt hurt to do this.

Cheers Martin


Jim Kirby wrote:

LMI (sponsor link above) sells a J-200 style plan, which I haven't seen. There really isn't much different with a 12 other than size of the neck cross section and width (and add more stiffening). The internal bracing pattern is the same, just go higher on width and height than you would go for a 6 string. Someone who has done this may want to be more specific here with these numbers - I'd probably just add a 1/16" to everything, or possibly 1/8" taller on the X. Some people also recommend adding a little brace behind the bridge plate, connecting the two legs of the X.

Jim


Top
 Profile  
 
PostPosted: Mon Nov 24, 2008 5:52 pm 
Offline
Old Growth Brazilian

Joined: Tue Dec 28, 2004 1:56 am
Posts: 10707
Location: United States
On dreadnought and MJ 12's I increase the X brace to 3/8" thick and open the angle a bit. I increase the tone bars to 5/16" and I change the spread on them a bit. My necks profile doe not change orther than width, 1 13/16" at the nut and 2 3/8" at the 14th. I make my pre- braces top thickness .125-.135 Most end up thined to .115 or so around the rim. no change on the sides and back.

I don't build a jumbo per say but if I did I would do the same thing.


Top
 Profile  
 
PostPosted: Mon Nov 24, 2008 6:20 pm 
Offline
Cocobolo
Cocobolo
User avatar

Joined: Sat Feb 02, 2008 8:23 pm
Posts: 191
Location: West Scotland
hi Michael
I maybe thinking of a 12 string in the new year based on the Lowden “O” model, ball park “MJ” dimensions.
Thank you for posting your measurements.
One question though, would you have a degree measurement for the X spread?.
Oh no it’s turned into two questions, where (distance) would you suggest the centre of the X be in relationship to the centre of the saddle.
best wishes
Geordie

_________________
some tunes on acoustic and guitar synth.
http://www.youtube.com/user/TheGeordieAdams
http://www.myspace.com/geordieadams


Top
 Profile  
 
PostPosted: Mon Nov 24, 2008 6:21 pm 
Offline
Brazilian Rosewood
Brazilian Rosewood
User avatar

Joined: Mon Dec 27, 2004 3:50 pm
Posts: 4662
Location: Napa, CA
I'm currently building a 12 Fret, 12 String slope shouldered Dred. The consensus on the research is to increase the X Brace to 5/8" high and 5/16" wide. All the rest of the braces are 1/4". I also have a brace behind a slightly wider bridge plate. Time will tell.

Remember...this one is in progress...no long term data on tone vs. implosion! Eat Drink

_________________
JJ
Napa, CA
http://www.DonohueGuitars.com


Top
 Profile  
 
PostPosted: Mon Nov 24, 2008 6:46 pm 
Offline
Brazilian Rosewood
Brazilian Rosewood
User avatar

Joined: Mon Dec 27, 2004 3:50 pm
Posts: 4662
Location: Napa, CA
I'm currently building a 12 Fret, 12 String slope shouldered Dred. The consensus on the research is to increase the X Brace to 5/8" high and 5/16" wide. All the rest of the braces are 1/4". I also have a brace behind a slightly wider bridge plate. Time will tell.

Remember...this one is in progress...no long term data on tone vs. implosion! Eat Drink

_________________
JJ
Napa, CA
http://www.DonohueGuitars.com


Top
 Profile  
 
PostPosted: Mon Nov 24, 2008 10:12 pm 
Offline
Walnut
Walnut

Joined: Thu Oct 16, 2008 10:22 pm
Posts: 19
Thank you guys for all the responces so far, lots of good advice. I think I might get the olf mj plan from stewmac and widen the neck and brace as you people have suggested. Now I just got to decide if I want to use mahogany or maple for the back and sides.
Thanks again,
Terry...


Top
 Profile  
 
PostPosted: Tue Nov 25, 2008 11:13 am 
Offline
Cocobolo
Cocobolo
User avatar

Joined: Sat Feb 02, 2008 8:23 pm
Posts: 191
Location: West Scotland
hi Terry
Comeing form a players perspective put simply there are two kinds of 12 string guitars - ones for struming and ones for finger picking.
Wood and acoustic model choice is very import in achiveing your required sound also -
The thing that gives the 12 string that high end “Sparkle” is the very thing that can be it’s downfall when it comes to more complex picking and arrangements.
I have a very “lively” cedar / mahogany 12 st.
Strummed, it can fill an accompaniment to voice or other instruments - BUT - finger picked, it ends up sounding like a barrel organ - individual notes get lost and as often as not the “bottom” (EADG) four strings octave notes are sometimes higher than the melody notes you would want to be prominent.
Are you with me so far ?
My solution -
I have changed the position of the four lower octave strings(wound ones) to the bass side. (nearer your head)
I finger pick (with a thumb pick) and have what people have tactfully described on this forum as a “robust” right hand and drive the strings/sound board as hard as a flatpickin plectrum player. In doing so a lot or most of the energy of the thumb picked notes was more prominent i.e. the higher octave bottom four strings were getting most of the energy of the thumb picks stroke so I swapped the bottom four strings pairs around. All that's required is a nut cut to suite.
Hope this all makes sense and is of help.
yours Geordie

_________________
some tunes on acoustic and guitar synth.
http://www.youtube.com/user/TheGeordieAdams
http://www.myspace.com/geordieadams


Top
 Profile  
 
PostPosted: Tue Nov 25, 2008 12:08 pm 
Offline
Old Growth Brazilian

Joined: Tue Dec 28, 2004 1:56 am
Posts: 10707
Location: United States
Geordie Adams wrote:
hi Michael
I maybe thinking of a 12 string in the new year based on the Lowden “O” model, ball park “MJ” dimensions.
Thank you for posting your measurements.
One question though, would you have a degree measurement for the X spread?.
Oh no it’s turned into two questions, where (distance) would you suggest the centre of the X be in relationship to the centre of the saddle.
best wishes
Geordie


On my MJ IE "the OLF-MJ"
(20 long, 16 1/4" LB, 12 1/16 UB, 9 3/8" between waist valleys. And by the way, readily available at Stewart MacDonalds for a more than fair price that helps support this forum :D )

I open the X spread to 88 degrees this is only to acomodated a wider 12 string bridge. Nut width neck tapper, scale length wil play a role here. On my MJ the center of the X would stay at 1 3/4" from the leading edge of the saddle at the centerline.


Top
 Profile  
 
PostPosted: Tue Nov 25, 2008 1:55 pm 
Offline
Cocobolo
Cocobolo
User avatar

Joined: Sat Feb 02, 2008 8:23 pm
Posts: 191
Location: West Scotland
Thanks Michael
very gracious of you in sharing your knowledge.
there we go Terry all we need to build a stormer, keep uz posted.
best wishes
Geordie

_________________
some tunes on acoustic and guitar synth.
http://www.youtube.com/user/TheGeordieAdams
http://www.myspace.com/geordieadams


Top
 Profile  
 
PostPosted: Wed Nov 26, 2008 6:51 pm 
Offline
Koa
Koa
User avatar

Joined: Sun Jun 12, 2005 11:46 am
Posts: 720
Location: Australia
G'day Tubeman,

I'm a little late to this thread , but have a few 12 string suggestions you may want to consider as options.

Firstly here is a pic. of my bracing layout . This isn't a jumbo but does have a 16 ' lower bout ,so I'm thinking the layout would be much the same. 5/16 " crossbraces @ 90 degree , a little taller than 5/8 " . The lower tone bars 1/4 " X 1/2 "except for the third one which I carved down to around 7/32 X 7/32 , all tapered parabolic .
Note the tonebar closest to the bridge . This ends very close to the lower crossbrace at the perimeter , bringing more support to the rear of the bridgepatch area . The bridge patch itself is thicker than normal @ .12 " and a larger footprint than 6 stringers.
I've also included a substantial A-Frame setup to help cope with the additional neck strain . These braces are 5/16 " X 1/2 ". . At this size they ,and the upper transverse need to be notched into each other , much like you would do the
crossbraces. The finger braces are 9/32 , but carved away to very little by the time I've finished with the chisel .

Attachment:
boat71.JPG


Attachment:
boat41.jpg


I chose Englemann for the soundboard for it's tonal characteristics . Because it's Englemann ,I left it at .137 " but thinned it a heap around the lowerbout perimeter . Down to around .08 at the tail .

I made this a thirteen fret to the body to not only reduce neck leverage , but also place the bridge a little further down the lower bout capturing a little more bass response to overcome some of the slightly heavier bracing .
I also made it a 24.9 " scale . This also reduces the leverage affect on the neck a tad , but more importantly helps playability with the wider neck I.M.O.
Width at the nut is 1 15/16 " . Just a bit wider than most , but gives a noticeable amount of extra room between courses . Better for finger style as well .

The neck has two C.F. 1/8' X 3/8 " rods as well as an L.M.I. two way rod. It's a complete bolt down including the fretboard extension.

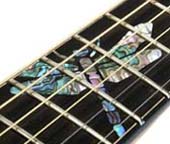
The bridge sports a 6 pin shared hole arrangement . After speaking with both Howard Klepper and Dave White , I was encouraged enough to give this design a go and happy that I did. There are a number of advantages . Lighter weight by way of 6 less pins and a smaller overall bridge , although I made it with a slightly bigger footprint than a six stringer . No congestion
around the pins . It also allows room for a wider saddle . This , I made 3/16 " to allow me to intonate each string individually . I
definatley recommend this feature . Such a big difference to play
a 12 string ( in tune ! ) up the neck .

I prepared a lengthy tutorial on how to go about a shared pin bridge with fully compensated saddle , on our Australian forum . I'll see if I can give you a link.
Here's a couple of pics :


Attachment:
zed41.jpg


Attachment:
anz201.jpg


Stewmac's oversize Ebony pins are used with the shared pin method. Looking inside ;

Attachment:
zzas11.jpg


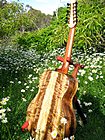
The end result is a much better 12 stringer than I have ever played , both playability and tone wise . I was very fortunate to have received such a wonderful ( Myrtle ) back and sides set from L.M.I . Such a beautiful set , they have featured this guitar in their latest catalogue , ,,, here's a view any way :D

Attachment:
lmis291.jpg


Hoping all this info helps and gives you a lot to consider

Cheers,


You do not have the required permissions to view the files attached to this post.

_________________
CRAIG LAWRENCE of AUSTRALIA
_____________________________________________


Top
 Profile  
 
PostPosted: Wed Nov 26, 2008 7:17 pm 
Offline
Koa
Koa
User avatar

Joined: Sun Jun 12, 2005 11:46 am
Posts: 720
Location: Australia
G'day again Tubeman :D

Here is the link I mentioned earlier on my tutorial on a shared pin and fully compensated saddle , bridge design

http://www.anzlf.com/viewtopic.php?t=354

I should also have mentioned I installed Gotoh mini tuners , and to save weight even further, bought the Ebony replacement buttons. This, as well a thirteen fretter @ 24.9 " scale to combat the heavy neck syndrome. This worked well and has a good weight balance.

Attachment:
zed51.jpg


.


You do not have the required permissions to view the files attached to this post.

_________________
CRAIG LAWRENCE of AUSTRALIA
_____________________________________________


Top
 Profile  
 
PostPosted: Wed Nov 26, 2008 7:56 pm 
Offline
Contributing Member
Contributing Member
User avatar

Joined: Mon Mar 19, 2007 7:05 am
Posts: 9191
Location: United States
First name: Waddy
Last Name: Thomson
City: Charlotte
State: NC
Focus: Build
Status: Semi-pro
Craig, that is just beautiful! Words can't describe! [clap] [clap] [clap] [clap] [clap] [clap]

_________________
Waddy

Photobucket Build Album Library

Sound Clips of most of my guitars


Top
 Profile  
 
PostPosted: Wed Nov 26, 2008 8:56 pm 
Offline
Contributing Member
Contributing Member
User avatar

Joined: Sat Jul 28, 2007 1:03 pm
Posts: 724
Location: NE Oklahoma, United States
First name: Steve
Last Name: Walden
City: Bartlesville
State: Oklahoma
Zip/Postal Code: 74006
Country: USA
Focus: Build
Status: Amateur
WaddyThomson wrote:
Craig, that is just beautiful! Words can't describe! [clap] [clap] [clap] [clap] [clap] [clap]

I could not agree more. That is a gorgeous guitar. [:Y:] [:Y:] [clap] [clap] [clap] [clap]

What did you lam on the underside of the peg head?

_________________
Steve Walden
Aspiring Builder,
Bartlesville, OK


Top
 Profile  
 
PostPosted: Wed Nov 26, 2008 10:23 pm 
Offline
Walnut
Walnut

Joined: Thu Oct 16, 2008 10:22 pm
Posts: 19
Craig, that guitar looks great. I like the six pin bridge simple and looks sharp. Thanks for the link, its nice to have the info to make a twelve string compensated saddle, I wonderd how to do that, it will save me a lot of trial and error. Nice pictures of your bracing, you did a real nice job.
You guys have been so much help, a lot of good ideas.
Thanks so much...
Terry...


Top
 Profile  
 
PostPosted: Thu Nov 27, 2008 7:38 am 
Offline
Koa
Koa
User avatar

Joined: Sun Jun 12, 2005 11:46 am
Posts: 720
Location: Australia
Terry, The above link I gave you covers string spacing calculations ,bridge slotting, stringing -up tips etc. I have covered saddle compensation in another thread ,started by another Aussie forum member . The subject is 12 string compensation . I made a couple of posts ( under the user name '" Craig " ) explaining how I go about it along with a couple of diagrams .
http://www.anzlf.com/viewtopic.php?t=890

Appreciate your comments Waddy, Steve and Terry. The guitar has another little feature you may enjoy. I inlayed a Puau Kiwi into the headblock ,viewable through the soundport. Apologies to those who have already seen this pic

Attachment:
pro41.jpg


The purfling around the fretboard , bridge etc . is Ivory . Couldn't bring myself to use plastic and I thought a light coloured wood like Maple would only get grubby looking on a fretboard over time . The off white colour of the Ivory suited the other elements of the guitar .

Terry , if I can be of further help , give us a yell [:Y:]

Cheers,


You do not have the required permissions to view the files attached to this post.

_________________
CRAIG LAWRENCE of AUSTRALIA
_____________________________________________


Top
 Profile  
 
PostPosted: Thu Nov 27, 2008 8:17 am 
Offline
Contributing Member
Contributing Member
User avatar

Joined: Fri Sep 09, 2005 7:51 am
Posts: 3786
Location: Canada
Quite possibly the nicest 12 I have ever seen .. that is VERY nice. Bravo [clap]

_________________
Tony Karol
www.karol-guitars.com
"let my passion .. fulfill yours"


Top
 Profile  
 
PostPosted: Thu Nov 27, 2008 10:18 am 
Offline
Walnut
Walnut

Joined: Tue May 06, 2008 9:37 am
Posts: 21
Country: United States
Focus: Build
Status: Amateur
Craig,

Thanks very much for sharing all the info & pics on your 12 string. It is absolutely stunning.

I'm curious about your A-frame support in the upper bout and the 6 pin bridge you used. For the A-frame, are its upper legs in-let into the neck block or secured to the block in any other way? I see they're notched into the UTB, but I was curious whether or not you secured the upper 2 legs to the neck block somehow.

You mentioned that you made your bridge plate .12" thick. With your 6 pin design, have you noticed any problems with the bridge plate given that you have two string ends tugging up on each pin hole?

Thanks again for sharing.

John


Top
 Profile  
 
PostPosted: Thu Nov 27, 2008 5:21 pm 
Offline
Koa
Koa
User avatar

Joined: Sun Jun 12, 2005 11:46 am
Posts: 720
Location: Australia
John Buckley wrote:
Craig,

Thanks very much for sharing all the info & pics on your 12 string. It is absolutely stunning.

I'm curious about your A-frame support in the upper bout and the 6 pin bridge you used. For the A-frame, are its upper legs in-let into the neck block or secured to the block in any other way? I see they're notched into the UTB, but I was curious whether or not you secured the upper 2 legs to the neck block somehow.

You mentioned that you made your bridge plate .12" thick. With your 6 pin design, have you noticed any problems with the bridge plate given that you have two string ends tugging up on each pin hole?

Thanks again for sharing.

John


Cheers for that Tony and John.

I first got the A-Frame idea from George Lowden whome I think originated it , but there has been some argument about that . No matter !
Mine are of bigger dimensions than other builders use . 1/4 " X 1/4 "seems quite popular and eliminates having to notch both the Upper Transverse AND the A-Frame braces . Simplifies the whole deal , but I believe this A-Frame set up has got quite a heavy duy task and requires larger dimensions , especially in the longer term . Mine are 5/16 " X 1/2 " tall where they notch to the Transverse , but chiselled to a parabolic type shape around the soundhole.

Yes John , The end of these braces are let into the headblock with a stopped end ( eliminating long term 'creep'.) This is a very important part of the design.Not that easy to have everything line up I'll admit ,but that's life ! :D Soundboard locating pins ( Tail and headblock area ) are most helpful here . I've found marking out the headblock pockets after you have the A-Frame braces glued to the soundboard , works out best. A picture being worth a thousand words " , I'll see what I can muster.:


You do not have the required permissions to view the files attached to this post.

_________________
CRAIG LAWRENCE of AUSTRALIA
_____________________________________________


Top
 Profile  
 
PostPosted: Thu Nov 27, 2008 5:46 pm 
Offline
Old Growth Brazilian Rosewood
User avatar

Joined: Fri Nov 02, 2007 9:49 am
Posts: 13208
Location: Ann Arbor, Michigan
First name: Hesh
Last Name: Breakstone
City: Ann Arbor
State: Michigan
Country: United States
Status: Professional
TonyKarol wrote:
Quite possibly the nicest 12 I have ever seen .. that is VERY nice. Bravo [clap]


I agree - WOW!!!! Beautiful craftsmanship Craig my friend!!! [:Y:] [:Y:] [clap] [clap] [clap] [clap] [clap] [clap] [clap] [clap] [clap] [clap] [clap] [clap] This qualifies as 2 guitars...... :D

_________________
Ann Arbor Guitars


Top
 Profile  
 
PostPosted: Thu Nov 27, 2008 5:48 pm 
Offline
Koa
Koa
User avatar

Joined: Sun Jun 12, 2005 11:46 am
Posts: 720
Location: Australia
Sorry , I've had to make two posts to answer your questions John. The picture upload feature here sucks a bit . First job for Hesh to undertake ( I hope :D !! )
Here are the braces in place; The Mahogany piece between the headblock and Transverse is for a bolt down fretboard extension ( holes not drilled at that stage

Attachment:
boat31.jpg


I had the same concerns with the bridge plate John and had visions of laminating a bone or Ivory strip to the face of the patch. In the end I didn't bother and the patch appears to be holding up with no problems so far . Dave and Howard have had their system in place longer than mine . Last I checked , they too had no problem , although a laminated plate couldn't hurt . The shared pin method isn't new. I have a picture of an instrument which goes back to around 1908. The .12 " ( 3 mm. ) patch thickness is advisable , but I would use the same thickness even if it were for a 12 pinner.

If any of the folk here are considering the shared pin ,I strongly recommend you read my tutorial ( link on a previous post above )
I'd consider this to be important !

Thanks Hesh ,,err,,,, I mean Boss ( suck suck :lol: ) By the way , Congratulations mate [:Y:] Now have a look at the picture upload function ! . Lets see what you're made of ! :D


You do not have the required permissions to view the files attached to this post.

_________________
CRAIG LAWRENCE of AUSTRALIA
_____________________________________________


Top
 Profile  
 
PostPosted: Thu Nov 27, 2008 9:23 pm 
Offline
Walnut
Walnut

Joined: Tue May 06, 2008 9:37 am
Posts: 21
Country: United States
Focus: Build
Status: Amateur
Craig---thanks very much for your responses and for the A-frame pics. I really like the way you approached the upper bout design. And, your craftsmanship is really amazing!

Regards,

John


Top
 Profile  
 
Display posts from previous:  Sort by  
Post new topic Reply to topic  [ 23 posts ] 

All times are UTC - 5 hours


Who is online

Users browsing this forum: joe white and 37 guests


You cannot post new topics in this forum
You cannot reply to topics in this forum
You cannot edit your posts in this forum
You cannot delete your posts in this forum
You cannot post attachments in this forum

Jump to:  
Powered by phpBB® Forum Software © phpBB Group
phpBB customization services by 2by2host.com