Official Luthiers Forum!

Owned and operated by Lance Kragenbrink
It is currently Wed May 22, 2024 11:54 pm


All times are UTC - 5 hours


Forum rules


Be nice, no cussin and enjoy!


Post new topic Reply to topic  [ 17 posts ] 
Author Message
PostPosted: Fri Dec 12, 2008 9:09 am 
Offline
Contributing Member
Contributing Member

Joined: Sun Oct 05, 2008 8:50 pm
Posts: 239
I don't know how it happened but there ended up being a very small gash in the Engelman top on a current build (for myself). It's too deep to sand out. I'm getting it ready for finish. What have you folks done to fill stuff like this? Sawdust and thin superglue? Straight medium viscosity super-glue? transparent pore filler? What would be the most un-noticeable option? Thanks, Peter


Top
 Profile  
 
PostPosted: Fri Dec 12, 2008 9:25 am 
Offline
Contributing Member
Contributing Member
User avatar

Joined: Sat May 17, 2008 1:11 pm
Posts: 2350
Location: Spokane, Washington
First name: Pat
Last Name: Foster
Country: USA
Focus: Build
Status: Semi-pro
A picture would really help.

Don't use CA. It will discolor the wood. I've had some success gluing in a splinter from cutoff of the same top with hot hide glue. Shape the splinter like the bottom of the gash as closely as possible. Match up the runout and it could end up invisible. Clamp carefully with a caul like a piece of acrylic.

Frank Ford's web site at frets.com has a blurb about something similar.

Pat

_________________
formerly known around here as burbank
_________________

http://www.patfosterguitars.com


Top
 Profile  
 
PostPosted: Fri Dec 12, 2008 9:30 am 
Offline
Brazilian Rosewood
Brazilian Rosewood
User avatar

Joined: Thu Mar 22, 2007 10:59 pm
Posts: 2103
Location: Bucharest, Romania
Country: Romania
Focus: Build
Status: Professional
Is it cut / ripped fibers, or an indentation? I hope the latter. If so, you should steam it. It's quite easy. I use a cheap chisel and a piece of damp cotton tshirt cloth. Heat the chisel tip on a stove, then place a corner of the damp cloth over the dent and then touch it with the chisel bevel. Don't push, just lay it over neatly. In less than 1 second you will see steam rising, remove the chisel quickly, see how it worked. Repeat again if it needs more. After you sand this a little, it will be invisible.

_________________
Build log


Top
 Profile  
 
PostPosted: Fri Dec 12, 2008 9:41 am 
Offline
Old Growth Brazilian

Joined: Tue Dec 28, 2004 1:56 am
Posts: 10707
Location: United States
Like others have said if it is a deep extended dent as in the wood has been compressed not sliced then steam it out. if it is a slice with the grain then you treat it like a long grain crack and glue in a long grain tapered splint from drops off the top. Once the glue is cured you can scrape level and it will be near invisible. Cross grain slice is a whole other ball game.


Top
 Profile  
 
PostPosted: Fri Dec 12, 2008 10:01 am 
Offline
Contributing Member
Contributing Member

Joined: Sun Oct 05, 2008 8:50 pm
Posts: 239
Unfortunately, it's a short sort of deep cross grain gash. Probably the corner of a thin ruler hit it... It's only about an 1/8" long and very narrow. It is a gash though, not a dent.


Top
 Profile  
 
PostPosted: Fri Dec 12, 2008 10:03 am 
Offline
Contributing Member
Contributing Member

Joined: Fri May 09, 2008 2:25 pm
Posts: 1956
First name: George
City: Seattle
State: WA
Country: USA
Focus: Build
Status: Amateur
I had the same problem. Fumbled a clamp and--bam--a dent and a tear in my top. I steamed the dent until it raised up a bit and then followed the splinter repair method as outlined on Frets.com. (Basically what has been described above, only with pictures, etc.) My handiwork is not invisible, but most people don't notice the scar unless I point it out. It was my first foray into the use of hide glue and the glue is indeed invisible.
Good luck,
George :-)

_________________
George :-)


Top
 Profile  
 
PostPosted: Fri Dec 12, 2008 10:19 am 
Offline
Brazilian Rosewood
Brazilian Rosewood
User avatar

Joined: Thu Mar 22, 2007 10:59 pm
Posts: 2103
Location: Bucharest, Romania
Country: Romania
Focus: Build
Status: Professional
gaah sorry sounds like no easy way-out, but maybe do try to steam some of it out first. Maybe it will help some.

_________________
Build log


Top
 Profile  
 
PostPosted: Fri Dec 12, 2008 10:31 am 
Offline
Contributing Member
Contributing Member

Joined: Sun Oct 05, 2008 8:50 pm
Posts: 239
Thanks everybody.. I guess it's time to fire up the glue pot...


Top
 Profile  
 
PostPosted: Fri Dec 12, 2008 11:13 am 
Offline
Koa
Koa
User avatar

Joined: Tue Sep 30, 2008 8:57 am
Posts: 544
Location: Auchtermuchty, Fife, Scotland
Focus: Build
Status: Amateur
Uhm feel for you... I dinged teh top of my first build within about 15 minutes of having it finished..... :cry:

But it happens eventually anyway... so as its for you, I would take a deep breath and consider it the first ding of the new guitar.... and tell everyone its a relic....sorry.


Top
 Profile  
 
PostPosted: Fri Dec 12, 2008 12:03 pm 
Offline
Cocobolo
Cocobolo

Joined: Fri Feb 10, 2006 7:32 am
Posts: 104
Location: Palo Alto, CA US
I'm also currently pondering a small indentation on the soundboard of the OLF SJ I'm
almost done with.

Does anyone have experience using the LMI "Second Chance Dent Filler" product?
Its designed to be used for just this purpose.

I recently purchased a set, but haven't used it. You get 6 small bottles labelled:
Spruce -1, 0, +1 and Cedar -1, 0, +1. The three Spruce bottles range in tone
as do the darker colored Cedar bottles. You're supposed to blend tones to get a
good color match.

I've experimented a bit on scrap, but haven't been able to get a good match yet.

I also worry about the dent filler showing up as the top changes color over time
after finishing.

Eric


Top
 Profile  
 
PostPosted: Fri Dec 12, 2008 12:42 pm 
Offline
Old Growth Brazilian

Joined: Tue Dec 28, 2004 1:56 am
Posts: 10707
Location: United States
I have never used it but I will tell you it will be visible. If dealing with a dent then stem the dent out. It may take a few attemps but most dents wil rise enough to sand out.


Top
 Profile  
 
PostPosted: Fri Dec 12, 2008 9:25 pm 
Offline
Contributing Member
Contributing Member
User avatar

Joined: Fri Nov 11, 2005 3:32 am
Posts: 2683
Location: Ithaca, New York, United States
If you really want to try to make it disappear, what I would suggest is taking a cut-off piece of the same top and experimenting. Try making several similar cuts/dings and then try several methods of fixing them and see what works best. If it were me, and I wanted to make it disappear, and steaming it out didn't work, the first thing I'd do is take a small gouge and carve out the damage. That cross grain cut is going to show as long as it exists, so you have to surgically remove it. After that, you've got several options - fill it with a sliver of spruce, fill it with thickened super-blond shellac (let a small amount sit out in a little cup until it evaporates to a honey thickness; this may not work well on Englemann due to the amber color of the thickened shellac, but it's worth trying on scrap), seal it well with shellac and fill it with medium viscosity super glue (possibly the best option), fill it with something else that's clear (like thickened nitro or that dental cavity stuff), maybe other possibilities...

If you experiment with filling it with spruce sawdust and some sort of adhesive/binder, you will find that that will not work well. But try it on scrap anyway just to see what happens.

If you carefully gouge out the injury, then sand it so it's a smooth depression, and successfully fill it with something clear, it will be virtually invisible under finish (as long as the filler doesn't sink). It will be very difficult or impossible to tell that there is actually a small depression in the wood under the level, glossy surface you will have once the finish is on. If you're in doubt about whether your choice of filler will sink, then wait a long time before finishing and fill it again if it has sunk.

The key here is to experiment on scrap first! Be patient, and I'll bet you can make it disappear if you really want to.

_________________
Todd Rose
Ithaca, NY

https://www.dreamingrosesecobnb.com/todds-art-music

https://www.facebook.com/ToddRoseGuitars/


Top
 Profile  
 
PostPosted: Fri Dec 12, 2008 9:57 pm 
Offline
Brazilian Rosewood
Brazilian Rosewood

Joined: Sat Jan 15, 2005 12:50 pm
Posts: 3885
Location: United States
There are a couple of ways to patch something that extends sideways for a few grain lines. It's darn near impossible to get 'invisible', but you can often get 'close'. The key is to avoid as much as possible cutting across the grain: make your cuts at a long angle along the grain. If you have a cuttoff from the top it is a whole lot easier. It's also a lot easier if you can end one part of the patch against an edge, like the shoulder or the rosette or even under the bridge.

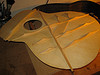
If you do have a cuttoff from the top find the section that matches the grain in the damaged area exactly. There will be one on either side of the center joint, but one of them will have the wrong runnout, so be careful. If you can find one cut a piece that looks like a football, or half of one if you've got an edge. The longer and narrower the better, but stay within reason. Try to get the point to be right on a grain line. Once you've got that lay it down on the top, cut around it with the sharpest knife you've ever had, and ground out the area of the top a millimeter or so deep. Make the knife cut vertical, or just a little off, but not too much. The more angle to the knife cut the more the glue line will show. Make the patch tight when you dry fit it. Glue the patch is with HHG or Titebond: the hide glue will probably work better. The idea here is that the grain lines and runnout will match if you've been careful, the glue lines will be at an angle along the grain and won't show up too badly, and the water based glue will shrink and make the glue lines even less obtrusive. Of course, with a tight fitting patch you have to be quick once you put the glue dwn, so that things won't swell and lock up before you can get it in.

If you haven't got a cuttoff that will work, you can make a 'finger' patch. Find a piece of wide grained wood with the same runnout. Cut along the reed on one grain line on the edge of the damaged area, making an end cut across the grain at a steep angle into the damage. Then cut along the grain again to outline the first patch piece. Cut a piece of the patch material that only has soft earlywood in it, making sure you match the runnout and annual ring line angle (so the medullary ray pattern will look right), and fit it tightly into the cavity. Glue that in, and when it dries fit the next one. Start on the first grain line of the top in the good area and cut along the patch piece following that grain line. Then make an angled end for that piece into the damaged area for the next piece, but make sure it's in a somewhat different place than the end of the first piece. The idea is that the glue lines will look like grain lines when you get done, and the places where you had to cut across the grain at an angle will be tight, and in different places, so they won't be as noticable.

It's possible to get these sorts of patches to 'go away', or nearly so, but it takes a lot of practice. It's been a while since I've done much of this, and lately I've been finding out just how rusty I am.


Top
 Profile  
 
PostPosted: Fri Dec 12, 2008 10:50 pm 
Offline
Cocobolo
Cocobolo

Joined: Wed Dec 03, 2008 11:44 am
Posts: 210
OK, here I go again. This relates to fixing wood not necessarily an instrument. But you can make damage almost vanish in a dent on soft wood like the sound board of a guitar. I'm Mr. Magnifier, so you need to magnify what you are doing. Get the wood wet, let it surface dry and wet it again. Then wipe off the water. Take a pointed exacto blade (in a handle or not which ever feels better) and apply gentle lifting action to the wood in the wound. To do that slowly press the blade into the deepest part of the wound and lift ever so slightly move outward to the more shallow areas. Do this a little then soak the wood again. Wipe off the excess water and look at it to see what's up. You'll probably need to lightly dig in and lift some more. After a while you'll have raised a slight bump where there was a dent. Let it dry for at least a day and then lightly sand it. Then dampen as you would to wet sand the wood let it dry and sand again. The wound should be gone.

If you do this carefully, the damp wood will hold together and it will retain it's bond and grain pattern. Once dry and sanded it will likely show a slightly damaged section of wood, but if done with care it will look natural.

I have also used a glue syringe and put a little bit of thinned glue into the wound to help hold the fibers. I like Elmer's white glue for this. By a little, I mean a drop or two. If it surfaces, wash it clean with a damp paper towel.

Before finishing, examine the area with a 10x magnifier to be sure you don't have any glue or other surface anomalies that might show when the finish is applied. If so, sand again to clear them out of the area.


Top
 Profile  
 
PostPosted: Sat Dec 13, 2008 6:19 pm 
Offline
Walnut
Walnut

Joined: Wed Aug 24, 2005 6:00 pm
Posts: 23
Location: Australia
Try some sanding dust (made with 180grit paper and from an offcut of the soundboard ) and mix that with some thinned down nitro lacquer into a paste. Put a blob of that on the ding and leave for a couple of days. Sand flat, leave for a couple more days and repeat. It will shrink back quite a bit, so it is best to leave it as long as possible before final sanding. It will dry the same colour as the rest of the soundboard, and if it is filled level, it is not nearly so noticeable after finishing as a ding. The lacquer is really acting just as a glue for the dust and ends up as only 10-20%of the filler by the end

cheers

graham


Top
 Profile  
 
Display posts from previous:  Sort by  
Post new topic Reply to topic  [ 17 posts ] 

All times are UTC - 5 hours


Who is online

Users browsing this forum: No registered users and 33 guests


You cannot post new topics in this forum
You cannot reply to topics in this forum
You cannot edit your posts in this forum
You cannot delete your posts in this forum
You cannot post attachments in this forum

Jump to:  
Powered by phpBB® Forum Software © phpBB Group
phpBB customization services by 2by2host.com