Official Luthiers Forum!

Owned and operated by Lance Kragenbrink
It is currently Wed Jul 30, 2025 12:16 am


All times are UTC - 5 hours


Forum rules


Be nice, no cussin and enjoy!


Post new topic Reply to topic  [ 23 posts ] 
Author Message
PostPosted: Fri Apr 30, 2010 12:41 am 
Offline
Contributing Member
Contributing Member
User avatar

Joined: Fri Jan 22, 2010 9:59 pm
Posts: 3622
First name: Dennis
Last Name: Kincheloe
City: Kansas City
State: MO
Country: USA
Focus: Build
Status: Amateur
More work on the rosette. Just need to add a few MOP stars above the flowers. The outer purfling snapped while I was pushing it in, next to the left flower :cry: Oh well, it's still pretty. Let's just say it adds character :p
Attachment:
Rosette2.jpg


You do not have the required permissions to view the files attached to this post.


Top
 Profile  
 
PostPosted: Fri Apr 30, 2010 7:55 am 
Offline
Koa
Koa
User avatar

Joined: Thu Sep 24, 2009 9:50 am
Posts: 942
Location: Ellicott City, Md - USA
First name: John
Last Name: A
Focus: Build
Status: Amateur
I like the rosette - question - I guess with so many pieces - sometimes you have voids. How do you fill them in ? with CA and some same colored wood dust ?


- My progress - just finished up two rosettes for my first 2 guitars. They came out OK but not perfect - as I do have some voids - I will post the pics in a separate thread,so I can ask my questions.

Next up today - hopefully I can cut out the sound holes and begin thinking about bracing.

_________________
It's this new idea from recent decades that everyone gets a participation award. - MUX


Top
 Profile  
 
PostPosted: Fri Apr 30, 2010 12:10 pm 
Offline
Contributing Member
Contributing Member
User avatar

Joined: Fri Jan 22, 2010 9:59 pm
Posts: 3622
First name: Dennis
Last Name: Kincheloe
City: Kansas City
State: MO
Country: USA
Focus: Build
Status: Amateur
John A wrote:
I like the rosette - question - I guess with so many pieces - sometimes you have voids. How do you fill them in ? with CA and some same colored wood dust ?

Thanks!
Yes, there have been plenty of gaps. When I was cutting out the background walnut burl veneer, I was taking little slivers off with an x-acto knife until it fit nicely in the channel. I've just been using those slivers to fill the gaps. I use a second x-acto knife with a dull blade for poking LMI white glue into the gaps, and then poking the wood slivers in with it, followed by smashing it flat with the back of my thumbnail. They're still visible up close, but the veneer is pretty soft and compresses into the space it has, so it does give a level surface.

I'm not sure how I'm going to go about pore and tiny-gap filling though. I'll be french polishing with pumice for the back/sides/neck, but I'm skeptical about pumicing on the top with all those contrasting colors. Maybe shellac, then CA or epoxy, then sand flat.


Top
 Profile  
 
PostPosted: Fri Apr 30, 2010 3:23 pm 
Offline
Koa
Koa
User avatar

Joined: Sat Aug 19, 2006 1:29 am
Posts: 1384
Location: United States
In my shop now are a bunch of things. I have an old guitar I made for a friend I need to re-top. The center seam let go behind the bridge and since I have it here I figured I could improve it a bit with a whole new top. Will need a re fret also as my fretting skills were not so hot back then.......
I am starting my sonic sitka guitar hopefully to be done to have in Montreal(just for cataloging, I am not trying to exhibit)
I have a nice retro style blues box inspired guitar I am making for a local guy.
Lots of shop improvements still in the works, setting up vacuum stuff, setting up a knock down spray booth, a couple deflection data tests I have been putting off for a long time.

I also finished up a guitar recently and it is the first one I was completely happy with the binding and purfling job on. The answer for me? It was the surgical tubing. I was getting very good results with the tape and CA but just not that last 5% exact. The tubing gave me that extra little bit and I couldn't be happier with the results. Here's a photo:

Attachment:
CL17-purfs.jpg


I am looking forward to the elusive 1 day in New England spring when I can work with the window open before I have to switch to the dehumidifier. As it is it was 35 degrees a few mornings ago and is about 70 right now. RH is still a bit low though.


You do not have the required permissions to view the files attached to this post.

_________________
Burton
http://www.legeytinstruments.com
Brookline, MA.


Top
 Profile  
 
PostPosted: Fri Apr 30, 2010 3:29 pm 
Offline
Contributing Member
Contributing Member
User avatar

Joined: Thu May 12, 2005 5:46 am
Posts: 2997
Location: United States
Burton LeGeyt wrote:
....
I am looking forward to the elusive 1 day in New England spring when I can work with the window open before I have to switch to the dehumidifier. As it is it was 35 degrees a few mornings ago and is about 70 right now. RH is still a bit low though.


Got a little snow here today in the mountians of New Mexico. I'm definately ready for spring!

_________________
Jim Watts
http://jameswattsguitars.com


Top
 Profile  
 
PostPosted: Fri Apr 30, 2010 3:40 pm 
Offline
Contributing Member
Contributing Member
User avatar

Joined: Fri Jul 10, 2009 4:44 am
Posts: 5583
First name: colin
Last Name: north
Country: Scotland.
Focus: Build
Status: Semi-pro
Bad news/good news.
Waiting for more finish after removing finish for bridge gluing in the wrong position (noticed problem to locate clamps during trial fit) gaah
Stickered some old mahogany B & S sets from reclaimed timber (gift from a builder friend) after getting local carpenter to resaw (£15 for 6 sets, not bad) bliss
My friend is definitely due a bottle of Scotch.

_________________
The name catgut is confusing. There are two explanations for the mix up.

Catgut is an abbreviation of the word cattle gut. Gut strings are made from sheep or goat intestines, in the past even from horse, mule or donkey intestines.

Otherwise it could be from the word kitgut or kitstring. Kit meant fiddle, not kitten.


Top
 Profile  
 
PostPosted: Sat May 01, 2010 5:55 am 
Offline
Contributing Member
Contributing Member
User avatar

Joined: Fri Jul 10, 2009 4:44 am
Posts: 5583
First name: colin
Last Name: north
Country: Scotland.
Focus: Build
Status: Semi-pro
Colin North wrote:
Bad news/good news.
Waiting for more finish after removing finish for bridge gluing in the wrong position (noticed problem to locate clamps during trial fit) gaah
Stickered some old mahogany B & S sets from reclaimed timber (gift from a builder friend) after getting local carpenter to resaw (£15 for 6 sets, not bad) bliss
My friend is definitely due a bottle of Scotch.


Better news?
I've just compared it with the honduran mahogany I have and can't tell the difference - colour, grain, taste, smell, tap.

_________________
The name catgut is confusing. There are two explanations for the mix up.

Catgut is an abbreviation of the word cattle gut. Gut strings are made from sheep or goat intestines, in the past even from horse, mule or donkey intestines.

Otherwise it could be from the word kitgut or kitstring. Kit meant fiddle, not kitten.


Top
 Profile  
 
PostPosted: Sat May 01, 2010 10:47 am 
Offline
Cocobolo
Cocobolo
User avatar

Joined: Mon Jan 03, 2005 7:06 am
Posts: 460
Location: United States
Here's an OM45 BRZ/Lutz in the early stages. Vintage 30's specs. It's a real challenge to duplicate the best that Martin had to offer during this time period, but it's lots of fun. Thanks for looking.

Attachment:
om45back1.jpg

Attachment:
om45boat1.jpg

Attachment:
om45is1.jpg

Attachment:
om45neckblock.jpg

Attachment:
om45backstrip.jpg


You do not have the required permissions to view the files attached to this post.

_________________
Jimmy Caldwell
http://www.caldwellguitars.com


Top
 Profile  
 
PostPosted: Sat May 01, 2010 11:28 am 
Offline
Koa
Koa
User avatar

Joined: Sun Jun 21, 2009 6:34 pm
Posts: 1058
Country: Canada
Working on a telecaster build.
Heres the back, making and perfecting my dovetail jig took a TON of work.
Attachment:
DSC05159.JPG


You do not have the required permissions to view the files attached to this post.


Top
 Profile  
 
PostPosted: Sat May 01, 2010 11:30 am 
Offline
Cocobolo
Cocobolo

Joined: Tue Sep 15, 2009 5:52 pm
Posts: 299
Location: United States
First name: Bobby
Last Name: Masten
City: The Woodlands
State: TX
Zip/Postal Code: 77380
Country: United States
Focus: Build
Status: Amateur
Score! Picked up a used 16-32 Performax Drum Sander last night I bought on fleabay last week. I stopped twice for drinks on the way home and got offers to buy it both times! $350.00 including 3 new rolls paper, and a mobile base. The previous owner said he didn't think he had 10 hours on it and it looks it! Got it set up and running this morning and put this orphan back thru and it came out fantastic. Now to just have some patience until my new bandsaw shows up later this week. bliss


You do not have the required permissions to view the files attached to this post.

_________________
Bobby Masten


Top
 Profile  
 
PostPosted: Sat May 01, 2010 4:42 pm 
Offline
Contributing Member
Contributing Member
User avatar

Joined: Wed Oct 08, 2008 11:36 am
Posts: 7473
Location: Southeast US
City: Lenoir City
State: TN
Zip/Postal Code: 37772
Country: US
Focus: Repair
Finished gluing on the linings on my hog size 0. Resawed some Texas ebony for the headstock, rosette, and tail wedge, got the bookmatched pieces thickness sanded and joined.

Never heard of the Texas ebony before but found a piece about 2' x 4" x 14" at my local hardwood suppliers. I've had it sitting in the shop about a year so I decided to use it. Nice figure and looks like it has some curl but chips out easy. Kind of brittle. I like to book match my headstocks and this stuff really likes a very light cut with a very sharp blade when you plane the edge.

Also spent some time reorganizing my binding stock - found some cool stuff I forgot about like some waterfall Bubinga that came from the '09 swapalooza; might look good with a Koa OM I've got coming up.

I've been staring at this walnut 000-13 cutaway body I glued up a few weeks ago. Based on some discussions on another forum I decided to open up the soundhole to 4 1/4". Kind of as an experiment. I've been going back and forth wondering if I should bind the hole and put it back to 4" but I decided today to press forward. I can always bind the soundhole later although that would mean a refinish but, oh well. All in all, a good 1/2 day in the shop.

_________________
Steve Smith
"Music is what feelings sound like"


Top
 Profile  
 
PostPosted: Sun May 02, 2010 4:48 pm 
Offline
Cocobolo
Cocobolo

Joined: Tue Jan 13, 2009 11:39 am
Posts: 205
Location: Bonney Lake, WA.
Focus: Build
Status: Amateur
Made drawings for my bending jig.
Chuck


Top
 Profile  
 
PostPosted: Sun May 02, 2010 9:40 pm 
Offline
Contributing Member
Contributing Member
User avatar

Joined: Sat May 17, 2008 1:11 pm
Posts: 2390
Location: Spokane, Washington
First name: Pat
Last Name: Foster
Country: USA
Focus: Build
Jimmy Caldwell wrote:
Here's an OM45 BRZ/Lutz in the early stages. Vintage 30's specs. It's a real challenge to duplicate the best that Martin had to offer during this time period, but it's lots of fun. Thanks for looking.


Nice to see you posting, Jimmy. That's going to be a beautiful guitar!

I got this little one buttoned up today. 12-fret L-00, white spruce over BRW.
Attachment:
body.jpg


Pat


You do not have the required permissions to view the files attached to this post.

_________________
formerly known around here as burbank
_________________

http://www.patfosterguitars.com


Top
 Profile  
 
PostPosted: Sun May 02, 2010 11:24 pm 
Offline
Contributing Member
Contributing Member
User avatar

Joined: Wed Feb 15, 2006 7:37 am
Posts: 4820
Finally able to get some work done on my LP [:Y:] I took these before the afternoon was over, but I walked out with the control cavities routed, the sides trued, and the back cleaned and sanded from the scratches and double-side tape residue.

Attachment:
IMG_1329.jpg

Attachment:
IMG_1331.jpg

Attachment:
IMG_1347.jpg


You do not have the required permissions to view the files attached to this post.


Top
 Profile  
 
PostPosted: Mon May 03, 2010 4:53 am 
Offline
Walnut
Walnut
User avatar

Joined: Mon Jun 22, 2009 7:59 am
Posts: 17
First name: Oskar
Last Name: Strådal
City: Stockholm
Country: Sweden
Focus: Build
Burton:

I must say I´m a big admirer of your work, and that binding looks really nice.

Burton LeGeyt wrote:
I also finished up a guitar recently and it is the first one I was completely happy with the binding and purfling job on. The answer for me? It was the surgical tubing. I was getting very good results with the tape and CA but just not that last 5% exact. The tubing gave me that extra little bit and I couldn't be happier with the results. Here's a photo:


Could you expand on the use of surgical tubing? I used the tape method on my first and wasn´t all that happy with the results.

//Oskar


Top
 Profile  
 
PostPosted: Mon May 03, 2010 9:53 am 
Offline
Koa
Koa
User avatar

Joined: Sat Aug 19, 2006 1:29 am
Posts: 1384
Location: United States
Thanks Oskar!

Using the tubing is fairly easy. I will first to a dry run fitting the purfling and bindings with just a little tape to make sure everything fits closely and then I will trim the ends to be very close to final length. Then I spread glue along the channels stopping a few inches from each end. Then I put the bindings and purflings in again, tape them tightly in place and then on top of that wrap surgical tubing as tightly as i can around them starting at the waist and moving out from there. It exerts great force (and gets stronger with each wrap) and pulls in the little spots the tape doesn't always seem able to. Once that glue has dried I work carefully with a chisel and sanding block to get the ends flush. They usually pull in fine with just tape as there is only a small bit to have to fit there. You could technically do the entire piece at once but I do not trust something to move slightly and leave a visible gap at that end joint.

Sometimes if the purfling is very fancy or the fit is questionable I will glue the purfling in first by itself. To do this I cut some long teflon strips in binding size pieces and use them to push in the purfling. I use the same tape and tubing in the same way as with the regular binding to push on the teflon which snugs the purfling in perfectly.

I got the teflon from a local plastics supplier and I purchased the tubing from Lee Valley.

One thing I pay attention to when doing it this way is that the binding height is very close to final fit size. If it stands up too far over the purfling the tubing can pull it so it does not sit perfectly straight in the binding channel.

_________________
Burton
http://www.legeytinstruments.com
Brookline, MA.


Top
 Profile  
 
PostPosted: Mon May 03, 2010 10:03 am 
Offline
Contributing Member
Contributing Member
User avatar

Joined: Wed Feb 15, 2006 7:37 am
Posts: 4820
Thank you, Filippo. That's a high compliment from you! Everytime I see yours though, I don't like mine quite as much. The black limba body is just beautiful.

Chris and Mattia, woah! Check out those backs! It must be nice to be able to group up like that.


Top
 Profile  
 
PostPosted: Mon May 03, 2010 12:04 pm 
Offline
Walnut
Walnut
User avatar

Joined: Mon Jun 22, 2009 7:59 am
Posts: 17
First name: Oskar
Last Name: Strådal
City: Stockholm
Country: Sweden
Focus: Build
Thanks for the explanation Burton, that seems like a very nice method.

//Oskar


Top
 Profile  
 
PostPosted: Mon May 03, 2010 8:20 pm 
Offline
Koa
Koa

Joined: Tue Apr 27, 2010 9:07 pm
Posts: 512
City: Tucson
State: AZ
Country: USA
Focus: Build
Status: Amateur
Got an old Stanley No. 5 and a Worth plane. 60 bucks for the set. People like luthiers. ;)


Top
 Profile  
 
Display posts from previous:  Sort by  
Post new topic Reply to topic  [ 23 posts ] 

All times are UTC - 5 hours


Who is online

Users browsing this forum: No registered users and 17 guests


You cannot post new topics in this forum
You cannot reply to topics in this forum
You cannot edit your posts in this forum
You cannot delete your posts in this forum
You cannot post attachments in this forum
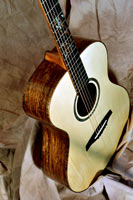
Jump to:  
Powered by phpBB® Forum Software © phpBB Group
phpBB customization services by 2by2host.com