Official Luthiers Forum!

Owned and operated by Lance Kragenbrink
It is currently Sat Sep 13, 2025 4:31 pm


All times are UTC - 5 hours


Forum rules


Be nice, no cussin and enjoy!


Post new topic Reply to topic  [ 33 posts ]  Go to page 1, 2  Next
Author Message
PostPosted: Mon Mar 18, 2013 9:43 pm 
Offline
Contributing Member
Contributing Member
User avatar

Joined: Mon Jun 18, 2012 10:04 pm
Posts: 184
First name: Robert
Last Name: Flindall
City: Peterborough
State: Ontario
Country: Canada
Focus: Build
Status: Amateur
Hi everyone,

I have a few questions about sanding / levelling my first nitro finish. Actually there are a few 'firsts' I have some questions about.

I've sprayed my current two builds with nitro finish and allowed them to cure. I picked up some Micro Mesh, which I've never used before, and began on sanding my first guitar back. My spraying wasn't the greatest which left me with some orange peel to contend with. I think I've done a fairly decent job so far, but I've got some concerns. I've worked my way up to 4000 MM and decided to stop and snap some pictures.

My first concern was sanding through the nitro my first time out, so instead of completely levelling the orange peel with the 1500MM, I left a tiny little bit, thinking the successive grits would eventually take care of it completely.

Here's an overall shot of the back :

Image

After getting to the 4000MM, I'm left with these tiny spots over the back where the finish isn't completely, and uniformly level :

Image

My first question is - should I stop and go back to a higher grit of micro mesh and remove these tiny spots, or will my buffer take this out? I've never used a buffer station before so I have no idea what to expect if I were to take this to the buffer as is.

For my next question, here's the finish at the edge of my guitar :

Image

Everywhere I've read about sanding your finish, I've read not to get too close to the edge for fear of completely remove the finish on the corner. I keep reading that the corners/edges will 'work themselves out'. Again, as I've never used a buffing station before, do I still need to work this orange peel out, or will the buffer take care of this?

Never having used nitro before and a proper buffing station, I'm at a loss as to what I should expect to see in the finish after sanding, before taking it to the buffing station.

I'd really appreciate any feedback on this. I'm going to hang tight doing any more sanding before this noob really screws something up! Lol :)

_________________
Rob Flindall
Flindall Guitars
http://www.flindallguitars.com
https://www.facebook.com/FlindallGuitars


Top
 Profile  
 
PostPosted: Mon Mar 18, 2013 10:32 pm 
Offline
Contributing Member
Contributing Member
User avatar

Joined: Tue Jan 04, 2005 10:03 am
Posts: 6680
Location: Abbotsford, BC Canada
Go back and keep sanding till all shiny spots are gone. Then move up to the next grit etc.... That'll never buff out! It has to be flat in order to, well be flat.

_________________
My Facebook Guitar Page

"There's really no wrong way, as long as the results are what's desired." Charles Fox

"We have to constantly remind ourselves what we're doing....No Luthier is putting a man on the moon!" Harry Fleishman

"Generosity is always different in the eye of the person who didn't receive anything, but who wanted some." Waddy Thomson


Top
 Profile  
 
PostPosted: Mon Mar 18, 2013 11:34 pm 
Offline
Koa
Koa
User avatar

Joined: Sat Jan 08, 2005 4:19 am
Posts: 1534
Location: United States
First name: Nelson
Last Name: Palen
That looks a little more like solvent popping than orange peel to me. I would also recommend going back to your starting grit and getting rid of all the shiny spots, then progress thru the grits. If you do start to sand down to the wood, then I would stop and spray several more coats of nitro before proceeding. By the way, solvent popping can be caused by spraying coats too many and too fast between. Something I've found with nitro is that I have better luck thinning it even if it can be sprayed "out of the can". Just seems to flow out much better and lessens chance of solvent popping.
The only other thought I would have is whether your pits are caused by silicone contamination. Some of the more experienced folks hopefully will chime in here.


Top
 Profile  
 
PostPosted: Tue Mar 19, 2013 4:26 am 
Offline
Brazilian Rosewood
Brazilian Rosewood
User avatar

Joined: Mon Dec 27, 2010 9:06 pm
Posts: 2739
Location: Magnolia DE
First name: Brian
Last Name: Howard
City: Magnolia
State: Delaware
Zip/Postal Code: 19962
Country: United States
Focus: Repair
Status: Professional
Tough to tell from the pics, looks like it was just orange peeled really bad. They will not buff out. The surface must be flat before buffing so you have more sanding to do. It could be solvent pops but that does not look like the craters you usually see with that. FWIW, adding more solvent to your lacquer is not really the best cure for solvent pop, its caused by the solvents in the coating. Allowing proper dry time between costs and avoiding drafts in the drying environment are the best ways to avoid solvent pops.

_________________
Brian

You never know what you are capable of until you actually try.

https://www.howardguitarsdelaware.com/


Top
 Profile  
 
PostPosted: Tue Mar 19, 2013 2:06 pm 
Offline
Contributing Member
Contributing Member
User avatar

Joined: Tue Oct 12, 2010 9:01 pm
Posts: 3031
First name: Tony
Last Name: C
City: Brooklyn
State: NY
Focus: Build
Status: Amateur
If your wood prep was good, sand the finish until it is flat and you should not sand through the lacquer. Be sure to check your progress constantly and stop as soon as the last dip is sanded out.

_________________
http://www.CostaGuitars.com
PMoMC


Top
 Profile  
 
PostPosted: Tue Mar 19, 2013 2:45 pm 
Offline
Koa
Koa

Joined: Mon Jun 30, 2008 1:06 am
Posts: 508
First name: Greg
Last Name: B
City: Los Angeles
State: California
Those pits look pretty deep. My gut feeling is you won't be able to sand level without sanding through at this point. I wouldn't personally try to do a final level from that starting condition.

Therefore, I'd also recommend sanding back with ~ P400 until only a few shallow pits are left. At that point shoot 3 or 4 more coats, wait another 30 days...

Are you using rattle cans or a gun? If a gun, play around with pressure, pattern, distance, thinning, etc, until you get a smoother coat. If cans, try warming them in hot water.


Top
 Profile  
 
PostPosted: Tue Mar 19, 2013 5:35 pm 
Offline
Contributing Member
Contributing Member
User avatar

Joined: Tue Oct 12, 2010 9:01 pm
Posts: 3031
First name: Tony
Last Name: C
City: Brooklyn
State: NY
Focus: Build
Status: Amateur
If his finish prep was very good, then the wood is flat. There is lacquer at the bottom of those pits, so unless the wood is pitted similarly, sanding till he hits the bottom of the pits would not result in a sand through. But again, that is only if the finish prep was excellent. If not, there is a chance he will sand through. I would sand unless you know the finish was super thin to start with.

_________________
http://www.CostaGuitars.com
PMoMC


Top
 Profile  
 
PostPosted: Tue Mar 19, 2013 6:01 pm 
Offline
Contributing Member
Contributing Member
User avatar

Joined: Tue Jan 04, 2005 10:03 am
Posts: 6680
Location: Abbotsford, BC Canada
Greg B wrote:
Those pits look pretty deep. My gut feeling is you won't be able to sand level without sanding through at this point. I wouldn't personally try to do a final level from that starting condition.

Therefore, I'd also recommend sanding back with ~ P400 until only a few shallow pits are left. At that point shoot 3 or 4 more coats, wait another 30 days...

Are you using rattle cans or a gun? If a gun, play around with pressure, pattern, distance, thinning, etc, until you get a smoother coat. If cans, try warming them in hot water.


The one thing we don't know is how thick the finish was to start with. He may have sprayed 20 heavy coats, if that were the case he probably has plenty of finish to sand still to get those pits level.

Either drop fill them and wait 2-3 weeks then level and buff, keep sanding and take your chances, or spray more coats, in which you'll have to wait a couple more weeks anyway.

It all depends on how many coats you put down and how thick/thin they were.

_________________
My Facebook Guitar Page

"There's really no wrong way, as long as the results are what's desired." Charles Fox

"We have to constantly remind ourselves what we're doing....No Luthier is putting a man on the moon!" Harry Fleishman

"Generosity is always different in the eye of the person who didn't receive anything, but who wanted some." Waddy Thomson


Top
 Profile  
 
PostPosted: Tue Mar 19, 2013 6:16 pm 
Offline
Contributing Member
Contributing Member
User avatar

Joined: Mon Jun 18, 2012 10:04 pm
Posts: 184
First name: Robert
Last Name: Flindall
City: Peterborough
State: Ontario
Country: Canada
Focus: Build
Status: Amateur
Hi guys - thanks for the input. These are definitely not solvent popping, nor wood grain pits. I filled the pores with Zpoxy and the pore filling turned out perfectly. This is just the left over orange peel from my first three coats (sealer and a coat of lacquer) that went on poorly as I didn't have the gun dialed in well. I should have sanded them flat before continuing with the spraying - a good learning point for my next guitar. I got the gun dialed in and the remaining coats went on beautifully. I left a very small amount of orange peel with my lowest grit MM with the hope that as I moved through the grits of MM, the pits would eventually get sanded out. What I was left with in the pictures are the orange peel pits that remained. I put 2 coats of sealer and 9 coats of lacquer on the guitar which resulted in around 9 mils of lacquer left on the guitar. I'm going to go back to a lower grit and see if I can sand them out and then move up through the grits again. If I sand through, I sand through, and I'll respray. Hopefully I wont sand through! Lol.

I'll keep you posted on how I make out with this. Keeping my fingers crossed.

PS - and maybe, just maybe I'm a wuss using this MM stuff and should just buck up and sand it and get it done. Lmao.

_________________
Rob Flindall
Flindall Guitars
http://www.flindallguitars.com
https://www.facebook.com/FlindallGuitars


Top
 Profile  
 
PostPosted: Tue Mar 19, 2013 9:06 pm 
Offline
Contributing Member
Contributing Member
User avatar

Joined: Mon Jun 18, 2012 10:04 pm
Posts: 184
First name: Robert
Last Name: Flindall
City: Peterborough
State: Ontario
Country: Canada
Focus: Build
Status: Amateur
SUCCESS! I started right back at the 1800 MM and started sanding again. The small orange peel dots disappeared with no sand through. I worked right through to the 12000 MM and the pics below are the results. I'm pretty happy how the sanding turned out and I can't wait to see how it looks after the buffer. But I definitely need to spray a better finish on next time. That took forever to sand up to 12000 - and that's only the back! I still have the sides and top to do, and the neck, and then sand my second guitar..... Have I mentioned yet I hate sanding? Lol. I'm sure it will get quicker as my confidence grows with this part of the process.

Anyways, here are the pics!

Image

Image

Image

I think this one is funny - I was carrying the body back into the house when I caught the reflection of my recycling bins in the finish.

Image

And thanks again for your input guys!

_________________
Rob Flindall
Flindall Guitars
http://www.flindallguitars.com
https://www.facebook.com/FlindallGuitars


Top
 Profile  
 
PostPosted: Tue Mar 19, 2013 9:08 pm 
Offline
Contributing Member
Contributing Member
User avatar

Joined: Tue Jan 04, 2005 10:03 am
Posts: 6680
Location: Abbotsford, BC Canada
Looks great!!

_________________
My Facebook Guitar Page

"There's really no wrong way, as long as the results are what's desired." Charles Fox

"We have to constantly remind ourselves what we're doing....No Luthier is putting a man on the moon!" Harry Fleishman

"Generosity is always different in the eye of the person who didn't receive anything, but who wanted some." Waddy Thomson


Top
 Profile  
 
PostPosted: Tue Mar 19, 2013 9:16 pm 
Offline
Contributing Member
Contributing Member
User avatar

Joined: Mon Jun 18, 2012 10:04 pm
Posts: 184
First name: Robert
Last Name: Flindall
City: Peterborough
State: Ontario
Country: Canada
Focus: Build
Status: Amateur
Thanks Rod! Sometimes I have to remind myself to stop being a chicken $hit and just go for it. That's exactly what I did and it turned out pretty good. I do have another quick question though - just so I have a benchmark - how long does it typically take to finish sand a body and neck of a guitar before it goes to the buffer? Assuming the spraying went well of course with minimal orange peel. And lastly, what grit MM do you typically stop at before you go to the buffer. Going to 12000 seems a bit excessive.

_________________
Rob Flindall
Flindall Guitars
http://www.flindallguitars.com
https://www.facebook.com/FlindallGuitars


Top
 Profile  
 
PostPosted: Tue Mar 19, 2013 9:41 pm 
Offline
Contributing Member
Contributing Member
User avatar

Joined: Tue Jan 04, 2005 10:03 am
Posts: 6680
Location: Abbotsford, BC Canada
I've never used MM. I use P grade wet/dry sand paper. I start with P600 and get it fully level. I don't move on to a higher grit till all areas are done with one grit. It usually takes me 1.5-2 hours to do the initial level sand with P600. I work up the grits from there, P800, P1000,P1200,P1500 then go to the buffer. From 800-1500 takes me another 1.5 hours buffing takes me another 1-1.5 hours, for both med & fine buffing compounds.

_________________
My Facebook Guitar Page

"There's really no wrong way, as long as the results are what's desired." Charles Fox

"We have to constantly remind ourselves what we're doing....No Luthier is putting a man on the moon!" Harry Fleishman

"Generosity is always different in the eye of the person who didn't receive anything, but who wanted some." Waddy Thomson


Top
 Profile  
 
PostPosted: Tue Mar 19, 2013 10:06 pm 
Offline
Contributing Member
Contributing Member
User avatar

Joined: Tue Oct 12, 2010 9:01 pm
Posts: 3031
First name: Tony
Last Name: C
City: Brooklyn
State: NY
Focus: Build
Status: Amateur
Sanding takes as long as it takes. Don't rush the finish or you will end up with a finish that looks rushed.

Now if you will excuse me, I have to get back to my job writing fortune cookie fortunes.

Your finish looks great by the way. So smooth!

_________________
http://www.CostaGuitars.com
PMoMC


Top
 Profile  
 
PostPosted: Tue Mar 19, 2013 11:02 pm 
Offline
Contributing Member
Contributing Member
User avatar

Joined: Mon Jun 18, 2012 10:04 pm
Posts: 184
First name: Robert
Last Name: Flindall
City: Peterborough
State: Ontario
Country: Canada
Focus: Build
Status: Amateur
Lol. I'd stick with Lutherie versus your fortune cookie empire :)

Keeping my fingers crossed the rest of the body turns out like the back. The sides worry me the most for sand through. I have lots of lacquer on the top. Guess there's only one way to find out!

_________________
Rob Flindall
Flindall Guitars
http://www.flindallguitars.com
https://www.facebook.com/FlindallGuitars


Top
 Profile  
 
PostPosted: Wed Mar 20, 2013 7:53 am 
Offline
Contributing Member
Contributing Member
User avatar

Joined: Tue Oct 12, 2010 9:01 pm
Posts: 3031
First name: Tony
Last Name: C
City: Brooklyn
State: NY
Focus: Build
Status: Amateur
Don't knock the fortune cookie gig. I get paid $0.0001 cents for every cookie sold with my fortunes in them. So far, I have made nearly a dollar and eighteen cents! I tucked that money away in a hedge fund. It's probably worth considerably more by now.

I don't enjoy wet sanding either, but I do try to make it more enjoyable. I do it in my house, on the couch with a big towel on my lap. I don't get crazy with the water, just enough to keep things lubricated, so the towel is able to soak up the drips. Then I can talk to the wife, watch a little TV, etc. Helps to pass the time. As such, I have no idea how long it takes me to wet sand the finish. But I can tell you it is a few evenings worth of work, taking my time, and a couple of hours each night. I guess from rough finish until I am ready to buff, it takes 3-4 hours. But again, I am taking my time, and I brush my finish so it takes a whole lot more sanding to get it level. The last thing I want to do is to rush the finish and wind up with a bunch of sand through spots that I need to correct. Or, end up with a finish that does not look as good as it should. After spending so many hours putting the guitar together, making sure all of my joints are tight, getting everything as close to perfect as I can, I would hate to botch the finish! I did rush one to get it out on time and I ended up screwing up, sanding through in 2-3 places, and I had to call the guy and push the delivery date back as a result. In the end, the owner loves it and he took it to a guitar clinic in Galax Virginia this past weekend and had Wayne Henderson pick a tune on it. Wayne loved it, said is was a great guitar and he loved the finish. He also commented on the use of walnut as the back and side wood, saying how beautiful they were. So like I said earlier, in fortune cookie fashion, it takes as long as it takes!

_________________
http://www.CostaGuitars.com
PMoMC


Top
 Profile  
 
PostPosted: Wed Mar 20, 2013 7:34 pm 
Offline
Contributing Member
Contributing Member

Joined: Tue Jan 03, 2006 1:47 pm
Posts: 1624
Location: United States
First name: Larry
Last Name: Hawes
Focus: Build
Status: Amateur
Rod True wrote:
I've never used MM. I use P grade wet/dry sand paper. I start with P600 and get it fully level. I don't move on to a higher grit till all areas are done with one grit. It usually takes me 1.5-2 hours to do the initial level sand with P600. I work up the grits from there, P800, P1000,P1200,P1500 then go to the buffer. From 800-1500 takes me another 1.5 hours buffing takes me another 1-1.5 hours, for both med & fine buffing compounds.


Amazing how one can gather tidbits of information from this forum. I was trying to level sand (after refinishing a few times from rookie errors) the other day and I had a 400 grit that was really coarse and a 600 grit that was much much finer and I had no idea what was up. The 400 would put in really deep scratches that the 600 would take forever to sand out, and the 600 wasn't really coarse enough to level sand and I thought FTW?

So I looked and I could see the 400 was P400 and the 600 was 600-b. I have no idea what the 'b' stood for but now I see that the P400 really was too coarse for my wants and the mention of P600 (above) as a starting leveling grit has given me a great foundation to begin (again) the leveling process and the P600 seems just right to begin the process.

I get my paper at the local auto supply store and they don't have 800 but they have 1000 and 1500 and I have some 2000 and 3000 so I'm set.

Any way just wanted to mention that help sometimes comes in unexpected forms. Thanks

And Rob that finish looks great, thanks for asking the question.

_________________
Thank You and Best To All


Top
 Profile  
 
PostPosted: Wed Mar 20, 2013 9:48 pm 
Offline
Contributing Member
Contributing Member
User avatar

Joined: Mon Jun 18, 2012 10:04 pm
Posts: 184
First name: Robert
Last Name: Flindall
City: Peterborough
State: Ontario
Country: Canada
Focus: Build
Status: Amateur
No problem at all Larry! I'm glad this thread helped you out too.

Today I built my buffing station and it turned out great. I went to work sanding my top and sides of this bubinga guitar, but unlike the back, instead of going all the way to 12000MM, I stopped at 3200MM. I noticed a few things when I went to the buffer. First, I think I left the belt a little too loose. When I touch the guitar to the buffer, with little pressure, the wheel automatically starts to slow down quite noticeably. Secondly, I have no idea how much menzerna compound I'm putting on the wheels - is it too little or too much - I can't tell. I'm using fine and very fine on my wheels.

I started buffing the back. And it looks horrible! [headinwall] I have all these deeper scratches in the finish from sanding with the lower grits. My guess is that I didn't clean the micro mesh often enough when sanding, resulting in the deeper scratches, or I didn't fully sand out the previous grit's scratches. I'm guessing the former. So now I have to go back and sand down my back again. Grrr. The top turned out perfectly though. I'm really happy with how it looks. The sides have very, very fine scratches that neither buffing wheel will get out, so I'm wondering if I need to go to a higher micro mesh grit than the 3200.

Now Todd, you said to never sand in a straight line? Umm, oops. That's what I did. Mind if I ask a silly question - why never in a straight line? Is that why I see the very fine lines in my sides?

Oh, and one last question - after buffing, I noticed there were little tiny dots all over my guitar which turned out to be buffing compound. Any idea why I would have that after buffing?

Edit : Ok, I did a little digging, and I definitely didn't go high enough on the sides with the micro mesh. I need to keep sanding to at least 6000. Odd that the top turned out perfect at the 3200 though....

_________________
Rob Flindall
Flindall Guitars
http://www.flindallguitars.com
https://www.facebook.com/FlindallGuitars


Top
 Profile  
 
PostPosted: Wed Mar 20, 2013 11:05 pm 
Offline
Contributing Member
Contributing Member
User avatar

Joined: Tue Oct 12, 2010 9:01 pm
Posts: 3031
First name: Tony
Last Name: C
City: Brooklyn
State: NY
Focus: Build
Status: Amateur
If you sand with the grain, it is harder to tell if you have removed the sanding scratches or if it is a grain line. I don't know if Todd is saying to sand in a circular pattern, but I sand at an angle to the grain or across the grain when wet sanding. First at an angle, on the next grit I sand across, next grit, I sand at an angle again. It is easier to see if you have completely removed the scratches from the previous grit that way. If you don't fully remove them, well...you just found out what happens! Those deeper scratches will pop up when you buff and you are back to square one in that area.

_________________
http://www.CostaGuitars.com
PMoMC


Top
 Profile  
 
PostPosted: Mon Mar 25, 2013 2:25 pm 
Offline
Contributing Member
Contributing Member
User avatar

Joined: Mon Jun 18, 2012 10:04 pm
Posts: 184
First name: Robert
Last Name: Flindall
City: Peterborough
State: Ontario
Country: Canada
Focus: Build
Status: Amateur
Hi Todd - thanks for checking back in with me. Well, I've learned many valuable lessons sanding this guitar.

Here are some "Lessons From a Noob" :D (well, some lessons and some observations) :

1. I don't like Micro-Mesh.
2. Like all other sand paper, Micro-mesh, loses it's bite. I purchased 2 sets of the micro-mesh pads, and that certainly wasn't enough. The micro-mesh quickly loses it's sanding abilities. And unless you're made of money to purchase a lot of it, there's no sense. I'm going to go back to using quality wet/dry paper. This way I can continually switch out to good, clean paper. What I realized was happening was that the micro-mesh lost it's bite, which caused me to sand harder. Sanding harder caused deep scratches, even in the higher grits. It was a losing battle. I discovered this when I opened my second pack of micro-mesh and the new pads worked like a dream versus my first pack. Fortunately, I was able to use the two packs together, and I achieved amazing results.
3. If you're going to use Micro-mesh, sand at least up to the 6000 grit.
4. Sanding in random circles didn't work for me. I couldn't tell if I removed all the previous grits scratches. I reverted back to the "alternating directions" and it worked much better.
5. Remove "ALL" the previous grits scratches! And if you think you've got them all, check again - you missed some!
6. Get better lighting. Just when I thought I had all the previous grit's scratches out, I would rotate the guitar a quarter turn and discovered previously hidden scratches.
7. Take your friggin' time. :D Lol.
8. Listen to the pros. They're pros for a reason.
9. Sanding is much more enjoyable with a drink.
10. It would be nice to make a rotating table of sorts so you can turn the guitar for sanding, without rubbing the soundboard across my carpet. Anyone make one of these?
11. I love my new buffer I built.
12. and lastly, I learned that my lacquer thickness was definitely thick enough during spraying. I've sanded this back 3 times and didn't sand through.

And now, without further adieu, here's the back of my guitar!

Image

Image

Image

Image

And because I mentioned I built a buffer, here she is :

Image

Todd - I do have a quick question for you. After buffing, I have a little bit of buffing compound on the guitar that the buffing wheels didn't remove. What should I use to remove this as well as miscellaneous fingerprints etc, without effecting the buffing gloss? I have a bottle of Farecla G10 swirl remover - would that do the trick?

Anyways, I really appreciated everyones input on this thread. It's been a tremendous help! [:Y:]

_________________
Rob Flindall
Flindall Guitars
http://www.flindallguitars.com
https://www.facebook.com/FlindallGuitars


Top
 Profile  
 
PostPosted: Mon Mar 25, 2013 4:39 pm 
Offline
Contributing Member
Contributing Member

Joined: Fri Feb 29, 2008 2:41 pm
Posts: 312
Buflex!

http://www.eagleabrasives.com/

_________________
https://soundcloud.com/jeffreylsuits/he ... -runnin-13


Top
 Profile  
 
PostPosted: Mon Mar 25, 2013 6:37 pm 
Offline
Contributing Member
Contributing Member

Joined: Tue Jan 03, 2006 1:47 pm
Posts: 1624
Location: United States
First name: Larry
Last Name: Hawes
Focus: Build
Status: Amateur
Todd Stock wrote:
Jag wrote:
Hi Todd - thanks for checking back in with me. Well, I've learned many valuable lessons sanding this guitar.

Here are some "Lessons From a Noob" :D (well, some lessons and some observations) :

1. I don't like Micro-Mesh.
2. Like all other sand paper, Micro-mesh, loses it's bite. I purchased 2 sets of the micro-mesh pads, and that certainly wasn't enough. The micro-mesh quickly loses it's sanding abilities. And unless you're made of money to purchase a lot of it, there's no sense. I'm going to go back to using quality wet/dry paper. This way I can continually switch out to good, clean paper. What I realized was happening was that the micro-mesh lost it's bite, which caused me to sand harder. Sanding harder caused deep scratches, even in the higher grits. It was a losing battle. I discovered this when I opened my second pack of micro-mesh and the new pads worked like a dream versus my first pack. Fortunately, I was able to use the two packs together, and I achieved amazing results.
3. If you're going to use Micro-mesh, sand at least up to the 6000 grit.
4. Sanding in random circles didn't work for me. I couldn't tell if I removed all the previous grits scratches. I reverted back to the "alternating directions" and it worked much better.
5. Remove "ALL" the previous grits scratches! And if you think you've got them all, check again - you missed some!
6. Get better lighting. Just when I thought I had all the previous grit's scratches out, I would rotate the guitar a quarter turn and discovered previously hidden scratches.
7. Take your friggin' time. :D Lol.
8. Listen to the pros. They're pros for a reason.
9. Sanding is much more enjoyable with a drink.
10. It would be nice to make a rotating table of sorts so you can turn the guitar for sanding, without rubbing the soundboard across my carpet. Anyone make one of these?
11. I love my new buffer I built.
12. and lastly, I learned that my lacquer thickness was definitely thick enough during spraying. I've sanded this back 3 times and didn't sand through.

Todd - I do have a quick question for you. After buffing, I have a little bit of buffing compound on the guitar that the buffing wheels didn't remove. What should I use to remove this as well as miscellaneous fingerprints etc, without effecting the buffing gloss? I have a bottle of Farecla G10 swirl remover - would that do the trick?

Anyways, I really appreciated everyones input on this thread. It's been a tremendous help! [:Y:]


This is a post that all of the folks starting out on leveling, sanding, and buffing need to read - hearing about the lessons learned from someone that just went through the process is great gouge. Thanks for taking the time to post a 'lessons learned'...so often we don't do a good job of documenting that hard-won info, and it reallt does flatten the learning curve for folks following after you.


+1

_________________
Thank You and Best To All


Top
 Profile  
 
PostPosted: Tue Mar 26, 2013 3:47 pm 
Offline
Contributing Member
Contributing Member
User avatar

Joined: Mon Jun 18, 2012 10:04 pm
Posts: 184
First name: Robert
Last Name: Flindall
City: Peterborough
State: Ontario
Country: Canada
Focus: Build
Status: Amateur
Thanks guys! Hopefully my comments will help other new luthiers like myself when it comes to the finishing steps. It'd be nice to be able to give back to the community.

I decided to go back and resand my soundboard and I'm happy I did. bliss I had a few scratches from the micro-mesh and I went back to the 3M paper. My soundboard finish turned out perfectly.

Here are some pics (although they're not the greatest quality)

Image

Image

Image

Image

Now to get rid of those pesky scratches on the sides...... I feel I've been sanding forever on this guitar! Lol. :D

_________________
Rob Flindall
Flindall Guitars
http://www.flindallguitars.com
https://www.facebook.com/FlindallGuitars


Top
 Profile  
 
PostPosted: Tue Mar 26, 2013 6:03 pm 
Offline
Contributing Member
Contributing Member
User avatar

Joined: Tue Oct 12, 2010 9:01 pm
Posts: 3031
First name: Tony
Last Name: C
City: Brooklyn
State: NY
Focus: Build
Status: Amateur
THe finish looks great! It would have been a shame to leave orange peel or fine scratches on such a nice log.

_________________
http://www.CostaGuitars.com
PMoMC


Top
 Profile  
 
PostPosted: Wed Mar 27, 2013 7:57 am 
Offline
Koa
Koa

Joined: Mon Jul 11, 2005 5:17 am
Posts: 1034
Location: United States
City: Tyler
State: Texas
I have found naptha to be great for removing buffing wax residue.


Top
 Profile  
 
Display posts from previous:  Sort by  
Post new topic Reply to topic  [ 33 posts ]  Go to page 1, 2  Next

All times are UTC - 5 hours


Who is online

Users browsing this forum: No registered users and 11 guests


You cannot post new topics in this forum
You cannot reply to topics in this forum
You cannot edit your posts in this forum
You cannot delete your posts in this forum
You cannot post attachments in this forum
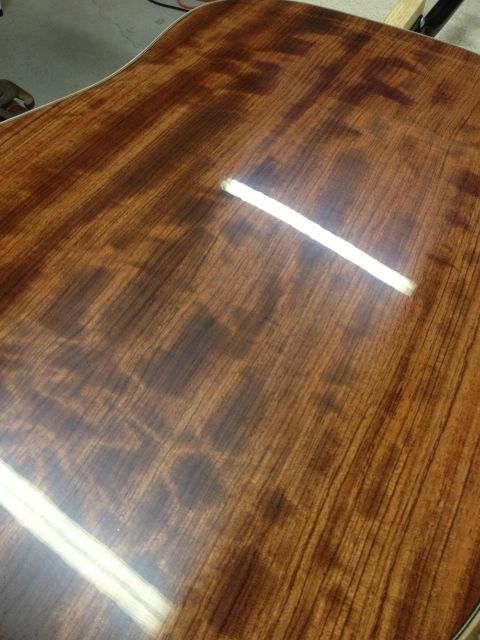
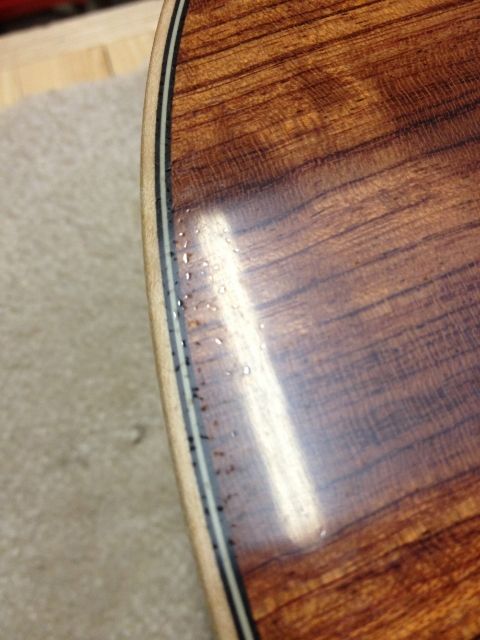
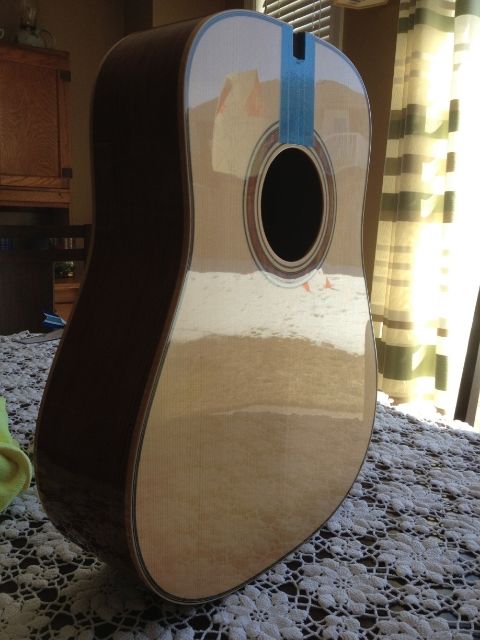
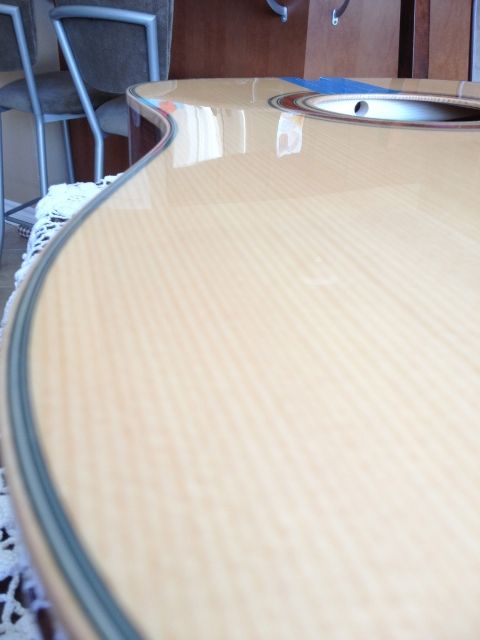
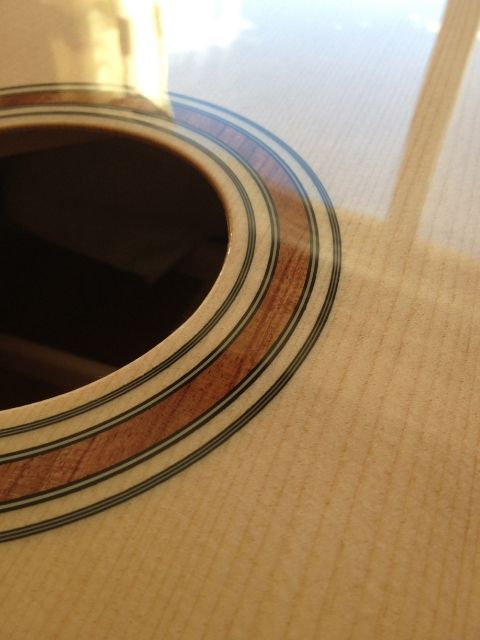
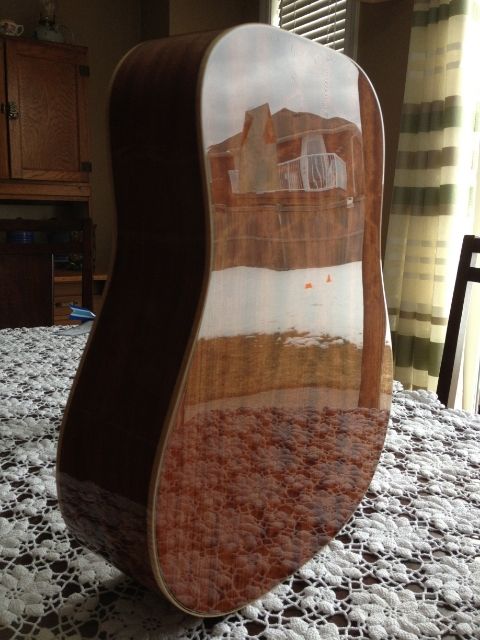
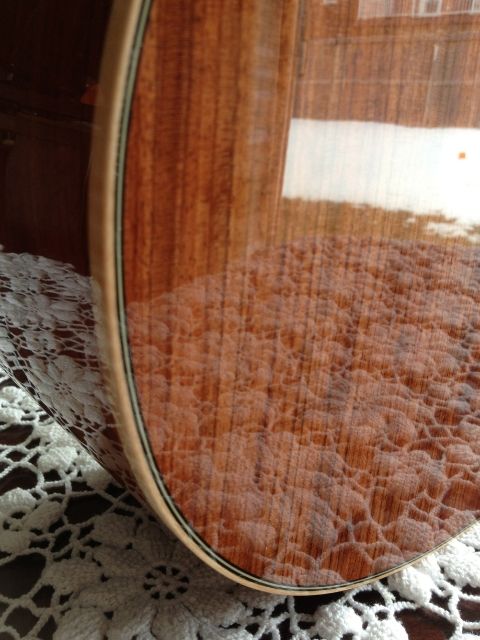
Jump to:  
Powered by phpBB® Forum Software © phpBB Group
phpBB customization services by 2by2host.com