Official Luthiers Forum!

Owned and operated by Lance Kragenbrink
It is currently Mon Aug 04, 2025 6:05 am


All times are UTC - 5 hours


Forum rules


Be nice, no cussin and enjoy!


Post new topic Reply to topic  [ 20 posts ] 
Author Message
PostPosted: Thu Oct 08, 2015 2:14 pm 
Offline
Brazilian Rosewood
Brazilian Rosewood

Joined: Wed Feb 20, 2008 7:15 pm
Posts: 7548
First name: Ed
Last Name: Bond
City: Nanaimo
Country: Canada
Focus: Build
Status: Professional
Hardly ever do gloss these days, and I've never done one with the cutaway flush like this.

The issue is, I can get the neck to body joint clean on the non cut side...

Image 
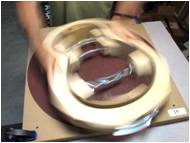
(still a bit of work there, but I'm going to quit while ahead for now)

But the cut side looks like crap, as the finish curves around the corner of the body, creating a valley that will not lie flush. I'm thinking I might need to sand the finish off the body on the cut side down to almost bare wood so that it's not a round corner.

Image
What do you guys do? Cause that really bothers me.


Top
 Profile  
 
PostPosted: Thu Oct 08, 2015 2:21 pm 
Offline
Site Admin
User avatar

Joined: Mon Dec 27, 2004 5:02 am
Posts: 8555
Location: United States
First name: Lance
Last Name: Kragenbrink
City: Vandercook Lake
State: Michigan
Zip/Postal Code: 49203
Country: USA
Focus: Build
Status: Semi-pro
I know you know this but you did scoop out the heel and are flossing with THIN sand paper right? Should be able to make that heel fit flush.

I had that same problem with this one

Attachment:
1918175_1242557136830_4029425_n.jpg


You do not have the required permissions to view the files attached to this post.

_________________
Support the OLF! Bookmark our STEWMAC link Today!
Lance@LuthiersForum.com


Top
 Profile  
 
PostPosted: Thu Oct 08, 2015 2:23 pm 
Offline
Site Admin
User avatar

Joined: Mon Dec 27, 2004 5:02 am
Posts: 8555
Location: United States
First name: Lance
Last Name: Kragenbrink
City: Vandercook Lake
State: Michigan
Zip/Postal Code: 49203
Country: USA
Focus: Build
Status: Semi-pro
by the way nice miters and nice nails :-)

_________________
Support the OLF! Bookmark our STEWMAC link Today!
Lance@LuthiersForum.com


Top
 Profile  
 
PostPosted: Thu Oct 08, 2015 2:33 pm 
Offline
Brazilian Rosewood
Brazilian Rosewood

Joined: Wed Feb 20, 2008 7:15 pm
Posts: 7548
First name: Ed
Last Name: Bond
City: Nanaimo
Country: Canada
Focus: Build
Status: Professional
Thanks! Yup, relief cut done. Here's another angle...


Top
 Profile  
 
PostPosted: Thu Oct 08, 2015 2:37 pm 
Offline
Brazilian Rosewood
Brazilian Rosewood

Joined: Wed Feb 20, 2008 7:15 pm
Posts: 7548
First name: Ed
Last Name: Bond
City: Nanaimo
Country: Canada
Focus: Build
Status: Professional
Image


Top
 Profile  
 
PostPosted: Thu Oct 08, 2015 2:55 pm 
Offline
Brazilian Rosewood
Brazilian Rosewood

Joined: Wed Feb 20, 2008 7:15 pm
Posts: 7548
First name: Ed
Last Name: Bond
City: Nanaimo
Country: Canada
Focus: Build
Status: Professional
Here I've wet sanded a bit. You can see the line of roll off between the flat sanded section and the shiny gloss. Bothersome.Image

As well, the finish on the neck was a bit roundedImage over.


Top
 Profile  
 
PostPosted: Thu Oct 08, 2015 3:07 pm 
Offline
Site Admin
User avatar

Joined: Mon Dec 27, 2004 5:02 am
Posts: 8555
Location: United States
First name: Lance
Last Name: Kragenbrink
City: Vandercook Lake
State: Michigan
Zip/Postal Code: 49203
Country: USA
Focus: Build
Status: Semi-pro
I see what you mean. On my necks I will use a chisel and carve out the back side of the heel so that there is less than 1/4" of meat touching all the way around. Im not sure this will help you as it looks like you have a different system than me.

_________________
Support the OLF! Bookmark our STEWMAC link Today!
Lance@LuthiersForum.com


Top
 Profile  
 
PostPosted: Thu Oct 08, 2015 3:27 pm 
Offline
Brazilian Rosewood
Brazilian Rosewood

Joined: Wed Feb 20, 2008 7:15 pm
Posts: 7548
First name: Ed
Last Name: Bond
City: Nanaimo
Country: Canada
Focus: Build
Status: Professional
I do the same. The issue lie with paint disliking a proper right angle. Stupid surface tension.Image


Top
 Profile  
 
PostPosted: Thu Oct 08, 2015 3:58 pm 
Offline
Contributing Member
Contributing Member
User avatar

Joined: Mon Apr 16, 2012 12:47 pm
Posts: 2575
First name: Jay
Last Name: De Rocher
City: Bothell
State: Washington
Is the round over or roll off in the wood or in the finish? I've only done two of this type of joint, but for both I sanded the wood across both sides of the joint with the neck temporarily attached to prepare for finishing and I also did the level sanding of the finish across the joint during the finish application process with the neck in place. My rationale is that you can't get round over on those edges that way in the wood or the finish .

_________________
Once in a while you get shown the light in the strangest of places if you look at it right - Robert Hunter


Top
 Profile  
 
PostPosted: Thu Oct 08, 2015 4:34 pm 
Offline
Contributing Member
Contributing Member
User avatar

Joined: Sat Dec 30, 2006 3:20 am
Posts: 2593
Location: Powell River BC Canada
First name: Danny
Last Name: Vincent
I assume you had a perfect fit before you started finishing Ed? That would more than likely mean the finish on the body has been rounded over. I would go back to 4 or 600grit and work around the neck joint area with a HARD block. I always level with dry paper. It's easier to see where you've been. 3M makes a non clog paper that is great for this. I really dislike doing much flossing around the neck joint because it can be a little chippy on the heel edge.

If you can get a little better fit before you start flossing it might make your life easier. That looks like a lot of flossing with 220 grit.


Top
 Profile  
 
PostPosted: Fri Oct 09, 2015 1:04 pm 
Offline
Koa
Koa
User avatar

Joined: Thu Nov 21, 2013 2:03 pm
Posts: 569
First name: Toonces
Last Name: the Cat
City: New Smyrna Beach
State: FL
Country: United States
Focus: Build
Status: Amateur
It doesn't help you with this situation - but in the future, leave about 1/16" offset for the heel against that edge as it still looks very good. Getting a perfectly flush neck joint on the cutaway side with separately finished neck/body is very challenging from a finishing standpoint. IMO, the only solution would be to spray a fairly thick finish at that location -- thick enough, to allow you to level sand completely and get a very sharp edge on the cutaway side. Then you would have to polish very, very carefully.


These users thanked the author Toonces for the post: DannyV (Fri Oct 09, 2015 8:56 pm)
Top
 Profile  
 
PostPosted: Sat Oct 10, 2015 12:05 am 
Offline
Koa
Koa
User avatar

Joined: Thu Aug 25, 2005 4:49 pm
Posts: 1209
Location: Ukiah, CA
J De Rocher wrote:
Is the round over or roll off in the wood or in the finish? I've only done two of this type of joint, but for both I sanded the wood across both sides of the joint with the neck temporarily attached to prepare for finishing and I also did the level sanding of the finish across the joint during the finish application process with the neck in place. My rationale is that you can't get round over on those edges that way in the wood or the finish .


+1

_________________
Ken Franklin
clumsy yet persistent
https://www.kenfranklinukulele.com


Top
 Profile  
 
PostPosted: Sat Oct 10, 2015 1:26 am 
Offline
Brazilian Rosewood
Brazilian Rosewood

Joined: Wed Feb 20, 2008 7:15 pm
Posts: 7548
First name: Ed
Last Name: Bond
City: Nanaimo
Country: Canada
Focus: Build
Status: Professional
Fit was flush before finish. It's the finish itself rounding the corner causing trouble. Might take it down to wood under the neck. Set aside for now.,.


Top
 Profile  
 
PostPosted: Tue Oct 13, 2015 2:37 pm 
Offline
Cocobolo
Cocobolo
User avatar

Joined: Sat Jul 17, 2010 11:00 am
Posts: 363
First name: Rusty
Maybe get the joint perfect as you can and spray the neck and body together?


Sent from my iPhone using Tapatalk


Top
 Profile  
 
PostPosted: Tue Oct 13, 2015 3:00 pm 
Offline
Brazilian Rosewood
Brazilian Rosewood

Joined: Wed Feb 20, 2008 7:15 pm
Posts: 7548
First name: Ed
Last Name: Bond
City: Nanaimo
Country: Canada
Focus: Build
Status: Professional
I very much feel the neck and body should be easily separated.

Had to settle for this...

Image

Ended up sanding back to wood under the neck til just under the heelcap.

Next time, I'll do the wet sanding myself, or leave a litte area for the paint to round over.


Top
 Profile  
 
PostPosted: Sat Oct 17, 2015 8:12 am 
Offline
Contributing Member
Contributing Member

Joined: Fri Jan 25, 2008 9:51 pm
Posts: 1134
Location: Albany NY
First name: David
Last Name: LaPlante
Status: Professional
I think the problem is that you are combining a "Martin" style finishing regimen (separate neck and body) with a "Guild" heel design where this body to neck joint was finished once they were joined.
When they introduced the cutaway Martin's approach was to maintain their traditional "Spanish" heel shape.
Repairmen still swear at Guild (for several reasons) but not the least of which their practice of finishing body and neck (Gibson too?) together.


Top
 Profile  
 
PostPosted: Sat Oct 17, 2015 9:17 am 
Offline
Brazilian Rosewood
Brazilian Rosewood

Joined: Wed Feb 20, 2008 7:15 pm
Posts: 7548
First name: Ed
Last Name: Bond
City: Nanaimo
Country: Canada
Focus: Build
Status: Professional
Another way of making it better would have been to align and bolt the neck on before wet sanding that joint. Could have gotten it much smoother I'm sure. Or yes, kept a more normal curvy heel.


Top
 Profile  
 
PostPosted: Sat Oct 17, 2015 6:21 pm 
Offline
Koa
Koa
User avatar

Joined: Thu Nov 21, 2013 2:03 pm
Posts: 569
First name: Toonces
Last Name: the Cat
City: New Smyrna Beach
State: FL
Country: United States
Focus: Build
Status: Amateur
That is a very good idea, Ed. Honestly tho', I think offsetting the neck just a little bit still looks very good and is easier. Here's what I do for my instruments - the heel lays inside the cutaway edge by 1/32" to 1/16". The finish still has to be leveled perfectly and that edge also has to be kept as hard as possible

Image


Top
 Profile  
 
PostPosted: Sat Oct 17, 2015 11:22 pm 
Offline
Contributing Member
Contributing Member
User avatar

Joined: Mon Apr 16, 2012 12:47 pm
Posts: 2575
First name: Jay
Last Name: De Rocher
City: Bothell
State: Washington
Personally, I think the little bit of extra work it takes to get a smooth transition is worthwhile. Just my preference. And all that the extra work really amounts to is just putting the neck on and taking it off a few times so you can do the sanding of the wood and the finish in that area with the joint closed.

Image

_________________
Once in a while you get shown the light in the strangest of places if you look at it right - Robert Hunter


Top
 Profile  
 
PostPosted: Sun Oct 18, 2015 12:01 am 
Offline
Brazilian Rosewood
Brazilian Rosewood

Joined: Wed Feb 20, 2008 7:15 pm
Posts: 7548
First name: Ed
Last Name: Bond
City: Nanaimo
Country: Canada
Focus: Build
Status: Professional
Toonces and J, your design each have some advantages...

Toonces, I'll probably do that next time, or go with a French style heel. I do 95+% satin finish where that transition is seamless...

J, the flat planes lend well to that joint. Mine transitions immediately into a curve. As well, the coplanar heelcap allows you to sand the finish off the inside edge more or less entirely, whereas I had to feather in a ledge so there was finish past the heelcap. Next time...l


These users thanked the author meddlingfool for the post: J De Rocher (Sun Oct 18, 2015 12:46 am)
Top
 Profile  
 
Display posts from previous:  Sort by  
Post new topic Reply to topic  [ 20 posts ] 

All times are UTC - 5 hours


Who is online

Users browsing this forum: Bing [Bot], Woodie G and 43 guests


You cannot post new topics in this forum
You cannot reply to topics in this forum
You cannot edit your posts in this forum
You cannot delete your posts in this forum
You cannot post attachments in this forum

Jump to:  
Powered by phpBB® Forum Software © phpBB Group
phpBB customization services by 2by2host.com