Official Luthiers Forum!

Owned and operated by Lance Kragenbrink
It is currently Tue Jun 04, 2024 10:13 am


All times are UTC - 5 hours


Post new topic Reply to topic  [ 37 posts ]  Go to page 1, 2  Next
Author Message
 Post subject:
PostPosted: Tue Dec 11, 2007 5:06 am 
Offline
Old Growth Brazilian Rosewood
User avatar

Joined: Fri Nov 02, 2007 9:49 am
Posts: 13203
Location: Ann Arbor, Michigan
First name: Hesh
Last Name: Breakstone
City: Ann Arbor
State: Michigan
Country: United States
Status: Professional
Welcome back!

It takes me approximately 30 minutes to bind the top or back of a guitar.  I always try to set myself up very well in advance since we are working against the clock here with glue that wants to jell.

For binding with wood bindings I use good old Titebond original.  Others use other glues and this is fine so long as you get good results with what you use and are comfortable working with it.

Titebond can be a bit messy so I keep a large supply of paper towels ready to be used.  I also try to be sure that I am using a bottle of Titebond that is not more then a year old.  Titebond does come with a date code on it.

Additionally I always transfer some Titebond into a Wood Craft glue bottle simply because the applicator tip on the Wood Craft bottle is smaller and easier for me to control.

Here we see my set up - the bindings and purfs have been cut to size, the center of the tail end of the guitar is marked, tape and paper towels are in easy reach, and all is well.

Not shown is a cheap artist's brush that I use to help get the glue where I want it.


I start with spreading some glue from the center of the tail end of the guitar about half way up the lower bout.  This distance is a distance that I can cover with the tape and bindings in several minutes.  The glue is spread into the channel(s) and excess glue is wiped off.


It is very important to have your purfings and binding line up well with the mark that we made on the lower bout.  This will ensure that the waist area of the bent bindings and purfings will fit well.

I also spread some glue on the side of the purfings that will contact the bindings.


Once the bindings are aligned with the center mark I begin to tape them in place again starting at the center of the tail of the guitar.  When using the brown tape I tape it to the side of the guitar first and then pull up and over as tightly as I can without breaking the tape or punching my hands through the top........  What we are looking to do here is pull the bindings and purfings as tightly as we can into the cut channels.

I always say that if my hands don't hurt when I am done binding a guitar then I didn't pull the tape tight enough.......


This process of buttering up the channels ahead of your progress is repeated as you work your way around the guitar.  I make a point to go back to the starting point fairly quickly and then clean away the squeeze out from the channels where the bindings and purfings terminate.  This makes getting a tight fit on the second half of the guitar much easier where the bindings and purfings will butt together.


Again the process is repeated and something that once started cannot be stopped.  This is why all of a sudden you will see the completed guitar below.....


As soon as I have completed a side I closely check my work for any gaps and either adjust the tape or add more tape to close any gaps.  Pay particular attention to the waist area in as much as this area is notorious for being gap prone.  Also inspect the side of the guitar to be sure that the binding were seated all the way in the channels.


And of course the same process is repeated for the second half of the top of the guitar and then the back of the guitar.


I typically will wait at least 4 hours before removing the tape and at least 24 hours before scraping the bindings level.  When working with plastic bindings and a solvent based glue it is even more important to wait at least 24 hours before scraping the bindings because the solvent based glue will shrink as the solvents dissipate into the air.  Once the .....shrinkage..... is complete your results with scraping level will be better.

To remove the tape I gently warm the tape with a hair dryer and this helps to release the adhesive.  In addition I am always sure to pull the tape in a direction that is in the neighborhood of 45 degrees to the grain and from the center of the guitar toward the edges.  This will also help avoid any tear out or lifting of top fibers.


For me the key to a good binding job is fitting everything very well in advance and being set up so that once you start everything that you need is close at hand.

Thanks folks and happy binding!


_________________
Ann Arbor Guitars


Top
 Profile  
 
 Post subject:
PostPosted: Tue Dec 11, 2007 5:27 am 
Offline
Koa
Koa

Joined: Wed Jun 01, 2005 6:35 am
Posts: 1325
Location: Kings Mtn., NC, USA
First name: Bill
Last Name: Greene
City: Kings Mountain
State: North Carolina
Zip/Postal Code: 28086
Country: USA
Focus: Build
Status: Amateur
Great job Hesh and, as always, "thank you" for all the time you put into these. They are invaluable.

Bill

_________________
Eagles may soar, but weasels don't get sucked into jet engines.


Top
 Profile  
 
 Post subject:
PostPosted: Tue Dec 11, 2007 5:44 am 
Offline
Mahogany
Mahogany

Joined: Fri Nov 30, 2007 1:57 am
Posts: 97
Location: East Granby, CT
Thanks for doing this Hesh - Do you have any on setting the rosette?


Top
 Profile  
 
 Post subject:
PostPosted: Tue Dec 11, 2007 5:45 am 
Offline
Contributing Member
Contributing Member
User avatar

Joined: Mon Mar 19, 2007 7:05 am
Posts: 9191
Location: United States
First name: Waddy
Last Name: Thomson
City: Charlotte
State: NC
Focus: Build
Status: Semi-pro
Very nice tutorial, Hesh, as we have come to expect from you.  Your clean and organized methods aid the learning curve immensely.

_________________
Waddy

Photobucket Build Album Library

Sound Clips of most of my guitars


Top
 Profile  
 
 Post subject:
PostPosted: Tue Dec 11, 2007 5:54 am 
Offline
Walnut
Walnut

Joined: Tue Oct 09, 2007 1:37 pm
Posts: 12
Location: United States
Thanks for your efforts in putting this and your other tutorials together.  I always seem to find myself making a huge mess when binding and wondering where I could have gone wrong with something which should be easy....


Top
 Profile  
 
 Post subject:
PostPosted: Tue Dec 11, 2007 6:16 am 
Offline
Koa
Koa
User avatar

Joined: Mon Sep 11, 2006 3:56 am
Posts: 855
Location: United States
Thanks, Hesh. Outstanding tutorial. Did you put anything around the edge on the top? It looks like there's something there. I use a wash coat of blonde shellace which will be sanded off later.

Regards,

_________________
Max Bishop
Brighton, Michigan


Top
 Profile  
 
 Post subject:
PostPosted: Tue Dec 11, 2007 6:32 am 
Offline
Koa
Koa

Joined: Sat Aug 04, 2007 10:37 am
Posts: 590
Location: United States
First name: Michael
Last Name: Shaw
City: Phila
State: PA
Zip/Postal Code: 19125
Country: United States
Thanks Hesh. It great that you and the others take your time doing these tutorals for us newbies.

_________________
Guitars, guitars and more guitars.


Top
 Profile  
 
 Post subject:
PostPosted: Tue Dec 11, 2007 6:33 am 
Offline
Koa
Koa
User avatar

Joined: Thu Mar 30, 2006 4:33 am
Posts: 1513
Location: Canada
Part 2 is great too Hesh - you rock!
Cheers
Charlie


Top
 Profile  
 
 Post subject:
PostPosted: Tue Dec 11, 2007 6:39 am 
Offline
Old Growth Brazilian Rosewood
User avatar

Joined: Fri Nov 02, 2007 9:49 am
Posts: 13203
Location: Ann Arbor, Michigan
First name: Hesh
Last Name: Breakstone
City: Ann Arbor
State: Michigan
Country: United States
Status: Professional
Thanks guys!

Mitch here is a link to the OLF tutorial page and if you scroll down to rosettes you will see some good tutorials.  I did one too that was embedded in another thread and I can never find it but Anthony Z has found it before.  Here is your link.

http://www.connor.net.au/olftutorial/

Gabriel this is messy for me too and I go through an indecent amount of paper towels but the results are good.

Max buddy right you are - there is a thin coat of shellac on the top.


_________________
Ann Arbor Guitars


Top
 Profile  
 
 Post subject:
PostPosted: Tue Dec 11, 2007 7:30 am 
Offline
Contributing Member
Contributing Member

Joined: Sat Aug 25, 2007 2:05 am
Posts: 680
Location: Saint Petersburg, Florida
First name: Glenn
Last Name: LaSalle
City: Saint Petersburg
State: Florida
Status: Amateur

Hesh,


Thanks!! This is what makes the OLF so valuable for us newbies.


Glenn


Top
 Profile  
 
 Post subject:
PostPosted: Tue Dec 11, 2007 7:37 am 
Offline
Old Growth Brazilian

Joined: Tue Dec 28, 2004 1:56 am
Posts: 10707
Location: United States
Great point to point out Hesh!!!!!!!

The shellac does many things for you. Keep glue from penitrating the top, keeps the tape from wanting to pull off fibers from the top. And!!! if you apply it before you rout it helps some to prevent tearouts and fuzzing.


Top
 Profile  
 
 Post subject:
PostPosted: Tue Dec 11, 2007 7:55 am 
Offline
Cocobolo
Cocobolo

Joined: Tue Aug 15, 2006 8:03 am
Posts: 456
Location: Toronto, Canada
Thanks for taking the time to do this Hesh.

I have been using CA. One problem with the CA is that it sets so quickly if you spot a gap it is sometimes to late to do anything about it.

_________________
David White, Toronto

"All my favourite singers can't sing."


Top
 Profile  
 
 Post subject:
PostPosted: Tue Dec 11, 2007 8:00 am 
Offline
Old Growth Brazilian

Joined: Tue Dec 28, 2004 1:56 am
Posts: 10707
Location: United States
No it is not. a little acetone will decure the CA( for lack of a better term).


Top
 Profile  
 
 Post subject:
PostPosted: Tue Dec 11, 2007 8:10 am 
Offline
Old Growth Brazilian Rosewood
User avatar

Joined: Fri Nov 02, 2007 9:49 am
Posts: 13203
Location: Ann Arbor, Michigan
First name: Hesh
Last Name: Breakstone
City: Ann Arbor
State: Michigan
Country: United States
Status: Professional

[QUOTE=drwhite]Thanks for taking the time to do this Hesh.


I have been using CA. One problem with the CA is that it sets so quickly if you spot a gap it is sometimes to late to do anything about it.[/QUOTE]

Or.... don't use CA for bindings  We argue about this issue often here on the OLF and at the risk of being redundant, or overly redundant..... I don't like CA for guitar building.  For inlay it's cool but it is just way to easy to gain a false sense of security from CA. 

We have a member who had to remove a binding that was glued on with CA and noticed that when he went to remove the binding much of it just popped right off with no effort in some areas.......

Anyway consider using a slower setting glue.  Fish glue is another glue that I want to try and others have had success with other glues.

Also, how many people have stained tops from CA use for bindings and rosettes?  Lots including me on early guitars.

_________________
Ann Arbor Guitars


Top
 Profile  
 
 Post subject:
PostPosted: Tue Dec 11, 2007 8:15 am 
Offline
Mahogany
Mahogany

Joined: Sun Oct 28, 2007 9:33 am
Posts: 60
Location: Canada
Hesh....Great tutorial.....Makes me want to run out to the shed and bind up something........When I see pics I always pay close attention...The tape dispencer caught my eye.....good idea...Larry.


Top
 Profile  
 
 Post subject:
PostPosted: Tue Dec 11, 2007 8:37 am 
Offline
Brazilian Rosewood
Brazilian Rosewood
User avatar

Joined: Thu Mar 01, 2007 3:15 pm
Posts: 2302
Location: Florida
Excellent tutorial Hesh!!

_________________
Reguards,

Ken H


Top
 Profile  
 
 Post subject:
PostPosted: Tue Dec 11, 2007 8:41 am 
Offline
Cocobolo
Cocobolo
User avatar

Joined: Wed Aug 24, 2005 11:15 am
Posts: 356
Location: United States
Focus: Build
Status: Professional
Hesh, nice tutorial. I think Titebond is perfect for bindings, for everything else I use fish glue except for fretboard extensions and bridges (hot hide glue for those). I've battled with carpel tunnel over the years, but for some reason it seems to have mostly subsided, EXCEPT for when I bind guitars. Then I need to give my hands a days rest.

_________________
Randy Muth
RS Muth Guitars Website
RS Muth Guitars Blog
Facebook Fan Page


Top
 Profile  
 
 Post subject:
PostPosted: Tue Dec 11, 2007 9:06 am 
Offline
Old Growth Brazilian Rosewood
User avatar

Joined: Fri Nov 02, 2007 9:49 am
Posts: 13203
Location: Ann Arbor, Michigan
First name: Hesh
Last Name: Breakstone
City: Ann Arbor
State: Michigan
Country: United States
Status: Professional
Randy so binding is pretty hard on your hands too then.  I can relate.....

OK folks I thought that I would "scrape" together a few more pics.  So I went ahead and scraped the front of the guitar and hit it with the ROS.

Here are my results - no gaps to fill and I think that these Mahog-O-Lam purfings look pretty cool with BRW bindings.

Take a look.


_________________
Ann Arbor Guitars


Top
 Profile  
 
 Post subject:
PostPosted: Tue Dec 11, 2007 10:12 am 
Offline
Cocobolo
Cocobolo

Joined: Sat Aug 25, 2007 12:59 pm
Posts: 241

Thought I would add a bit of alternate method here.... My process is pretty much the same as yours Hesh with the difference being that once the bindings are fitted, glued (Titebond) and taped (I use good old masking tape). I then wrap the guitar in seam tape (mine is stretchy but non stretchy cotton tape is fine too) tightly. This provides far more pressure than sticky 
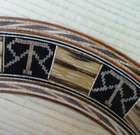
tape. the ends of the 20 yards or so of material are fastened by tapping in aluminum push pins in an area that is solid and won't be seen once the guitar is finished. The tape is then removed by sliding the cloth binding aside and peeling as you describe, this provides for quicker drying of the glue and a fit check.


Top
 Profile  
 
 Post subject:
PostPosted: Tue Dec 11, 2007 10:27 am 
Offline
Koa
Koa

Joined: Sun Sep 23, 2007 12:39 am
Posts: 1016
Location: United States
  Hey  TEACH... er Hesh    Nice tutorial... thanks for sharing   ! DP  ? you are doing bindings after the neck is attached? interesting , I have not seen it done that way, any trouble routing  where the neck meets the box? thanks Jody


Top
 Profile  
 
 Post subject:
PostPosted: Tue Dec 11, 2007 10:34 am 
Offline
Cocobolo
Cocobolo

Joined: Sat Aug 25, 2007 12:59 pm
Posts: 241

This is a classical guitar which are assembled neck on unlike a steel string with a separate neck and body.


Yes one has to be careful to delineate where to halt the router and finish the channels with knife and chisel. 


Top
 Profile  
 
 Post subject:
PostPosted: Tue Dec 11, 2007 10:54 am 
Offline
Old Growth Brazilian Rosewood
User avatar

Joined: Fri Nov 02, 2007 9:49 am
Posts: 13203
Location: Ann Arbor, Michigan
First name: Hesh
Last Name: Breakstone
City: Ann Arbor
State: Michigan
Country: United States
Status: Professional
Thanks Jody buddy!

David your methods looks very cool.  I have seen this done with inner tubes and latex hose as well.  My understanding is that neither of these materials will stick to the Titebond either.

BTW beautiful craftsmanship, not just workmanship since I now know the difference after reading David Pye, in your very fine work!!!

Additionally, there is no waste in your method since you can reuse the seam tape over and over.  Nice job!


_________________
Ann Arbor Guitars


Top
 Profile  
 
 Post subject:
PostPosted: Tue Dec 11, 2007 11:09 am 
Offline
Koa
Koa
User avatar

Joined: Sat Jul 01, 2006 5:55 am
Posts: 1392
Location: United States
First name: James
Last Name: Bolan
City: Nashville
State: Tennessee
Country: USA
Great Tutorial Hesh.You are so productive it is unbelievable.Looks like you`ve got another great guitar in the works.
                   James

_________________
James W Bolan
Nashville Tennessee


Top
 Profile  
 
 Post subject:
PostPosted: Tue Dec 11, 2007 11:20 am 
Offline
Cocobolo
Cocobolo

Joined: Fri Nov 16, 2007 8:36 am
Posts: 114
Location: United States
First name: kurt
Last Name: thomas
City: colden
State: ny
Zip/Postal Code: 14033
Status: Amateur
Yeah Hesh, this stuff is just invaluable to newbies like me, that goes for you other guys that post building tips and advice, THANKS!

_________________
_____________________________

Kurt Thomas

"There's a first time for everything even if you do it by mistake."


Top
 Profile  
 
 Post subject:
PostPosted: Tue Dec 11, 2007 12:32 pm 
Offline
Koa
Koa

Joined: Wed Jun 01, 2005 6:35 am
Posts: 1325
Location: Kings Mtn., NC, USA
First name: Bill
Last Name: Greene
City: Kings Mountain
State: North Carolina
Zip/Postal Code: 28086
Country: USA
Focus: Build
Status: Amateur
Todd:

Do you do plates to the rims with this setup?

Bill

_________________
Eagles may soar, but weasels don't get sucked into jet engines.


Top
 Profile  
 
Display posts from previous:  Sort by  
Post new topic Reply to topic  [ 37 posts ]  Go to page 1, 2  Next

All times are UTC - 5 hours


Who is online

Users browsing this forum: Facebook [Bot] and 4 guests


You cannot post new topics in this forum
You cannot reply to topics in this forum
You cannot edit your posts in this forum
You cannot delete your posts in this forum
You cannot post attachments in this forum

Jump to:  
Powered by phpBB® Forum Software © phpBB Group
phpBB customization services by 2by2host.com