Official Luthiers Forum!

Owned and operated by Lance Kragenbrink
It is currently Mon Mar 18, 2024 11:57 pm


All times are UTC - 5 hours


Post new topic Reply to topic  [ 148 posts ]  Go to page Previous  1, 2, 3, 4, 5, 6
Author Message
PostPosted: Wed Nov 14, 2012 11:56 pm 
Offline
Brazilian Rosewood
Brazilian Rosewood
User avatar

Joined: Thu Feb 12, 2009 12:12 pm
Posts: 3290
First name: Bryan
Last Name: Bear
City: St. Louis
State: Mo
Country: USA
Focus: Build
Status: Amateur
That looks sweet!

_________________
Bryan Bear PMoMC

Take care of your feet, and your feet will take care of you.


Top
 Profile  
 
PostPosted: Thu Nov 15, 2012 10:19 am 
Offline
Brazilian Rosewood
Brazilian Rosewood

Joined: Tue May 13, 2008 10:44 am
Posts: 6232
Location: Virginia
Fantastic, can't wait to hear it.


Top
 Profile  
 
PostPosted: Thu Nov 15, 2012 10:30 am 
Offline
Contributing Member
Contributing Member
User avatar

Joined: Tue Oct 12, 2010 9:01 pm
Posts: 3031
First name: Tony
Last Name: C
City: Brooklyn
State: NY
Focus: Build
Status: Amateur
A real looker for sure. Nicely done.

_________________
http://www.CostaGuitars.com
PMoMC


Top
 Profile  
 
PostPosted: Tue Nov 20, 2012 8:30 am 
Offline
Contributing Member
Contributing Member
User avatar

Joined: Sat Feb 02, 2008 4:01 pm
Posts: 1104
Location: Winfield, IL.
Thanks everyone, it turned out nicer than I hoped. Initialy I thought I had way over built the top, the insturment was quite lacking in volume. After completeing the setup and with the strings on for the last few days it's really starting to perk up and I'm sure all is well.

Here are a few shots from doing the set up. All that's left on this one is a good hand polishing and an end pin.


You do not have the required permissions to view the files attached to this post.


Top
 Profile  
 
PostPosted: Tue Nov 20, 2012 9:53 am 
Offline
Contributing Member
Contributing Member
User avatar

Joined: Wed Jan 13, 2010 12:46 am
Posts: 1247
First name: Beth
Last Name: Mayer
City: Tucson
State: AZ
Country: United States
Focus: Build
Status: Amateur
Gorgeous!!!!


Top
 Profile  
 
PostPosted: Tue Nov 20, 2012 5:33 pm 
Offline
Contributing Member
Contributing Member
User avatar

Joined: Sat Feb 02, 2008 4:01 pm
Posts: 1104
Location: Winfield, IL.
Today I had a few hours after work so I changed gears in the shop and assembled the Baritone Uke.

First was the bridge ground. Always exciting to drill these after finising because you forgot to do it earlier.
Attachment:
Challange Uku-wail-e 001.JPG


Then the bridge.
Attachment:
Challange Uku-wail-e 002.JPG


Pickup.
Attachment:
Challange Uku-wail-e 004.JPG


The volume pot and the output jack.
Attachment:
Challange Uku-wail-e 005.JPG


You do not have the required permissions to view the files attached to this post.


Top
 Profile  
 
PostPosted: Tue Nov 20, 2012 5:47 pm 
Offline
Contributing Member
Contributing Member
User avatar

Joined: Sat Feb 02, 2008 4:01 pm
Posts: 1104
Location: Winfield, IL.
A piece of 220 grit sandpaper is used to scuff the back of the pot and then a blob of solder is added to the back of the pot for the ground wires. The same treatment is given to the case where the third lug of the pot is grounded.
Attachment:
Challange Uku-wail-e 007.JPG

Attachment:
Challange Uku-wail-e 008.JPG


Solder all the wires in. These one pickup one volume setups are so easy to wire, you barely have to think.
Attachment:
Challange Uku-wail-e 009.JPG


Install the electronics cover and your done. I'll have to go back and see if I showed how this cover is made. That small anomaly by the lower left screw is where I touched the finish with the soldering iron. [headinwall] Always nice to get to practice your touch up techniques on a brand new insturment.
Attachment:
Challange Uku-wail-e 010.JPG


You do not have the required permissions to view the files attached to this post.


Top
 Profile  
 
PostPosted: Tue Nov 20, 2012 6:03 pm 
Offline
Contributing Member
Contributing Member
User avatar

Joined: Sat Feb 02, 2008 4:01 pm
Posts: 1104
Location: Winfield, IL.
Installed these nice Grover tuners I got from Stew-Mac. Not sure if they really are that crooked or if it's the camera angle.
Attachment:
Challange Uku-wail-e 014.JPG

Attachment:
Challange Uku-wail-e 015.JPG


Then I got lazy with the camera for all the fret dressing, nut finishing, saddle adjustment, etc. Here it is all strung up and ready to rock.
Attachment:
Challange Uku-wail-e 018.JPG


The string tension is a bit low with the DGBe tuing and 19" scale. I might swap out for heavier strings. This is a set of super slinkys (.009 thru.042) with the high and low strings tossed out leaving me with .011, .016, .022w and .032. I might change it to .016 thru .042 and see how that feels. More than likely I'll wait until my friend Joe plays it to make any changes


You do not have the required permissions to view the files attached to this post.


Top
 Profile  
 
PostPosted: Wed Nov 21, 2012 11:53 am 
Offline
Contributing Member
Contributing Member
User avatar

Joined: Wed Jan 13, 2010 12:46 am
Posts: 1247
First name: Beth
Last Name: Mayer
City: Tucson
State: AZ
Country: United States
Focus: Build
Status: Amateur
You make it look so easy! Nice little uke!


Top
 Profile  
 
PostPosted: Wed Nov 21, 2012 1:39 pm 
Offline
Contributing Member
Contributing Member
User avatar

Joined: Sat Feb 02, 2008 4:01 pm
Posts: 1104
Location: Winfield, IL.
Thanks Beth,

After 25 or so insturments some things do seem easy, and then others are still bite you in the butt.

I made the last piece for the Mandolin today. I needed an end pin and since I know I'm getting awful close to the budget limit, I thought I'd make one. Problem is I dont have a 3 or 4 jaw chuck for my lathe so I used my drill press.

A little table saw action, some glue and clamps and the last of the ebony I used for the tuner buttons is the correct size.


You do not have the required permissions to view the files attached to this post.


Top
 Profile  
 
PostPosted: Wed Nov 21, 2012 1:47 pm 
Offline
Contributing Member
Contributing Member
User avatar

Joined: Sat Feb 02, 2008 4:01 pm
Posts: 1104
Location: Winfield, IL.
Made the piece round with a gouge.
Attachment:
Challange Mandolin 008.JPG

Cut the diameter for the nub above the taper.
Attachment:
Challange Mandolin 009.JPG

Cut the major diameter of the taper.
Attachment:
Challange Mandolin 010.JPG

Cleared some extra stuff out of the way.
Attachment:
Challange Mandolin 011.JPG

And set the minor diameter of the taper.
Attachment:
Challange Mandolin 012.JPG


You do not have the required permissions to view the files attached to this post.


Top
 Profile  
 
PostPosted: Wed Nov 21, 2012 1:52 pm 
Offline
Contributing Member
Contributing Member
User avatar

Joined: Sat Feb 02, 2008 4:01 pm
Posts: 1104
Location: Winfield, IL.
A large skew connects the two diameters.
Attachment:
Challange Mandolin 013.JPG


Here you can see where we're at and where we're going.
Attachment:
Challange Mandolin 014.JPG


Pretty close, a little more work is needed on the top.
Attachment:
Challange Mandolin 016.JPG


You do not have the required permissions to view the files attached to this post.


Top
 Profile  
 
PostPosted: Wed Nov 21, 2012 2:03 pm 
Offline
Contributing Member
Contributing Member
User avatar

Joined: Sat Feb 02, 2008 4:01 pm
Posts: 1104
Location: Winfield, IL.
A little clean up with a small file and 220 grit sand paper then on to the Micro Mesh. I went up through the grits to 3600.
Attachment:
Challange Mandolin 018.JPG


Thin CA and a paper towel finishes off the polishing.
Attachment:
Challange Mandolin 019.JPG


Now I have to cut the pin free and do the same finishing to the top.
Attachment:
Challange Mandolin 020.JPG


Here is the completed pin next to the Stew-Mac one I copied.
Attachment:
Challange Mandolin 021.JPG


And installed. One Jazz Mando completed.
Attachment:
Challange Mandolin 023.JPG


You do not have the required permissions to view the files attached to this post.


Top
 Profile  
 
PostPosted: Wed Nov 21, 2012 2:09 pm 
Offline
Contributing Member
Contributing Member
User avatar

Joined: Sat Feb 02, 2008 4:01 pm
Posts: 1104
Location: Winfield, IL.
Since I had strap buttons on my mind, I rustled around in the spare parts the bin and came up with this.
Attachment:
Challange Mandolin 024.JPG


Here is a helpful hint. To eliminate the chance of chipping lacquer, hit your mark with a hot soldering iron before drilling the pilot hole.
Attachment:
Challange Mandolin 026.JPG


Uke is officially finished.
Attachment:
Challange Mandolin 027.JPG


You do not have the required permissions to view the files attached to this post.


Top
 Profile  
 
PostPosted: Wed Nov 21, 2012 3:02 pm 
Offline
Contributing Member
Contributing Member
User avatar

Joined: Fri Feb 01, 2008 8:47 am
Posts: 1244
Location: Montreal, Canada
Focus: Build
Status: Amateur
Steve, could you send me a picture of yourself, just so I can make a poster out of it, hang it on my wall and spend my days idolizing you?

_________________
Alain Moisan
Former full time builder of Acoustics, Classicals and Flamencos.
(Now building just for fun!)


Top
 Profile  
 
PostPosted: Wed Nov 21, 2012 3:13 pm 
Offline
Contributing Member
Contributing Member
User avatar

Joined: Wed Oct 08, 2008 11:36 am
Posts: 7233
Location: Southeast US
City: Lenoir City
State: TN
Zip/Postal Code: 37772
Country: US
Focus: Repair
Alain Moisan wrote:
Steve, could you send me a picture of yourself, just so I can make a poster out of it, hang it on my wall and spend my days idolizing you?


laughing6-hehe laughing6-hehe

_________________
Steve Smith
"Music is what feelings sound like"


Top
 Profile  
 
PostPosted: Wed Nov 21, 2012 4:30 pm 
Offline
Contributing Member
Contributing Member
User avatar

Joined: Sat Feb 02, 2008 4:01 pm
Posts: 1104
Location: Winfield, IL.
SteveSmith wrote:
laughing6-hehe laughing6-hehe


This x 2 plus one of these.


You do not have the required permissions to view the files attached to this post.


Top
 Profile  
 
PostPosted: Wed Nov 21, 2012 6:19 pm 
Offline
Contributing Member
Contributing Member

Joined: Fri Jun 22, 2012 11:12 am
Posts: 1170
First name: Rodger
Last Name: Knox
City: Baltimore
State: MD
Zip/Postal Code: 21234
Country: USA
Focus: Build
Status: Amateur
Everything looks great, except that last pic.
I think that guy used to play bass in my band, he looked better then.

_________________
A man hears what he wants to hear, and disreguards the rest. Paul Simon


Top
 Profile  
 
PostPosted: Wed Nov 21, 2012 6:45 pm 
Offline
Contributing Member
Contributing Member
User avatar

Joined: Wed Jan 13, 2010 12:46 am
Posts: 1247
First name: Beth
Last Name: Mayer
City: Tucson
State: AZ
Country: United States
Focus: Build
Status: Amateur
StevenWheeler wrote:
A large skew connects the two diameters.
Attachment:
Challange Mandolin 013.JPG


Here you can see where we're at and where we're going.
Attachment:
Challange Mandolin 014.JPG


Pretty close, a little more work is needed on the top.
Attachment:
Challange Mandolin 016.JPG


That is brilliant! I can't believe how precise it turned ( laughing6-hehe ) out.


Top
 Profile  
 
PostPosted: Tue Nov 27, 2012 10:04 am 
Offline
Contributing Member
Contributing Member
User avatar

Joined: Tue Oct 12, 2010 9:01 pm
Posts: 3031
First name: Tony
Last Name: C
City: Brooklyn
State: NY
Focus: Build
Status: Amateur
That end pin picture sequence is great. Thanks for posting the process. You have done a killer job with all of these instruments. My rather large hat is off to you, sir.

_________________
http://www.CostaGuitars.com
PMoMC


Top
 Profile  
 
PostPosted: Sun May 19, 2013 12:56 pm 
Offline
Brazilian Rosewood
Brazilian Rosewood
User avatar

Joined: Thu Feb 12, 2009 12:12 pm
Posts: 3290
First name: Bryan
Last Name: Bear
City: St. Louis
State: Mo
Country: USA
Focus: Build
Status: Amateur
I got to see all of these instruments yesterday. I can tell you all that the black jazz mando looks even cooler in person! Also Steve looks different in person than the picture he posted. I'm not against posting a pic that makes you look better than you usually do, but I was surprised to learn he wears glasses.

_________________
Bryan Bear PMoMC

Take care of your feet, and your feet will take care of you.


Top
 Profile  
 
PostPosted: Sun May 19, 2013 2:10 pm 
Offline
Contributing Member
Contributing Member
User avatar

Joined: Wed Jan 13, 2010 12:46 am
Posts: 1247
First name: Beth
Last Name: Mayer
City: Tucson
State: AZ
Country: United States
Focus: Build
Status: Amateur
I thought he was adorable in his glamour shot! And his instruments are insanely cool!


Top
 Profile  
 
PostPosted: Tue May 21, 2013 11:24 am 
Offline
Contributing Member
Contributing Member
User avatar

Joined: Sun Jun 10, 2012 10:04 am
Posts: 773
First name: Peter
Last Name: Fenske
City: Leeds
State: Yorkshire
Country: Uk
Focus: Build
Status: Amateur
What happened to the video of these? I'm still waiting to see Steve play them all at once! laughing6-hehe

_________________
"I am always doing that which I cannot do, in order that I may learn how to do it."
Pablo Picasso

https://www.facebook.com/FenskeGuitars


Top
 Profile  
 
Display posts from previous:  Sort by  
Post new topic Reply to topic  [ 148 posts ]  Go to page Previous  1, 2, 3, 4, 5, 6

All times are UTC - 5 hours


Who is online

Users browsing this forum: No registered users and 5 guests


You cannot post new topics in this forum
You cannot reply to topics in this forum
You cannot edit your posts in this forum
You cannot delete your posts in this forum
You cannot post attachments in this forum
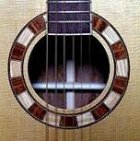
Jump to:  
cron
Powered by phpBB® Forum Software © phpBB Group
phpBB customization services by 2by2host.com