Official Luthiers Forum!

Owned and operated by Lance Kragenbrink
It is currently Thu Aug 07, 2025 10:24 pm


All times are UTC - 5 hours


Forum rules


Be nice, no cussin and enjoy!


Post new topic Reply to topic  [ 36 posts ]  Go to page 1, 2  Next
Author Message
PostPosted: Fri Mar 04, 2011 4:06 pm 
Offline
Koa
Koa
User avatar

Joined: Mon Oct 08, 2007 2:31 am
Posts: 936
Location: Ottawa, Canada
Hi all,

I just finished up this tenor uke today:

Image

Image

Image

Image

Image

The inspiration for it was some "scrap" Brazilian that was included with a couple of guitar sets. I figured out there was just enough for the uke so there you go. Sounds pretty good. The top is Englemann spruce, the bindings are bubinga and the purfling and rosette is blue paua abalone zipflex. Now for the important part:

I used this uke as a test bed for the cureUV.com finish which I bought a couple of weeks ago. This finish is real deal, i.e. it all works as advertised. My finish schedule has now dropped from two weeks to one day.

For me, there was about a three day learning curve. There were two main things to learn: How to handle the "nibs" that appear when the coating is applied (answer: sand until they are gone) and how to get up to a gloss finish (answer: be prepared to spend a relatively long time buffing).

When done, the finish is as tough as nails (well at least tougher than my finger nails as I can't scratch it). It is wonderful to be able to brush on the coating, wait five minutes for it to level out, zap it with the light than carry on. And, oh yes, I glued the bridge right to the finish with thick CA. Easy - squeeze out was cleaned up with acetone.

I'll be happy to try and answer any question anyone has on the coating. I haven't tried spraying it so I can't help you there.

Cheers,
Pat

_________________
There are three kinds of people:

Those that make things happen,
those that watch things happen,
and those that wondered what happened.


Top
 Profile  
 
PostPosted: Fri Mar 04, 2011 4:33 pm 
Offline
Brazilian Rosewood
Brazilian Rosewood

Joined: Wed Feb 20, 2008 7:15 pm
Posts: 7548
First name: Ed
Last Name: Bond
City: Nanaimo
Country: Canada
Focus: Build
Status: Professional
Ok, I'll bite!
1) please describe porefill
2) how many brushed on coats
3) how much was the initial cost outlay
4) what kind of shop setup/booth is required
It seems very promising.


Top
 Profile  
 
PostPosted: Fri Mar 04, 2011 5:11 pm 
Offline
Koa
Koa
User avatar

Joined: Mon Oct 08, 2007 2:31 am
Posts: 936
Location: Ottawa, Canada
1) There are three parts to the finishing. First is a sealer that is applied on oily type woods. It is applied and allowed to dry for ~15 min. Next is a gelatin pore filler that is wiped on with a rag followed by a wipe off of the excess. This is cured instantly with the UV light. I did a second application of the pore filler but that may not have been necessary. This was by far the easiest method I've used to fill pores.
2) I brushed on two top coats. When it came time to sand away the area that would be under the fret board extension it took a lot of sanding and it made me think that I could have gotten away with one top coat.
3) By the time I paid for shipping and UPS brokerage fees, my total outlay was closing in on 3K Canadian dollars. This is now my most expensive tool.
4) You need a plug for the light and protection for your skin and eyes. The instructions advise that the light creates ozone so you should have some ventilation. I found there was a mild odor and I kept a nearby window open.

Pat

_________________
There are three kinds of people:

Those that make things happen,
those that watch things happen,
and those that wondered what happened.


Top
 Profile  
 
PostPosted: Fri Mar 04, 2011 5:29 pm 
Offline
Cocobolo
Cocobolo
User avatar

Joined: Sun Jun 24, 2007 1:14 am
Posts: 246
Location: United States
City: Keene
State: NH
Pat, I just ordered my setup this morning! Talk about a timely post... I will be spraying mine with an Asturo mini hvlp gun designed to spray waterborne finishes... Can't wait to try it out. I have an EIR/sitka dread that has been ready for finish for a few weeks now... - Justin


Top
 Profile  
 
PostPosted: Fri Mar 04, 2011 5:42 pm 
Offline
Koa
Koa
User avatar

Joined: Mon Oct 08, 2007 2:31 am
Posts: 936
Location: Ottawa, Canada
Please forgive the following post as it is based upon my ignorance of spraying.

I've been having an email exchange with Dave Fifield and in one of them I expressed the opinion that there may, in fact, be advantages to simply brushing. Here's what I said to him are the advantages:

1) It's no fuss. Throw-away foam "brushes" work fine. In fact, because the stuff doesn't evaporate or cure unit it's hit with the light, I have found that the brush stays moist and usable for days at least (my original is still good) even if just left sitting out. After a life time of working with regular paints, I am finding this downright weird.

2) You can do one surface at a time - it works. When I was at first getting frustrated, I stopped working on the whole uke body and decided just to do the back and get that right. Then I did the top. Then I did the sides. I had anticipated that I would get too many drips or that the edges would turn out bad and I would need to sand back the whole body and coat it all at once. That turned out to be unnecessary. I was careful to do a thin coat on the sides and to be mindful of drips as the finish flowed out (I turned the body over often) and all was OK. So I used this method on the neck - doing the front of the head first.

3) Extending on from above, it's very handy to apply the coating to a small area, zap it with the light, and carry on.

4) With respect to nibs, I think most of them are "discontinuities" caused by the surface tension of the coating. I discovered a little trick. When I was doing the front of the head I had a relatively small number of nibs and I was watching them carefully as the coating was flowing out. Then I tried dabbing one very lightly with a corner of my foam brush. Much to my surprise, I replaced the nib with a little hill of finish which then quickly levelled. So I repeated that and ended up with a head with zero nibs! I don't know if that would be practical over a whole body, but it's interesting.

Again this is probably my ignorance talking, but I don't see what advantage spraying could have. Dave and I both had the same "issues" and he was spraying while I was brushing. It seems to me that the end result is determined by how well the finish flows and the sanding and buffing out. However, as most people spray, I know I must be missing something.

Pat

_________________
There are three kinds of people:

Those that make things happen,
those that watch things happen,
and those that wondered what happened.


Top
 Profile  
 
PostPosted: Sat Mar 05, 2011 12:24 am 
Offline
Cocobolo
Cocobolo

Joined: Thu Feb 24, 2011 1:43 am
Posts: 108
Location: Gilbert Arizona
First name: Brian
Last Name: Forbes
City: Gilbert
State: Arizona
Zip/Postal Code: 85297
Country: USA
Focus: Build
Status: Semi-pro
That is a BEAUTIFUL uke. I don't have the capacity to spray so I use tru-oil for everything, but that finish seems to be all brush on, which is something I plan on looking into. I can get a pretty glossy finish with tru-oil, but I cant get it like you did.

_________________
http://www.sixgunguitars.com


Top
 Profile  
 
PostPosted: Sat Mar 05, 2011 3:29 am 
Offline
Koa
Koa
User avatar

Joined: Wed Jan 23, 2008 8:05 pm
Posts: 1567
Location: San Jose, CA
First name: Dave
Last Name: Fifield
City: San Jose
State: CA
Zip/Postal Code: 95124
Country: USA
Focus: Build
Status: Amateur
That's a beauty of a uke Pat! Came out real nice!! How does it sound?

Having considered all the issues I had with spraying, I'm probably not going to do it that way again. Pat's reasons for using the stuff with a brush are all good IMO. The biggest advantage, being able to do one area at a time, is enough to convince me! I'd be very interested to hear how you get on spraying it Justin.

In addition to little nibs that need to be sanded flat, I found quite a few dips in my finish too. These were NOT due to pores. As Pat said above, the UV cured gel filler does a fantastic job on the pores and I agree that one pass of the filler would be enough. The dips (little craters) were due to my spraying technique (not wet enough for the amount of air apparently) and were formed when the orange-peely looking spray job didn't flow out as well as I hoped.

Coincidently, I am also experimenting with the finish on a tenor uke (no colusion with Pat on this, I swear!). Mines a few days behind Pat's though - I still have to put finish on/cure the neck, glue the bridge on, and string and set the uke up. I polished out the uke body a couple days ago and was generally very pleased with the result, except for the little dips here and there. Tonight, I tried an experiment. I used one of those micro plastic pipettes (I bought a box of 1000 recently) and drop-filled the dips with UV polyester finish, then cured them with the lamp, then started over at 400 grit and on up through 2500 grit and on to the polishing wheels. The dips completely disappeared. Not a trace of them anywhere. So, it looks like this finish "burns in" quite nicely too! Handy for repairs later I suspect! My uke body now looks fantastic (like Pat's, but it's an all-curly-Koa model). I'll post some pictures of it when it's done (probably Sunday evening).

As Pat says, the trick to getting the perfect finish with this material, is to make sure it's all flowed out and evenly spread BEFORE curing! I can also attest to its hardness - I accidently knocked my uke quite hard on the edge of one of my benches - my heart stopped for a moment - but there wasn't a single mark! It's a bear to sand too, so if you get lucky enough to afford the system, you'll want to aim for super thin flat coats every time.

Oh, one final warning - before you use the UV lamp, make sure to close up your can of finish and hide your sprayer/brush and/or micro pipette!! I forgot to move my pipette from the bench on one round of curing and it ended up rock solid!! gaah 
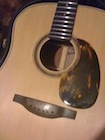
Good job they are cheap!

Cheers for now,
Dave F.

_________________
Cambrian Guitars

"There goes Mister Tic-Tac out the back with some bric-brac from the knick-knack rack"


Top
 Profile  
 
PostPosted: Sat Mar 05, 2011 10:45 am 
Offline
Brazilian Rosewood
Brazilian Rosewood
User avatar

Joined: Tue May 02, 2006 9:02 am
Posts: 2351
Location: Canada
First name: Bob
Last Name: Garrish
City: Toronto
State: Ontario
Country: Canada
Status: Professional
Some of the comments remind me of a conversation I had with Kevin Ryan about UV polyester a long time ago. The gist of the conversation was, after an "I don't recommend this...but" disclaimer: the the stuff's acetone proof so you can clean your guitar with everyones favourite safe solvent, it's harder than most pickguard materials (and picks) so a pickguard isn't really necessary, and the adhesion is such that it's impossible to separate from the wood once applied. He said he'd applied the stuff and sawn the pieces right side up and upside down, etc, and the finish would not break off of the wood period.

The 15 minute isolator sounds like the one Chemcraft has. The McFadden one was much slower (hours, maybe even 12 or 24?). I wonder if they're rebadging the Chemcraft product and selling with the lights?

_________________
Bob Garrish
Former Canonized Purveyor of Fine CNC Luthier Services


Top
 Profile  
 
PostPosted: Sat Mar 05, 2011 10:20 pm 
Offline
Koa
Koa

Joined: Tue Jan 18, 2005 11:36 am
Posts: 1595
State: ON
Country: Canada
Status: Professional
To those using this finish, any idea what sort of finish thickness you are ending up with?

Josh

_________________
Josh House

Canadian Luthier Supply
http://www.canadianluthiersupply.com
https://www.facebook.com/canadianluthiersupply?ref=hl
House Guitars - Custom Built Acoustic Instruments.
http://www.houseguitars.com


Top
 Profile  
 
PostPosted: Sun Mar 06, 2011 5:20 am 
Offline
Koa
Koa
User avatar

Joined: Wed Jan 23, 2008 8:05 pm
Posts: 1567
Location: San Jose, CA
First name: Dave
Last Name: Fifield
City: San Jose
State: CA
Zip/Postal Code: 95124
Country: USA
Focus: Build
Status: Amateur
Josh,

I've only used it on two instruments to date. I measure it at 3 mil thick on both of them. That's thick enough to give the finish some nice depth (curly woods really pop nicely under it), yet thin enough that it hardly affects the sound at all.

Cheers,
Dave F.

_________________
Cambrian Guitars

"There goes Mister Tic-Tac out the back with some bric-brac from the knick-knack rack"


Top
 Profile  
 
PostPosted: Sun Mar 06, 2011 7:19 am 
Offline
Koa
Koa
User avatar

Joined: Sat Mar 07, 2009 7:56 am
Posts: 1825
Location: Grover NC
First name: Woodrow
Last Name: Brackett
City: Grover
State: NC
Zip/Postal Code: 28073
Country: USA
Focus: Build
Be careful with the UV lights. I'd recommend building a cabinet for the guitar (or Uke) and lights instead of using them hand held.

_________________
I didn't mean to say it, but I meant what I said.
http://www.brackettinstruments.com/


Top
 Profile  
 
PostPosted: Sun Mar 06, 2011 8:28 am 
Offline
Contributing Member
Contributing Member
User avatar

Joined: Thu Jun 12, 2008 6:59 am
Posts: 1964
Location: Rochester Michigan
Could someone elaborate a bit on the problems with spraying the stuff? One thing I could imagine is that the overspray would never cure! (or at least, it would take a long time for it to get enough UV to cure).

This seems like really cool stuff.

_________________
http://www.birkonium.com CNC Products for Luthiers
http://banduramaker.blogspot.com


Top
 Profile  
 
PostPosted: Sun Mar 06, 2011 9:16 am 
Offline
Mahogany
Mahogany
User avatar

Joined: Sat Feb 09, 2008 1:40 pm
Posts: 91
Location: Orangeville Ont. Canada
I find this very interesting as well, but I've yet to find out what exactly
the material is defined as. I may have missed something on the website
but I can't find any MSDS sheets or a technical description.
Is it a polyester or a varnish?
It would sure solve a lot of problems in my shop, but I'd like to know
what I'm using first.
Does anyone know this or where I can find out?

Thanks
Bob


Top
 Profile  
 
PostPosted: Sun Mar 06, 2011 12:31 pm 
Offline
Contributing Member
Contributing Member
User avatar

Joined: Fri Feb 01, 2008 8:47 am
Posts: 1244
Location: Montreal, Canada
Focus: Build
Status: Amateur
Hey Pat,

Thanks a million for sharing this with us. I too am super interested, although I do have some question marks standing out.

Over all, how long did it take you to finish this uke?

_________________
Alain Moisan
Former full time builder of Acoustics, Classicals and Flamencos.
(Now building just for fun!)


Top
 Profile  
 
PostPosted: Sun Mar 06, 2011 6:15 pm 
Offline
Koa
Koa
User avatar

Joined: Mon Oct 08, 2007 2:31 am
Posts: 936
Location: Ottawa, Canada
Alain,

It took me four days to finish the uke but most of that was learning. I think now I could do a guitar in one or two days. If you are ever in Ottawa, you would be welcome to drop in and try it yourself before you buy.

Pat

_________________
There are three kinds of people:

Those that make things happen,
those that watch things happen,
and those that wondered what happened.


Top
 Profile  
 
PostPosted: Sun Mar 06, 2011 6:49 pm 
Offline
Cocobolo
Cocobolo
User avatar

Joined: Sun Jun 24, 2007 1:14 am
Posts: 246
Location: United States
City: Keene
State: NH
Bob, i emailed them and they sent me all 3 MSDS sheets in the response. I can PM them to you if you like. - Justin


Top
 Profile  
 
PostPosted: Sun Mar 06, 2011 7:58 pm 
Offline
Koa
Koa
User avatar

Joined: Mon Oct 08, 2007 2:31 am
Posts: 936
Location: Ottawa, Canada
The MSDS data sheets are somewhat sparse with regards to the ingredients. Here's what they say under Section 2 Hazardous Ingredients:

UV Cure Insulator/Sealer:
Acrylated Oligomer
N-Methyl-2-Pyrrolidone
Acrylate Ester Monomer
Ketone Derivative

UV Gel Filler:
Polyester Acrlate Oligomer
Keytone Derivative
Acrylated Amine

UV Cure Premium Clear-Wet Look Finish Topcoat:
Acrylated Ester Monomer
Keytone Dreivative
Acrylated Amine Oligomer
Acrylated Oligomer

They have a note that says that specific chemical identity and/or weight percent is being withheld as a trade secret.

Pat

_________________
There are three kinds of people:

Those that make things happen,
those that watch things happen,
and those that wondered what happened.


Top
 Profile  
 
PostPosted: Mon Mar 07, 2011 1:06 am 
Offline
Koa
Koa
User avatar

Joined: Wed Jan 23, 2008 8:05 pm
Posts: 1567
Location: San Jose, CA
First name: Dave
Last Name: Fifield
City: San Jose
State: CA
Zip/Postal Code: 95124
Country: USA
Focus: Build
Status: Amateur
Andy Birko wrote:
Could someone elaborate a bit on the problems with spraying the stuff? One thing I could imagine is that the overspray would never cure! (or at least, it would take a long time for it to get enough UV to cure).

This seems like really cool stuff.


Hi Andy,

If you use an HVLP or conversion gun then overspray isn't too much of an issue. The main problem I found with spraying the stuff was that it didn't seem to adhere evenly and I ended up with an orange peel finish with dips in it, and with some areas where the stuff simply shrunk right back leaving a bare area! I thought this may be just my finishing technique, but I've played with it a LOT (for several months now) and I have not yet found a spray setting that works well at all.

The overspray on the floor is a pain, yes. I ended up flashing it with the lamp and simply peeling it off the floor in the end! Still, a bit of a chore.

On the uke that I just finished, I did the body with a Husky conversion gun ($99 from Home Depot) with the best settings I have found to date, however I still ended up with poor coverage and dips (craters). I managed to fill these and all is well, but I'd rather not have to mess around doing this.

On the neck, I tried Pat's idea of brushing the top coat on with a cheap foam brush. WHAT A DIFFERENCE!!!! It worked beautifully! No issues at all. I will be brushing it from now on. No spray booth needed (so no overspray), no breathing in the aerosol, no waste, no dips, no coverage issues. I'm convinced.

I have a booth with UV lamps too (from UVIII.com), but the CureUV.com finish doesn't seem to like the UV lamp frequency or power or something. It doesn't cure properly and I end up burning the wood (test pieces only to date!) 9 times out of 10 cooking it for longer in an effort to get it to cure. Apparently these UV cure polyester finishes are designed to be specific to the curing lamps used. I ordered some filler and topcoat finish from a different vendor (stuff that's supposed to match the booth I have!) - it arrived on Friday, so I'll be putting that stuff through its paces shortly. I'll report back to the OLF when I have any news on that.

Meanwhile, my little tenor uke is now finished, strung up, and intonated. Sounds real nice! I'll post some piccies of it on a new thread (don't want to hijack Pat's thread).

Cheers,
Dave F.

_________________
Cambrian Guitars

"There goes Mister Tic-Tac out the back with some bric-brac from the knick-knack rack"


Last edited by Dave Fifield on Mon Mar 07, 2011 1:09 am, edited 1 time in total.

Top
 Profile  
 
PostPosted: Mon Mar 07, 2011 1:07 am 
Offline
Brazilian Rosewood
Brazilian Rosewood
User avatar

Joined: Tue May 02, 2006 9:02 am
Posts: 2351
Location: Canada
First name: Bob
Last Name: Garrish
City: Toronto
State: Ontario
Country: Canada
Status: Professional
Pat Hawley wrote:
The MSDS data sheets are somewhat sparse with regards to the ingredients. Here's what they say under Section 2 Hazardous Ingredients:

UV Cure Premium Clear-Wet Look Finish Topcoat:
Acrylated Ester Monomer
Keytone Dreivative
Acrylated Amine Oligomer
Acrylated Oligomer

They have a note that says that specific chemical identity and/or weight percent is being withheld as a trade secret.

Pat


Hmm...wonder what happens when the catalyst Polymerizes that Ester monomer? :)

_________________
Bob Garrish
Former Canonized Purveyor of Fine CNC Luthier Services


Top
 Profile  
 
PostPosted: Mon Mar 07, 2011 6:57 am 
Offline
Mahogany
Mahogany
User avatar

Joined: Sat Feb 09, 2008 1:40 pm
Posts: 91
Location: Orangeville Ont. Canada
Justin,
Thanks for the kind offer. In retrospect it was kind of a dumb question with an
obvious answer. I'll shoot them an email myself with more questions.

Pat
Thanks so much for sharing this experience with us and good job on the Uke!

I'll be watching this topic with great interest.

Bob


Top
 Profile  
 
PostPosted: Mon Mar 07, 2011 9:51 am 
Offline
Koa
Koa
User avatar

Joined: Tue Dec 15, 2009 1:46 pm
Posts: 667
First name: Robert
Last Name: Renick
City: Mount Shasta
State: ca
Zip/Postal Code: 96067
Country: us
Focus: Build
Status: Amateur
Dave,
Sounds like ditching the spray setup for this is a good idea, at $200/ gallon that overspray will add up fast. If you do go back to it, a trick that I use to spray in my too cold shop is warming up and keeping the spray cup and gun in a bucket of hot water. The product may just need a few more degrees to lay flat.

Did anyone get a price for the curing cabinet they sell?

Thanks for the thread Pat and Dave, very interesting. Dave, I may hit you up for a visit if I get close to buying one of these. Rob

_________________
http://shastaguitar.com/
http://www.kalimbakit.com/
http://www.youtube.com/user/comfyfootgr ... ature=mhee
http://www.facebook.com/robert.renick.7


Top
 Profile  
 
PostPosted: Mon Mar 07, 2011 1:03 pm 
Offline
Koa
Koa
User avatar

Joined: Mon Oct 08, 2007 2:31 am
Posts: 936
Location: Ottawa, Canada
Their booth starts at ~20K.

Pat

_________________
There are three kinds of people:

Those that make things happen,
those that watch things happen,
and those that wondered what happened.


Top
 Profile  
 
PostPosted: Mon Mar 07, 2011 7:27 pm 
Offline
Koa
Koa
User avatar

Joined: Sat Mar 07, 2009 7:56 am
Posts: 1825
Location: Grover NC
First name: Woodrow
Last Name: Brackett
City: Grover
State: NC
Zip/Postal Code: 28073
Country: USA
Focus: Build
Bob Garrish wrote:
Pat Hawley wrote:
The MSDS data sheets are somewhat sparse with regards to the ingredients. Here's what they say under Section 2 Hazardous Ingredients:

UV Cure Premium Clear-Wet Look Finish Topcoat:
Acrylated Ester Monomer
Keytone Dreivative
Acrylated Amine Oligomer
Acrylated Oligomer

They have a note that says that specific chemical identity and/or weight percent is being withheld as a trade secret.

Pat


Hmm...wonder what happens when the catalyst Polymerizes that Ester monomer? :)


wow7-eyes wow7-eyes wow7-eyes wow7-eyes wow7-eyes

I suspect the same thing that happens with Ilva or Simtech polyester.

_________________
I didn't mean to say it, but I meant what I said.
http://www.brackettinstruments.com/


Top
 Profile  
 
PostPosted: Mon Mar 07, 2011 11:13 pm 
Offline
Contributing Member
Contributing Member
User avatar

Joined: Wed Jan 05, 2005 3:45 pm
Posts: 4337
Location: United States
Pat, you and Dave are giving me uke envy.
Very pretty.
Gotta try one.

Steve

_________________
From Nacogdoches...the oldest town in Texas.

http://www.stephenkinnaird.com


Top
 Profile  
 
PostPosted: Tue Mar 29, 2011 10:16 am 
Offline
Cocobolo
Cocobolo
User avatar

Joined: Sun Jun 24, 2007 1:14 am
Posts: 246
Location: United States
City: Keene
State: NH
Got my finishes today. The lamp and safety gear should be here tomorrow. I think, after reading all the posts, that I will brush it and save my spray gun for color coats. Speaking of which, I'm going to run some tests to see if the finish will adhere to shellac (i suspect it will) for doing sunbursts... I also have some tru-oil guitars that i would love to refinish so I may do some tests to see if it will adhere over true-oil....

Justin


Top
 Profile  
 
Display posts from previous:  Sort by  
Post new topic Reply to topic  [ 36 posts ]  Go to page 1, 2  Next

All times are UTC - 5 hours


Who is online

Users browsing this forum: No registered users and 35 guests


You cannot post new topics in this forum
You cannot reply to topics in this forum
You cannot edit your posts in this forum
You cannot delete your posts in this forum
You cannot post attachments in this forum

Jump to:  
Powered by phpBB® Forum Software © phpBB Group
phpBB customization services by 2by2host.com