Official Luthiers Forum!

Owned and operated by Lance Kragenbrink
It is currently Wed Jul 23, 2025 6:34 am


All times are UTC - 5 hours


Forum rules


Be nice, no cussin and enjoy!


Post new topic Reply to topic  [ 13 posts ] 
Author Message
 Post subject: when to install rosette
PostPosted: Thu Dec 04, 2014 12:57 pm 
Offline
Cocobolo
Cocobolo

Joined: Thu Feb 19, 2009 1:31 pm
Posts: 158
Location: Atlanta GA
First name: Sean
Focus: Build
Status: Amateur
Hi guys,

Been a while; sometimes life gets in the way of hobbies :) Anyway, starting #8, and beginning to work on more detail and cleaner work. I've never made a guitar with a very complicated rosette, and this go around I am inlaying some MOP for the rosette. In the past, after thicknessing my top, I draw where the bracing and soundhole goes, then inlay my rosette, and glue my bracing in my radius dish. Now I'm wondering if anyone radiuses the top first, and then installs rosette? I'm wondering if this can eliminate any gaps from the radius of the top?

As always, advice is always appreciated.

Sean

_________________
change isn't synonymous with improvement
instagram.com/bucketguitars/


Top
 Profile  
 
PostPosted: Thu Dec 04, 2014 1:07 pm 
Offline
Contributing Member
Contributing Member
User avatar

Joined: Thu Feb 09, 2006 2:35 pm
Posts: 2951
Location: United States
First name: Joe
Last Name: Beaver
City: Lake Forest
State: California
Focus: Build
I can just speak for myself but, I always install the rosette on a flat, unbraced top. I do pretty much as you have done. I mark the saddle location and the bracing and then the center of the sound hole.

I leave the soundboard on the thick side with the top cleaned up pretty well. Then I install the rosette and sand it flush then flip it over and thickness leaving it a little thick again to give me room for final sanding.

I think bracing the top first will cause some difficulty in cutting and inlaying the rosette

_________________
Joe Beaver
Maker of Sawdust


Top
 Profile  
 
PostPosted: Thu Dec 04, 2014 1:30 pm 
Offline
Contributing Member
Contributing Member

Joined: Fri Jun 04, 2010 10:02 pm
Posts: 313
First name: Michael
Last Name: Giltzow
City: Boise
State: Idaho
Zip/Postal Code: 83709
Country: usa
Focus: Build
Status: Semi-pro
Same as Joe Beaver

_________________
guitarsbygiltzow.com


Top
 Profile  
 
PostPosted: Thu Dec 04, 2014 1:48 pm 
Offline
Brazilian Rosewood
Brazilian Rosewood

Joined: Wed Feb 20, 2008 7:15 pm
Posts: 7541
First name: Ed
Last Name: Bond
City: Nanaimo
Country: Canada
Focus: Build
Status: Professional
Same


Top
 Profile  
 
PostPosted: Thu Dec 04, 2014 2:06 pm 
Offline
Koa
Koa
User avatar

Joined: Thu Dec 18, 2008 11:42 am
Posts: 1135
Location: Hudson, MA
First name: Kevin
Last Name: Quine
City: Hudson
State: MA
Country: Usa
Focus: Build
Status: Amateur
Seems way too hard to support the top with braces attached. I think the top would flex under the router and probably cause a less accurate cut.
I've never noticed any gaps open around the edge after bracing.


Top
 Profile  
 
PostPosted: Thu Dec 04, 2014 3:15 pm 
Offline
Contributing Member
Contributing Member
User avatar

Joined: Wed Feb 15, 2006 7:37 am
Posts: 4820
Joe Beaver wrote:
I leave the soundboard on the thick side with the top cleaned up pretty well. Then I install the rosette and sand it flush then flip it over and thickness leaving it a little thick again to give me room for final sanding.


+1 [:Y:] Specifically, I thickness to about .150", install the rosette, level it, flip the top and bring it to thickness from the other side. Then I cut the soundhole and brace.


Top
 Profile  
 
PostPosted: Thu Dec 04, 2014 3:45 pm 
Offline
Brazilian Rosewood
Brazilian Rosewood

Joined: Wed Apr 08, 2009 9:34 am
Posts: 3081
+2 unless it's a 12. Then it's about .180".


Top
 Profile  
 
PostPosted: Thu Dec 04, 2014 11:45 pm 
Offline
Contributing Member
Contributing Member
User avatar

Joined: Thu Feb 09, 2006 2:35 pm
Posts: 2951
Location: United States
First name: Joe
Last Name: Beaver
City: Lake Forest
State: California
Focus: Build
One other point on doing it on a flat top, I lay the top on a piece of plywood and drill through the top and well into the ply on the soundhole center. That gives you a solid anchor hole for the center pin. (The one the router rotates on)

_________________
Joe Beaver
Maker of Sawdust


Top
 Profile  
 
PostPosted: Fri Dec 05, 2014 12:36 am 
Offline
Contributing Member
Contributing Member
User avatar

Joined: Mon Apr 16, 2012 12:47 pm
Posts: 2575
First name: Jay
Last Name: De Rocher
City: Bothell
State: Washington
Joe Beaver wrote:
One other point on doing it on a flat top, I lay the top on a piece of plywood and drill through the top and well into the ply on the soundhole center. That gives you a solid anchor hole for the center pin. (The one the router rotates on)


I lay the top on a sheet of plywood and run the router pin through a hole in the center of the sound hole location too. In my case, I have a dedicated piece of plywood/work board and the hole in the plywood has a metal bushing in it that matches the diameter of the router pin. With the bushing, the router pin has no free play at all and the hole can't enlarge from use over time and get sloppy.

I put the rosette into the unbraced top too. No gaps around the rosettes after bracing.

_________________
Once in a while you get shown the light in the strangest of places if you look at it right - Robert Hunter


These users thanked the author J De Rocher for the post: TimAllen (Fri Dec 05, 2014 2:20 am)
Top
 Profile  
 
PostPosted: Fri Dec 05, 2014 2:23 am 
Offline
Contributing Member
Contributing Member
User avatar

Joined: Wed Aug 12, 2009 1:13 am
Posts: 450
First name: Tim
Last Name: Allen
City: San Francisco
Focus: Build
Status: Amateur
I've had trouble with the top ending up too thin when I thicknessed before installing the rosette, so now I do as James does and finish thicknessing from the other side. To eliminate slop around the pin I really like Jay's approach of using a board with a bushing underneath--I think I'll try that.

_________________
Tim Allen
"Never hurry, never rest."


Top
 Profile  
 
PostPosted: Fri Dec 05, 2014 8:01 am 
Offline
Mahogany
Mahogany

Joined: Wed Oct 05, 2011 12:36 pm
Posts: 78
Location: West Plains MO
First name: Cecil
Last Name: Carroll
City: West Plains
State: Missouri
Zip/Postal Code: 65775
Country: USA
Focus: Build
Status: Semi-pro
Sean,

I have done it with the top braced,not by design but because I had my head where the sun don't shine. I will not do it again. At least not if I can help it.

cecil


Top
 Profile  
 
PostPosted: Fri Dec 05, 2014 10:44 am 
Offline
Cocobolo
Cocobolo

Joined: Tue Jun 30, 2009 3:20 pm
Posts: 456
Focus: Build
flat, un-braced, no soundhole. on the other hand i don't use shell either.


Top
 Profile  
 
PostPosted: Fri Dec 05, 2014 10:59 am 
Offline
Contributing Member
Contributing Member
User avatar

Joined: Wed Oct 08, 2008 11:36 am
Posts: 7472
Location: Southeast US
City: Lenoir City
State: TN
Zip/Postal Code: 37772
Country: US
Focus: Repair
Shell or no shell, doesn't matter. I do it flat, unbraced, on a work board and before the soundhole is cut out.

_________________
Steve Smith
"Music is what feelings sound like"


Top
 Profile  
 
Display posts from previous:  Sort by  
Post new topic Reply to topic  [ 13 posts ] 

All times are UTC - 5 hours


Who is online

Users browsing this forum: Bing [Bot], doncaparker and 13 guests


You cannot post new topics in this forum
You cannot reply to topics in this forum
You cannot edit your posts in this forum
You cannot delete your posts in this forum
You cannot post attachments in this forum
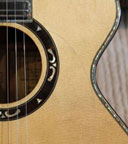
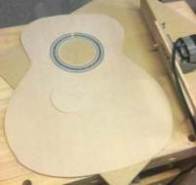
Jump to:  
Powered by phpBB® Forum Software © phpBB Group
phpBB customization services by 2by2host.com