Official Luthiers Forum!

Owned and operated by Lance Kragenbrink
It is currently Mon Jul 21, 2025 6:56 pm


All times are UTC - 5 hours


Forum rules


Be nice, no cussin and enjoy!


Post new topic Reply to topic  [ 243 posts ]  Go to page Previous  1, 2, 3, 4, 5, 6, 7, 8 ... 10  Next
Author Message
PostPosted: Wed Dec 21, 2016 10:59 am 
Offline
Contributing Member
Contributing Member

Joined: Mon Dec 27, 2004 11:25 pm
Posts: 7207
Location: United States
douglas ingram wrote:
Now that I've finished my Lacote, I am going full blast on home renovations. Ripping out the 40 year old carpet, repairing subfloor, adding more insulation to the interior of the exterior walls, new drywall, taping, paint, new cork floor. Repeat room by room.

Oh, my poor knees.


Oh, God Bless you... that's a lot of work!
Are you re-insulating walls with expansion foam or fiberglass?

_________________
"I want to know what kind of pickups Vince Gill uses in his Tele, because if I had those, as good of a player as I am, I'm sure I could make it sound like that.
Only badly."


Top
 Profile  
 
PostPosted: Wed Dec 21, 2016 10:30 pm 
Offline
Mahogany
Mahogany

Joined: Tue Dec 02, 2014 8:02 pm
Posts: 98
First name: Jonathan
Last Name: coleman
City: rome
State: ny
Zip/Postal Code: 13440
Country: usa
Focus: Build
Status: Amateur
ImageImageImageImageImageImageImage


Sent from my iPhone using Tapatalk


Top
 Profile  
 
PostPosted: Wed Dec 21, 2016 10:51 pm 
Offline
Brazilian Rosewood
Brazilian Rosewood

Joined: Thu Feb 12, 2009 10:27 pm
Posts: 2109
Location: South Carolina
First name: John
Last Name: Cox
Focus: Build
Status: Amateur
I made a home made hammer out of a stick.

I needed a little hammer to whack down fret ends.... Just so happened I had a stick laying around. We will see how this does - as it's eastern red cedar... Which isn't really all that heavy and dense. I may need to try again with an oak or pear stick. ;)

Image

Image

Thanks


These users thanked the author truckjohn for the post: Colin North (Thu Dec 22, 2016 4:15 am)
Top
 Profile  
 
PostPosted: Thu Dec 22, 2016 9:12 am 
Offline
Contributing Member
Contributing Member

Joined: Sun Feb 17, 2013 4:58 pm
Posts: 1449
First name: Ed
Last Name: Minch
City: Chestertown
State: MD
Zip/Postal Code: 21620
Country: United States
Focus: Build
Status: Amateur
geetarman77

Tell us about your "dish". Looks like a cylinder rather than a dome

Ed


Top
 Profile  
 
PostPosted: Thu Dec 22, 2016 10:09 am 
Offline
Contributing Member
Contributing Member
User avatar

Joined: Fri Jan 22, 2010 9:59 pm
Posts: 3620
First name: Dennis
Last Name: Kincheloe
City: Kansas City
State: MO
Country: USA
Focus: Build
Status: Amateur
geetarman77 wrote:
Image

That looks really thick, especially for such a dense wood. I'm impressed you managed to bend it at all!


Top
 Profile  
 
PostPosted: Thu Dec 22, 2016 12:09 pm 
Offline
Contributing Member
Contributing Member
User avatar

Joined: Wed Feb 15, 2006 7:37 am
Posts: 4820
I finished carving the shaft of a neck for the first time yesterday. It was a great experience and I learned a lot about my preferences. I did it using a spokeshave, two Lioger rasps (a rough and a smooth), my block plane (surprisingly), and a used strip of sandpaper from my drum sander for the final blending and smoothing. I think I could get by with just the rough rasp and sandpaper, but I enjoyed using everything. I really enjoyed the process. It felt like proper woodwork as opposed to model making, which is what the soundbox can feel like at times.

I'd always used Hanalei Moon necks until now. With fretboard glued on, they've been about an inch thick. Using a template I got from Luthier Suppliers, the neck was initially .820" at the first fret, which felt frighteningly thin after so many years playing 1". One of my favorite necks from the Santa Barbara show was carved using the 2006 Taylor template from Luthier suppliers as a guide, which is .870" thick at the 1st, so I cut a strip off of the leftovers of the blank I cut the neck from, matched up the grain, and glued it on in an act of desperation. :shock: It worked like a charm, and you can't tell what happened unless you really look at the heel. I think that will be blended out once I finish that area up. I was pretty happy to save this one. That extra hair of an inch made a big difference in how it felt to me!


You do not have the required permissions to view the files attached to this post.


Top
 Profile  
 
PostPosted: Thu Dec 22, 2016 3:20 pm 
Offline
Contributing Member
Contributing Member
User avatar

Joined: Wed Oct 08, 2008 11:36 am
Posts: 7472
Location: Southeast US
City: Lenoir City
State: TN
Zip/Postal Code: 37772
Country: US
Focus: Repair
Nice save [:Y:] It's always a challenge to put wood back on :shock:

_________________
Steve Smith
"Music is what feelings sound like"


Top
 Profile  
 
PostPosted: Thu Dec 22, 2016 7:51 pm 
Offline
Contributing Member
Contributing Member
User avatar

Joined: Sat Jan 31, 2009 8:50 pm
Posts: 2260
Location: Seattle WA
Focus: Build
Status: Semi-pro
DennisK wrote:
geetarman77 wrote:
Image

That looks really thick, especially for such a dense wood. I'm impressed you managed to bend it at all!
Yeah, that looks like 1/8"! How did you bend it?

_________________
Pat


Top
 Profile  
 
PostPosted: Fri Dec 23, 2016 12:52 am 
Offline
Brazilian Rosewood
Brazilian Rosewood
User avatar

Joined: Wed Feb 20, 2008 9:12 pm
Posts: 6994
First name: Mike
Last Name: O'Melia
City: Huntsville
State: Alabama
Focus: Build
Status: Semi-pro
Getting ready to spray a bunch of bodies in my Dexter room. Hehe


You do not have the required permissions to view the files attached to this post.


Last edited by Mike OMelia on Sat Dec 24, 2016 3:53 pm, edited 1 time in total.

Top
 Profile  
 
PostPosted: Fri Dec 23, 2016 6:43 pm 
Offline
Mahogany
Mahogany

Joined: Tue Dec 02, 2014 8:02 pm
Posts: 98
First name: Jonathan
Last Name: coleman
City: rome
State: ny
Zip/Postal Code: 13440
Country: usa
Focus: Build
Status: Amateur
The dish is a 25ft radius. More radical on the upper bout.

The picture does make them look thick eh?
They were bent at .085


Sent from my iPhone using Tapatalk


These users thanked the author geetarman77 for the post: Pmaj7 (Fri Dec 30, 2016 11:13 pm)
Top
 Profile  
 
PostPosted: Fri Dec 30, 2016 10:16 am 
Offline
Walnut
Walnut

Joined: Thu Sep 03, 2015 5:13 pm
Posts: 31
First name: John
Last Name: Joyce
City: Saint Paul
State: MN
Zip/Postal Code: 55116
Country: usa
Focus: Build
Status: Amateur
Installing/scraping the bindings and purfling on my Stahl Style 6 build.


You do not have the required permissions to view the files attached to this post.

_________________
Having fun learning every day.


These users thanked the author John J for the post: Haans (Sun Jan 01, 2017 5:31 pm)
Top
 Profile  
 
PostPosted: Fri Dec 30, 2016 5:42 pm 
Offline
Koa
Koa
User avatar

Joined: Tue Jan 20, 2009 12:41 am
Posts: 606
Location: LaCrosse WI
First name: Jason
Last Name: Moe
City: LaCrosse
State: WI
Zip/Postal Code: 54601
Country: USA
Focus: Build
Status: Semi-pro
Binding an OM.


You do not have the required permissions to view the files attached to this post.

_________________
Jason Moe
LaCrosse WI 54601


Top
 Profile  
 
PostPosted: Fri Dec 30, 2016 9:08 pm 
Offline
Contributing Member
Contributing Member
User avatar

Joined: Fri May 18, 2012 8:35 pm
Posts: 2660
First name: D
Last Name: S
State: TX
Country: USA
Focus: Build
Status: Amateur
Working on a Les Paul DC Redwood veneer project.
I glued the veneer to the top tonight.
I'll need to select a fretboard material and work on the neck before I do much more.
Dan


You do not have the required permissions to view the files attached to this post.

_________________
wah
Wah-wah-wah-wah
Wah


Top
 Profile  
 
PostPosted: Fri Dec 30, 2016 9:19 pm 
Offline
Contributing Member
Contributing Member
User avatar

Joined: Mon Apr 16, 2012 12:47 pm
Posts: 2575
First name: Jay
Last Name: De Rocher
City: Bothell
State: Washington
Wow! That's very cool. In my college days, I could have stared at that for an extended period when in the appropriate frame of mind...

_________________
Once in a while you get shown the light in the strangest of places if you look at it right - Robert Hunter


These users thanked the author J De Rocher for the post: dzsmith (Fri Dec 30, 2016 10:44 pm)
Top
 Profile  
 
PostPosted: Sat Dec 31, 2016 11:05 am 
Offline
Koa
Koa
User avatar

Joined: Wed Sep 26, 2007 12:55 am
Posts: 1505
Location: Lorette, Manitoba, Canada
First name: Douglas
Last Name: Ingram
City: Lorette
State: Manitoba
Country: Canada
Focus: Build
Don Williams wrote:
douglas ingram wrote:
Now that I've finished my Lacote, I am going full blast on home renovations. Ripping out the 40 year old carpet, repairing subfloor, adding more insulation to the interior of the exterior walls, new drywall, taping, paint, new cork floor. Repeat room by room.

Oh, my poor knees.


Oh, God Bless you... that's a lot of work!
Are you re-insulating walls with expansion foam or fiberglass?


Don,

I'm using 2" thick white foam panels, R 7.5, added to the inside. The rooms are large enough that I'm not loosing space, and its easier than ripping off all of the exterior cladding. Over the years I've done some of the other rooms, currently I'm just doing the living room and entrance. Then, one last bedroom when I get that far along. To add this, I smash holes into the old drywall in order to compromise the old vapour barrier, add the foam, then do the drywall. This adds 50% more insulation to my 2 x 4 walls with their fiberglass bats.

Ripping out the glued down parquet in the kitchen, dining room, and one bedroom was the worst. But the worst is done now.

_________________
Expectation is the source of all misery; comparison the thief of joy.
http://redrivercanoe.ca/


Top
 Profile  
 
PostPosted: Sat Dec 31, 2016 11:19 am 
Offline
Contributing Member
Contributing Member
User avatar

Joined: Wed Oct 08, 2008 11:36 am
Posts: 7472
Location: Southeast US
City: Lenoir City
State: TN
Zip/Postal Code: 37772
Country: US
Focus: Repair
douglas ingram wrote:
Don,

I'm using 2" thick white foam panels, R 7.5, added to the inside. The rooms are large enough that I'm not loosing space, and its easier than ripping off all of the exterior cladding. Over the years I've done some of the other rooms, currently I'm just doing the living room and entrance. Then, one last bedroom when I get that far along. To add this, I smash holes into the old drywall in order to compromise the old vapour barrier, add the foam, then do the drywall. This adds 50% more insulation to my 2 x 4 walls with their fiberglass bats.

Ripping out the glued down parquet in the kitchen, dining room, and one bedroom was the worst. But the worst is done now.


Wow, that's a lot of work Doug, but I guess it's better than going completely to the studs and it will sure make a big difference. I hope it all goes well for you. I have completely redone our house except for two bathrooms which I plan to do in the next year or two (just finished the kitchen) - then I'm never moving, ha.

_________________
Steve Smith
"Music is what feelings sound like"


Top
 Profile  
 
PostPosted: Sun Jan 01, 2017 10:10 am 
Offline
Cocobolo
Cocobolo

Joined: Thu Nov 27, 2014 10:35 am
Posts: 372
Location: Hopkinton, MA
First name: Robert
Last Name: Ionta
City: Hopkinton
State: Massachusetts
Zip/Postal Code: 01748
Country: USA
Focus: Build
Status: Amateur
That's better than adding 50% to the fiberglas batts because you're covering over the stud edges with the foam board, cutting down the thermal bridging that occurs through the studs. (Heat conduction through the wood.) Each 8 ft stud at 1-1/2" wide has 1 sq.ft. of surface area and a 15 ft stud wall with no windows or doors will have 13 studs for a total of 13 sq ft of area. At about R4.4 for a stud, that's almost like leaving a whole stud bay uninsulated. You just increased that 13 square feet of wall from R4.4 to R12.

I did the same thing in my shop, with 1-1/2" EPS (pink rigid foam board) over the stud cavities which were filled with 3-1/2" rock wool batts for R23 walls. (And similarly, R38 ceiling). The last thing I need is bigger energy bills.


Top
 Profile  
 
PostPosted: Sun Jan 01, 2017 10:29 am 
Offline
Cocobolo
Cocobolo

Joined: Thu Nov 27, 2014 10:35 am
Posts: 372
Location: Hopkinton, MA
First name: Robert
Last Name: Ionta
City: Hopkinton
State: Massachusetts
Zip/Postal Code: 01748
Country: USA
Focus: Build
Status: Amateur
I'm excited to finally have something to report here. bliss 
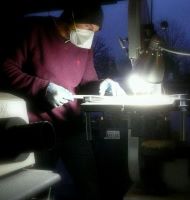
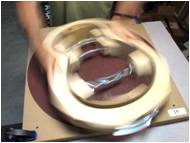
I just glued the braces on the top for my #1 guitar - a mahogany/lutz OM built from the OLF plans. I used the vacuum frame press I built for the occasion. It worked out pretty well with one little glitch - I glued the tone bars and little finger braces all at once and the lower tone bar kind of leaned over a bit so it wasn't making solid contact with the top. I had to carve it off and replace it. I'm a little concerned about being able to avoid that in the future. I might try making some spacer blocks to put between the braces or something like that. But the vacuum was great for gluing the X-brace and everything else.

Image


Sent from my iPhone using Tapatalk


Top
 Profile  
 
PostPosted: Sun Jan 01, 2017 12:29 pm 
Offline
Contributing Member
Contributing Member
User avatar

Joined: Sat Jan 31, 2009 8:50 pm
Posts: 2260
Location: Seattle WA
Focus: Build
Status: Semi-pro
bionta wrote:
I did the same thing in my shop, with 1-1/2" EPS (pink rigid foam board)

Did you use 3 inch drywall screws?

_________________
Pat


Top
 Profile  
 
PostPosted: Sun Jan 01, 2017 8:13 pm 
Offline
Contributing Member
Contributing Member
User avatar

Joined: Sat May 17, 2008 1:11 pm
Posts: 2390
Location: Spokane, Washington
First name: Pat
Last Name: Foster
Country: USA
Focus: Build
I became interested in the work of Greene & Greene architects a while back, so about the middle of last year, I decided to build a guitar using their design motifs for inspiration. The guitar is a new size, a bit wider than on OM, Lutz top, padouk B&S.

padouk bridge with African blackwood accents
Attachment:
P1080754.jpg


Amboyna burl rosette
Attachment:
P1080738.jpg


1937 Dodge grill
Attachment:
P1080691a.jpg


Pat


You do not have the required permissions to view the files attached to this post.

_________________
formerly known around here as burbank
_________________

http://www.patfosterguitars.com


Top
 Profile  
 
PostPosted: Sun Jan 01, 2017 8:25 pm 
Offline
Contributing Member
Contributing Member
User avatar

Joined: Fri Jan 22, 2010 9:59 pm
Posts: 3620
First name: Dennis
Last Name: Kincheloe
City: Kansas City
State: MO
Country: USA
Focus: Build
Status: Amateur
Excellent work, Pat! I love that bridge. 3 dimensional details are even cooler than inlays.


Top
 Profile  
 
PostPosted: Sun Jan 01, 2017 8:30 pm 
Offline
Contributing Member
Contributing Member
User avatar

Joined: Mon Apr 16, 2012 12:47 pm
Posts: 2575
First name: Jay
Last Name: De Rocher
City: Bothell
State: Washington
It's great to see design ideas that are new, at least to me, and those are especially nice. I like to rosette a lot and I agree about the 3-D aspects. Did you incorporate those sorts of elements into other parts of the guitar?

_________________
Once in a while you get shown the light in the strangest of places if you look at it right - Robert Hunter


Top
 Profile  
 
PostPosted: Sun Jan 01, 2017 8:44 pm 
Offline
Contributing Member
Contributing Member
User avatar

Joined: Sat May 17, 2008 1:11 pm
Posts: 2390
Location: Spokane, Washington
First name: Pat
Last Name: Foster
Country: USA
Focus: Build
DennisK wrote:
Excellent work, Pat! I love that bridge. 3 dimensional details are even cooler than inlays.


Thanks. I didn't know how it was going to pan out with the inlays standing proud on a guitar, but was pleased at the outcome.


J De Rocher wrote:
It's great to see design ideas that are new, at least to me, and those are especially nice. I like to rosette a lot and I agree about the 3-D aspects. Did you incorporate those sorts of elements into other parts of the guitar?


The fretboard inlays will be small paua squares, playing off the inlays on the bridge. They'll be flush; seemed weird having them sticking up on the fretboard. Side markers will be inlaid into the neck, small blackwood squares, also flush. The tail graft will echo the soundport, with recon stone jade.

Pat

_________________
formerly known around here as burbank
_________________

http://www.patfosterguitars.com


Top
 Profile  
 
PostPosted: Sun Jan 01, 2017 9:35 pm 
Offline
Cocobolo
Cocobolo

Joined: Thu Nov 27, 2014 10:35 am
Posts: 372
Location: Hopkinton, MA
First name: Robert
Last Name: Ionta
City: Hopkinton
State: Massachusetts
Zip/Postal Code: 01748
Country: USA
Focus: Build
Status: Amateur
pat macaluso wrote:
bionta wrote:
I did the same thing in my shop, with 1-1/2" EPS (pink rigid foam board)

Did you use 3 inch drywall screws?


No, I used 2" screws because the 1.5" EPS foam has a rabbet at the edge that overlaps a furring strip. The strips are installed horizontally, across the studs and the foam board (2' wide) is between them, with that overlap so there is only 3/4" of foam over the furring strip. With 1/2 gypsum board the 2" screws were long enough.


These users thanked the author bionta for the post: Pmaj7 (Sun Jan 01, 2017 10:15 pm)
Top
 Profile  
 
PostPosted: Mon Jan 02, 2017 9:26 am 
Offline
Cocobolo
Cocobolo
User avatar

Joined: Sat Feb 02, 2008 9:19 am
Posts: 184
Focus: Build
Status: Amateur
Since I teach I had more time in the shop over the past week than normal so I was able to get my latest up to the point of applying the finish. This one is Ziricote with bearclaw Sitka top. I've always loved the look of Ziricote and have built several guitars with it before that I planned on keeping as personal instruments but they have all sold quickly since other folks like the look and sound too. Maybe this one I'll get to keep for awhile, or maybe not since selling a guitar is pretty cool also.
ImageImageImage


Sent from my iPad using Tapatalk


Top
 Profile  
 
Display posts from previous:  Sort by  
Post new topic Reply to topic  [ 243 posts ]  Go to page Previous  1, 2, 3, 4, 5, 6, 7, 8 ... 10  Next

All times are UTC - 5 hours


Who is online

Users browsing this forum: peter.coombe and 34 guests


You cannot post new topics in this forum
You cannot reply to topics in this forum
You cannot edit your posts in this forum
You cannot delete your posts in this forum
You cannot post attachments in this forum

Jump to:  
Powered by phpBB® Forum Software © phpBB Group
phpBB customization services by 2by2host.com